
Sunday, January 31, 2016
Saturday, January 30, 2016
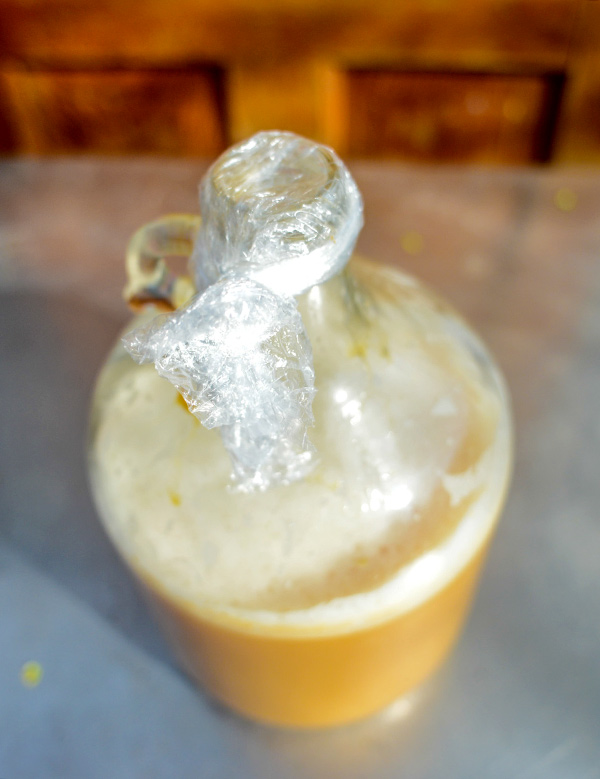
Video: Brew Boss Tips and Tricks Managing Hot Break
#brewbossbrewing #homebrew #hotbreak Brew Boss Electric Homebrew Equipment
How to manage hot break with Brew-Boss electric homebrew system. This is why we love electric brewing! Try that with gas!
How to manage hot break with Brew-Boss electric homebrew system. This is why we love electric brewing! Try that with gas!
Friday, January 29, 2016
Spent Grain Pizza Dough Recipe
#brewboss #homebrew Brew Boss Electric Homebrew Equipment www.brew-boss.com

You’re relaxing after a long day. What could be better than a hot slice of pizza and a cold homebrew? What if the pizza slice was homemade? And what if that homemade pizza was made from #spentgrain pizza dough? Where’s the spent grain from? The homebrew you’re holding, of course. We’re going to call it a match made in heaven.
If you don’t homebrew, many breweries donate their spent grains, so just head over with a big bin and fill up!
A few notes before beginning:
Recipe provided by Amber DeGrace, which can be found in “New Life For Spent Grains,” May/June 2011 Zymurgy
Ingredients:
1 1/2 cups warm water
1 tsp yeast
3 cups flour
1/3 cup oil
3/4 cup spent grains
Directions:
You’re relaxing after a long day. What could be better than a hot slice of pizza and a cold homebrew? What if the pizza slice was homemade? And what if that homemade pizza was made from #spentgrain pizza dough? Where’s the spent grain from? The homebrew you’re holding, of course. We’re going to call it a match made in heaven.
If you don’t homebrew, many breweries donate their spent grains, so just head over with a big bin and fill up!
A few notes before beginning:
- Store the grains in a large pot or bin after mashing.
- If you’re not going to use all the grains, you can store them in the refrigerator for later use to ensure they don’t get moldy.
- When baking with spent grains, a good rule to convert any recipe to use spent grains is to take the amount of flour and convert no more than 25 percent of it to spent grains (with the exception of dog treats!).
- Keep in mind that hops have been shown to be toxic to dogs. We recommend using gains that have not been in contact with hops—or keeping a close watch on your pups.
No-Knead Spent Grain Pizza Dough
Recipe provided by Amber DeGrace, which can be found in “New Life For Spent Grains,” May/June 2011 Zymurgy
Ingredients:
1 1/2 cups warm water
1 tsp yeast
3 cups flour
1/3 cup oil
3/4 cup spent grains
Directions:
- In a bowl, sprinkle yeast over the warm water and set aside. In a large mixing bowl or stand mixer, add the flour and drizzle oil over. Work oil through flour with your hands or dough hook attachment until it resembles crumbs or small pebbles. Add the spent grains to the flour mixture and combine.
- Gently stir the yeast and water mixture until combined. Add the yeast mixture to the bowl containing the spent grain mixture. Stir or mix with a dough hook until combined and a ball is formed. You may need to add flour, one tablespoon at a time. You’ll know it’s ready when the dough comes together and no longer sticks to the sides of the bowl.
- In a clean bowl add a bit of oil to the bottom, put the ball of dough in, flip it over and cover. You can let it rise, covered with a dish towel, in a warm place until it has doubled in volume, or you can cover with plastic wrap and put in the refrigerator overnight.
- Once the dough has risen, punch it down. This recipe will make enough dough for two pizza crusts, so I always halve it and put the second portion in a sealed freezer bag and toss in the freezer.
- Preheat the oven to 500°F (260°C) while you’re preparing the pizza. Stretch the dough out on a pizza stone using your fingers until it is relatively round and thin.
- Top with whatever you like. The sky’s the limit, especially for creative homebrewers. Some of favorites are prosciutto, egg, goat cheese and shrimp. Don’t pile the toppings on too thickly or the crust will remain a bit soft and soggy in the middle. Pop it in the oven for 8-10 minutes. You’ll know it’s ready when the crust has gotten crisp and the cheese is melted and bubbly.
Wednesday, January 27, 2016

Monday, January 25, 2016
7 Skills That Make You a Better Homebrewer
#homebrew Brew Boss Electric Brewing Equipment www.brew-boss.com #BIAB

What skills are needed for becoming a better #homebrewer? Do you need to be the boldest out of your friends or have the biggest beard? I don’t think so.
Homebrewing is a hobby that (in addition to providing you with great beer!) offers an opportunity to develop a wide range of skills. Not only do these skills make you a better brewer, but they can be transferred to other hobbies and activities as well. So in a sense, becoming a better homebrewer is a path towards self improvement.
Below what are some of the key skills involved in being a good homebrewer:
- Attention to detail – Together, cleaning and sanitation comprise the critical first step in homebrewing. If you can’t keep your equipment clean or skip steps on the sanitation process, it’s very likely that you’ll get an infected homebrew and have to dump a batch. While you can avoid some of the more “science-y” aspects of homebrewing, don’t skimp on cleaning and sanitation.
- Resiliency – Homebrewing is not for people who give up easily. At times, you may encounter frustration. Just remember to breathe and keep in mind that you’re doing this for fun!
- Problem solving – Becoming a better homebrewer means being a better problem solver. Occasionally, something will go wrong with a batch of beer. Homebrewing tests your ability to break down a multi-step process to identify the source of a problem. Even when things go right, you will be tested to identify the nuances in process and ingredients that affect a beer’s color, flavor, aroma, and other characteristics.
- Creativity – Homebrewing is a great avenue for exploring your creative side. Just about any ingredient can be used when making beer. Want to brew some unusual concoctions? Try a chipotle smoked porter, oak barrel IPA, or a maple Scotch ale to flex your creative muscle.
- Consistency – This skill is essential for professional brewers, but it can be important for homebrewers as well. Anyone can brew one good batch of beer, but can you do it over and over? Take good homebrewing notes and test your consistency by perfecting some of your favorite beer recipes.
- Curiosity – Homebrewing offers an endless path for learning, whether it’s about yeast propagation, water chemistry, or calculating IBUs. If you’re inclined to dive deep into a hobby, then homebrewing is for you.
- Good attitude! – This one can’t be stressed enough. Above all, homebrewing should always be fun. That’s not to say it won’t be challenging at times. But sometimes becoming a better homebrewer requires that you remind yourself of the reasons you started homebrewing in the first place.
- See more at: http://www.eckraus.com/blog/becoming-a-better-homebrewer#sthash.muScIHph.dpuf
Saturday, January 23, 2016
Porter vs. Stout: What's the Difference?
#homebrew Brew Boss Electric Homebrewing Equipment www.brew-boss.com #EBIAB

Can you tell whether this photo is of a #porter or a #stout? We can't! These are both dark beers with a similar range of malty, roasted, and bittersweet flavors. They also both have a reputation for being fairly heavy and for making us feel quite toasty while sipping them. So is there any difference at all between a porter and a stout?
This mystery has bothered us for quite some time, so we dove into research and discovered some interesting facts!
Porter is actually the great-grandpa of today's stout. It was, and still is, made with dark malted barley, a good amount of hops, and top-fermenting ale yeasts. The end result is usually a dark medium-bodied beer with a nice balance of malty sweetness and bitter hoppiness.
Stouts came about when people started tinkering with their porter recipes. They started adding new ingredients and upped the alcoholic strength. At first these were called "stout porters," but eventually the "porter" was dropped and stouts became a category unto themselves.
Today, the biggest difference between stouts and porters is the kind of malt used during brewing. While porters use malted barley, stouts primarily use unmalted roasted barley. It's this ingredient that gives stouts their signature coffee-like flavor. Porters also tend to be slightly lighter and less full-bodied than stouts.
Having said all this, there is definitely a lot of cross-over between porters and stouts. If you like one, you'll generally like the other! The best is to grab a friend and get one of each to compare and contrast.
What do you like about porters and stouts? Any recommendations for ones to try?
(P.S. The picture above is a porter. Kudos if you guessed it correctly!)
Thursday, January 21, 2016
SS Brewing Kettles
#BrewBoss Electric Homebrewing Equipment www.brew-boss.com
Our kettles are custom designed and made from high quality stainless steel and bear the Brew-Boss logo. These kettles are equipped with TIG welded Tri-Clamp type ferrules for the heater and valve. They are durable and look awesome. Better Yet, we have controllers starting at $565 and complete systems starting as low as $1,149 for a 240 volt 10 Gallon Value system. Come check our equipment today!

Our kettles are custom designed and made from high quality stainless steel and bear the Brew-Boss logo. These kettles are equipped with TIG welded Tri-Clamp type ferrules for the heater and valve. They are durable and look awesome. Better Yet, we have controllers starting at $565 and complete systems starting as low as $1,149 for a 240 volt 10 Gallon Value system. Come check our equipment today!
Tuesday, January 19, 2016
Brew-Boss Automated Electric Brewing System Setup, Brewing, and Cleaning
Many people have asked us for a Video showing an actual brew day with the #Brew-Boss automated electric brewing system. We set up a few cameras and filmed a brew session. This brew session included using the 15 gallon kettle system to make a 5 gallon batch of beer. We used the #COFI mash infusion technology, Swirl-Boss wort whirlpool device, and the Exchilerator counter flow wort chiller. We also show how easy it is to clean the equipment afterwards.
#homebrew #beer #electricbrewing #brewbossbrewing
Exploring the German Technique of Krausening
It’s a day or two after the yeast was pitched in your most recent homebrew and there are signs of fermentation in the form of foam called krausen. A few days later, the rocky froth nearly fills the headspace of your fermenter as the yeast work through their busiest period, known as high-krausen.
German lager brewers traditionally took high-krausen wort from a newly fermenting batch and added it to a fully-fermented batch of the same recipe. This process, known as krausening, introduces healthy, new yeast to pick up where the primary yeast—which went dormant due to the layering temperatures—left off.
The Uses of Krausening
Carbonation: Because of the German beer purity law (the Reinheitsgebot), use of sugars not derived from malt was not allowed, so alternative means were needed to supply a small dose of sugar for the yeast to convert and ultimately carbonate beer. The solution was to add high-krausen wort of the same recipe to an already fermented batch to provide the sugar needed for bottle carbonation. The same technique can also be implemented when naturally carbonating in casks and firkins. Some brewers will add non-fermented wort called spiese as the priming sugar, but the addition of active yeast from krausening was essential in carbonating lagers.(Re)Start Fermentation: While all instances of krausening are technically activating fermentation, the process can be used for various instances of either starting or restarting fermentation. Using the krausening technique to initiate fermentation is essentially the same as making a starter, where the entire contents of the starter would be added to the wort at the height of its activity. If you are experiencing stuck fermentation or need to finish off a high-gravity beer, krausening adds more healthy yeast that are up to the task. And, as was the case in traditional brewing, krausening can be used to add more yeast to a finished lager ready for conditioning and carbonation where the initial yeast has gone dormant due to the chilly fermentation temperatures.
Cleaning Up “Green” & Off Flavors: While carbonation was the primary goal of krausening in traditional German lager brewing, it was also recognized as a way to clean up some of the “green” qualities found in young beer by aiding the maturation process. It can also be used to help with flaws such as diacetyl and acetylaldehyde. Adding more yeast through krausening is also said to help reduce oxidation in batches that may have been unintentionally aerated.
Practical Applications for Homebrewers
For the homebrewer, krausening is not always a practical procedure. It is much simpler to just mix up a priming sugar solution and add it to the un-carbonated beer rather than saving or re-brewing wort for krausening. Of course, if you want to truly replicate a historical German lager or experience a different brewing technique, then this is a great opportunity.If you do decide to pursue krausening, bear in mind there is a high risk for contamination. Clarity can also become an issue since homebrewers don’t typically have the filtering methods available to commercial brewers.
However, krausening does have benefits that may be tempting to the homebrewer. If using krausening as a means to carbonate bottled beer, particularly smaller batches, you can rest assured that you are not diluting your beer with sugar water. Krausening can also be used to clean up the “green” flavors in beer or possible oxidation. The tricky part with this is needing to use the same wort as the main batch, so you either need to store wort from the original batch or brew a new, identical batch.
Sources: Brewing Better Beer by Gordon Strong; How To Brew by John Palmer; The Oxford Companion to Beer by Garret Oliver et al; “Krausening Home Brewed Beer” by Brad Smith (BeerSmith Blog)
Monday, January 18, 2016
Brew Boss Video - How to clean your Chugger pump.
#Brew-Boss is starting a new Brew-Boss Tips and Trick video series. Here is the first one.
How to clean your Chugger pump.
Brew Boss Electric #Homebrew Equipment
www.brew-boss.com
Sunday, January 17, 2016
Mastering the Art of Bottle Conditioning
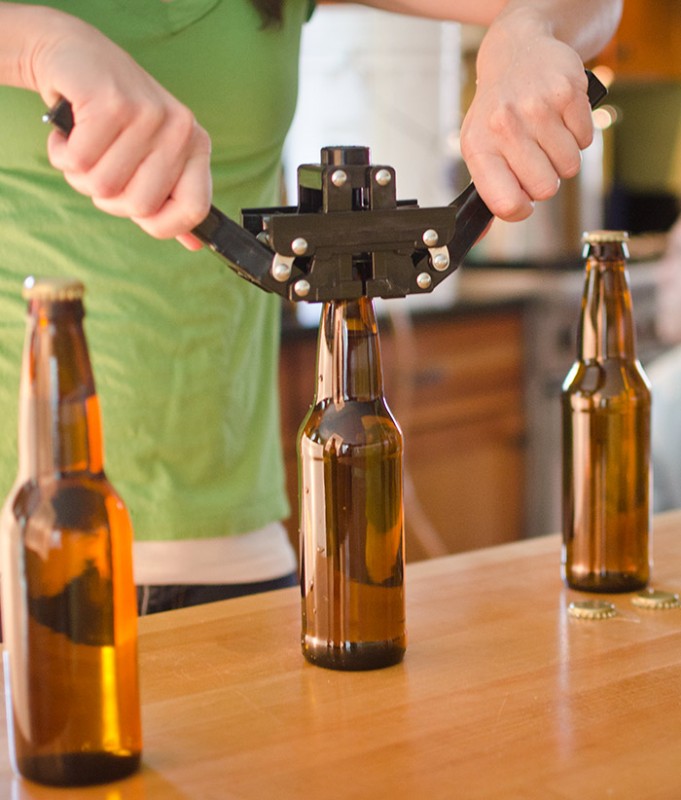
Bottling catches a lot of flack, especially from the die-hard keggers out there. Sure, preparing and filling a few cases of bottles is more labor-intensive than racking to a single keg, but packaging homebrew in bottles also has its benefits.
For one thing, grabbing a 6-pack of bottles to share or give to friends is quite a bit more convenient than shlepping a keg, CO2 tank and tap gear. Bottles are also perfect for long-term aging without taking up too much space in the cellar. And sometimes, there’s just nothing like popping a bottle of your own homebrew and hearing that “pffft” sound before pouring a beer into a glass.
To successfully bottle condition beer, it is important to take into account four key components: yeast, sugar, temperature and time.
Yeast
First and foremost, is yeast. Without enough viable yeast, there is nothing to convert sugar into CO2, which is what creates carbonation. If a beer undergoes a standard, healthy fermentation then there should be no issue with having enough yeast ready to do just a little bit more work to bottle condition beer.Issues can arise, however. Extended fermentation periods, as well as highly flocculent yeast strains paired with lengthy secondary aging can cause yeast to go dormant. Filtering beer can also prevent enough viable yeast from making it into the bottling bucket. In these instances, more yeast can be pitched, which is actually sometimes standard procedure in many commercial breweries that bottle condition filtered beer.
The moral of the story—make sure the yeast is happy, healthy and up to the task of bottle conditioning your homebrew.
Sugar
The next vital key to the bottle conditioning puzzle is sugar. Without enough fermentable sugar, yeast will have nothing to transform into CO2 and carbonate beer. There are a few options for ensuring sugar levels are where they need to be to achieve the desired level of carbonation without fear of creating the dreaded “bottle bombs” (bottles that explode to due being over pressurized).The daring homebrewer may determine when there’s just enough fermentable sugar left during fermentation and bottle at this point, but this is quite risky and without some experience with the particular recipe you’re brewing. The more common route is to wait for primary fermentation to complete fully, pick an easily fermentable sugar and add it to the bottling bucket. Rack the beer atop the sugar, mix it in thoroughly (without splashing!) and fill the bottles.
Corn sugar is the go-to priming sugar for many homebrewers because it is a simple sugar that is easily converted by yeast in a short time span. But brewers use everything from malt extract to honey to bottle condition beer. It is important to point out that different sugars have varying degrees of fermentability and will take different amount of times to achieve conditioning.
But wait! One of the most important parts of priming sugar is determining how much you need to achieve a specific level of carbonation, measured in volumes of CO2. The general rule of thumb used by beginners is 3/4 cup (177g) of corn sugar per 5 gallon batch to reach 2.25-2.5 vol. CO2. But, if you are after something with a higher or lower level of fizz, then you need to make some measurements.
Use the nomograph below to determine the amount of sugar you need to reach a specific level of carbonation. This is intended for a 5 gallon batch, but the amount of sugar determined for 5 gallons can be scaled to any volume. To use the nomograph, mark the temperature at which the beer will be bottled, the volumes of CO2 you’re after and then connect the lines with a straight-edge. Where the lines intersect the meter all the way to the right will determine how much corn or cane sugar is needed to reach that level of carbonation. Simple! Brewing software and online calculators can also be used to determine priming sugar amounts.
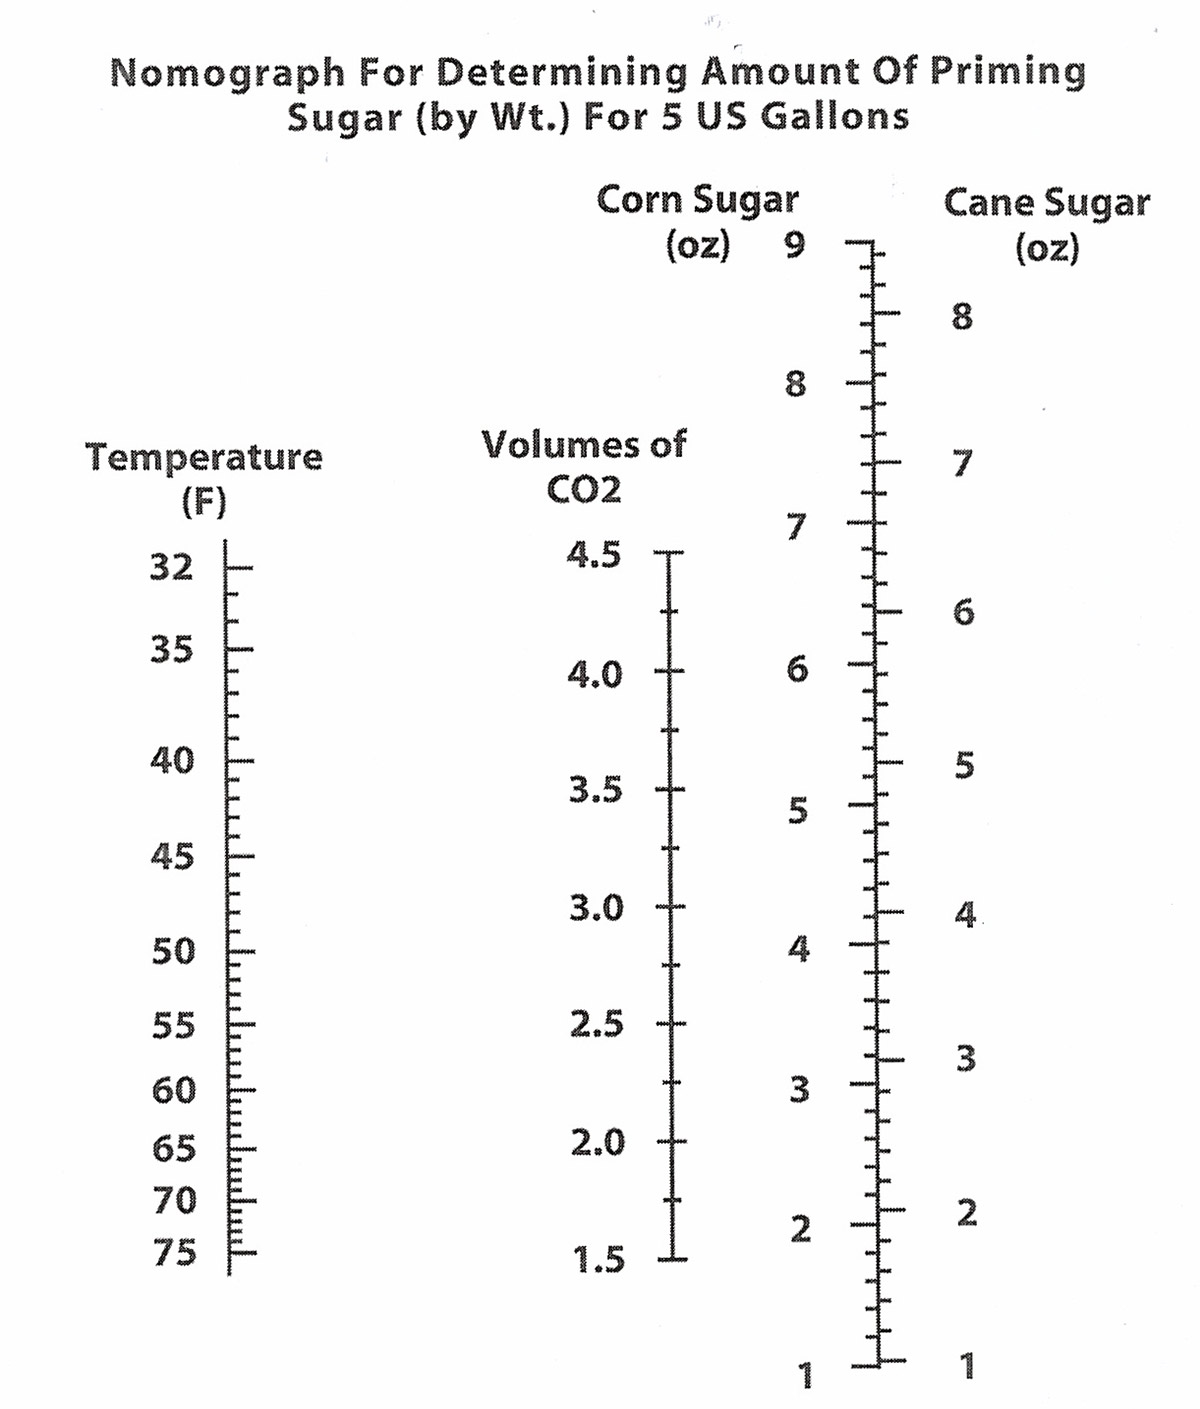
Click image to enlarge. Graph From How To Brew by John Palmer.
Temperature
As with primary fermentation, temperature plays a big role in how efficiently yeast will do its job converting sugars into alcohol and CO2. At the very least, filled and capped bottles should be stored at the temperature it was held during primary fermentation. A little warmer can be even better. 68-80°F is the general range for bottle conditioning.If you notice your bottles are having a hard time fermenting, but you’re confident with the yeast and priming sugar levels, it could very well be the temperature. Try sticking the bottles in a slightly warmer place and keep them off cold cellar floors that may be deceptively colder than the ambient temperature.
Time
Last but not least is time. Bottle conditioning typically takes 2-4 weeks to complete when using corn sugar. If you pop a bottle at two weeks, you’ll likely still hear the “pffft” of carbonation, assuming everything went to plan, but aging time up to a month is beneficial to ensure all the priming sugar has been consumed and the carbonation level has reached its fullest potential.It’s important to remember that different priming sugars will take various lengths. Honey, for example, typically takes a bit longer than corn sugar. After two weeks, open a bottle every week or so and track the carbonation. Once you enjoy what you taste, it’s time to enjoy the fruits of your labor!
Sources: “Putting the Bubble in Your Beer” by Ray Daniels (September/October 2001Zymurgy); “For Easier Bottling” by Chuck Skypeck (September/October 2001 Zymurgy);How to Brew by John J. Palmer
Friday, January 15, 2016
What to Age in Your Beer Cellar
Cellaring is the process of allowing a beer to mature under specific conditions to achieve nuances, particularly in its flavor and aroma, that often can only be achieved with aging. What you’re left with after aging beer successfully is what is called “vintage beer.”
Choosing a Beer Cellar Location
Before jumping into some tips on what makes a beer optimal to age (because not all of them are!), it is important to understand the beer cellar environment that is ideal for aging beer for an extended time.1. Temperature
Arguably the most important aspect of a beer cellar is the temperature. 55°F (12.8°C) has become a widely accepted temperature for aging most ales. Lagers aren’t usual suspects for cellaring, but a good rule to follow is to aim to keep beer cellar temperatures about 10°F below the temperature at which the beer is fermented.
Generally, ales are fermented around 65°F (18.3°C) and lagers at 50°F (10°C). Being able to maintain a temperature in this range with little fluctuation will allow the beer to mature at an appropriate rate. If it’s too cold, the maturation period slows significantly, and if too warm it can speed things up and cause off-flavors.
2. Darkness
The second thing to keep in mind is light. Keep your cellar dark! UV light interacts with hops in beer to create the dreaded light-struck flavor, otherwise known as “skunked” beer. Keep your beers shielded from light in any way possible, especially if they are packaged in clear or green bottles. A cheap way to prevent light-struck beer is to stick them in a sealed box or paper bag.
Those are the basics, but the trickiest part for cellaring is deciding which beers are suitable for aging because, after all, some just aren’t up for the task.
Tips for Picking a Beers to Cellar
1. The more alcohol, the betterWhen aging beer, it is crucial that there is a preservative present, which will essentially slow the aging process. A good rule of thumb is to aim for a beer that has at least 8% alcohol by volume (ABV). You may think speeding up the aging process is desirable, but in the case of cellaring beer the best technique is a slow-and-steady approach. A preservative like alcohol makes beer more resilient to potential staling flavors, which are typically caused by oxidation. And keep in mind that the booziness that is often present in fresh beers with high ABVs will typically mellow over time, allowing other flavors to come to the forefront.
All of that being said, there are some exceptions to the “more alcohol, the better” rule. The lactic acid in sour beers and the smokey phenols in smoked beers also act as preservatives, lessening the importance of the level of alcohol.
2. Body by beer cellar
During the aging process, the malt proteins present in beer will drop out. This reaction causes the body of beer to reduce over time, and the result is often a very thin and some cases overly-dry beer after it’s been aged. Wheat-derived proteins tend to fall out exceptionally quick, making wheat-based styles very tricky to age successfully. Because of this, it is important to cellar beers that are very full-bodied when they are fresh. This allows the malt proteins to drop out while still retaining some of the body and overall balance.
If a beer seems to thicken, becoming almost syrupy over time instead of thinning, it most likely means the alcohol character has decreased (as mentioned in #1) to the point where it creates the impression that the body thickened.

The yeast-derived character of both esters and phenols will evolve and change over time, which may or may not be desirable depending on the base style of the beer.
The fruity esters—reminiscent of pears and other tree fruits—commonly found in Belgian and some British style ales will develop into more dark fruit-like character (think raisin and figs). Banana esters, like those common in German hefeweizens, tend to disappear altogether in a fairly short span of time. Esters from Brett will take much longer period of times to change, but have the potential to achieve interesting flavors like pineapple and grapefruit.
Phenols—the spicy yeast flavors that come across as clove or pepper—will evolve into much different flavors, including vanilla, tobacco and leather. In instances where earthy phenolics are present in the fresh beer, there is the potential to achieve complex flavors that are all but impossible to achieve unless done with aging.
4. More hops isn’t always best
Remember when we said beer needs some sort of preservative to be a good candidate for cellaring? Well, despite hops reputation as being originally used for its antibacterial utility, hop bitterness and flavor/aroma are not well suited for aging. Simply put, the presence of hops fades over time, and this can drastically affect the balance of a beer. After all, if a hoppy beer style like IPA was brewed to a desirable balance of malt and hops, then reducing the presence of hops can throw this harmony out of wack.
In some instances hop character not only diminishes but can result in unfavorable flavors left behind. For example, American hop varieties with high levels of alpha acids can leave behind stale, paper-like flavors. On the other hand, English hop varieties with high beta acids, which are said to have a better chance of retaining bitterness, can impart fruity notes similar to pineapple and cherry as they age.

Sours can be a tricky beast when aging, and the results may not be what you expect. First off, the tart, lip-puckering character that puts the “sour” in “sour beer” will lessen with time, diminishing that typically-dominant characteristic. This softening of the sourness can be either a good or bad thing depending on the balance of the cellared beer at the time it’s consumed.
It’s important to note that while the sour character mellows and in some instances evolves (as with Brettanomyces) at a very, very slow rate, it is not uncommon for some sour beers to become even more sour in the first few years it’s being aged. It’s also not unusual for sour beers that have been aged for extended periods of time to appear more sour due to other characters, particularly the malt, diminishing.
Brett (short for Brettanomyces), though slow to evolve in the cellar, can undergo very drastic evolution when aged. Brett is a slow-acting yeast but a hungry one, and it will basically eat through all available fermentable sugars slowly but surely. This means extensive aging can often leave Brett beers bone dry, which can throw off the balance. During this process, the esters can evolve as mentioned in #3, but there is also the potential for aggressive phenolics to develop, which can be undesirable.
6. Keep the yeast in the bottle
Beers that are bottle conditioned, unfiltered and/or unpasteurized are generally better-suited for aging. By having yeast in the bottle, the beer is essentially a living entity that can consume residual oxygen and continue to condition slowly. This opens up a wider possibility of aging produced cellar character that a beer without yeast otherwise might not be able to achieve.
Filtered and/or pasteurized beers can still exhibit character evolution from aging but to a much lesser extent.
Sources: This post is based on the 2015 National Homebrewers Conference seminar “Crafting Cellarworthy Homebrew” presented by Patrick Dawson, author of Vintage Beer: A Taster’s Guide to Brews That Improve over Time. Download the audio/visual presentation of “Crafting Cellarworthy Homebrew.”
Wednesday, January 13, 2016
Hopped up IPA
India Pale Ale
All Grain
Brewer/Contributor: Don Pfeiffer
Batch Size: 5.50 gal
Boil Size: 7.00 gal
Hopped up IPA
| |||||||||||||||||||||||||||||||||||||||||||||||||
| Type: All Grain | Date: 8/19/2004 | ||||||||||||||||||||||||||||||||||||||||||||||||
| Batch Size: 5.50 gal | Brewer: Don Pfeiffer | ||||||||||||||||||||||||||||||||||||||||||||||||
| Boil Size: 7.00 gal | Asst Brewer: | ||||||||||||||||||||||||||||||||||||||||||||||||
| Boil Time: 60 min | Equipment: Shakey Dog Brewery | ||||||||||||||||||||||||||||||||||||||||||||||||
| Taste Rating(out of 50): 35.0 | Brewhouse Efficiency: 70.00 | ||||||||||||||||||||||||||||||||||||||||||||||||
| Taste Notes: | |||||||||||||||||||||||||||||||||||||||||||||||||
Ingredients
| |||||||||||||||||||||||||||||||||||||||||||||||||
| |||||||||||||||||||||||||||||||||||||||||||||||||
Beer Profile
| |||||||||||||||||||||||||||||||||||||||||||||||||
| Est Original Gravity: 1.065 SG | Measured Original Gravity: 1.065 SG | ||||||||||||||||||||||||||||||||||||||||||||||||
| Est Final Gravity: 1.014 SG | Measured Final Gravity: 1.010 SG | ||||||||||||||||||||||||||||||||||||||||||||||||
| Estimated Alcohol by Vol: 6.56 % | Actual Alcohol by Vol: 7.18 % | ||||||||||||||||||||||||||||||||||||||||||||||||
| Bitterness: 59.6 IBU | Calories: 290 cal/pint | ||||||||||||||||||||||||||||||||||||||||||||||||
| Est Color: 10.0 SRM | Color:
| ||||||||||||||||||||||||||||||||||||||||||||||||
Mash Profile
| |||||||||||||||||||||||||||||||||||||||||||||||||
| Mash Name: Single Infusion, Medium Body, No Mash Out | Total Grain Weight: 14.00 lb | ||||||||||||||||||||||||||||||||||||||||||||||||
| Sparge Water: 4.56 gal | Grain Temperature: 72.0 F | ||||||||||||||||||||||||||||||||||||||||||||||||
| Sparge Temperature: 168.0 F | TunTemperature: 72.0 F | ||||||||||||||||||||||||||||||||||||||||||||||||
| Adjust Temp for Equipment: TRUE | Mash PH: 5.4 PH | ||||||||||||||||||||||||||||||||||||||||||||||||
| |||||||||||||||||||||||||||||||||||||||||||||||||
| Mash Notes: Simple single infusion mash for use with most modern well modified grains (about 95% of the time). | |||||||||||||||||||||||||||||||||||||||||||||||||
Carbonation and Storage
| |||||||||||||||||||||||||||||||||||||||||||||||||
| Carbonation Type: Corn Sugar | Volumes of CO2: 2.4 | ||||||||||||||||||||||||||||||||||||||||||||||||
| Pressure/Weight: 4.2 oz | Carbonation Used: - | ||||||||||||||||||||||||||||||||||||||||||||||||
| Keg/Bottling Temperature: 60.0 F | Age for: 28.0 days | ||||||||||||||||||||||||||||||||||||||||||||||||
| Storage Temperature: 52.0 F http://beersmith.com/Recipes2/recipe_242.htm | |||||||||||||||||||||||||||||||||||||||||||||||||
Monday, January 11, 2016
Brewing India Pale Ale Recipes IPA Beer Styles
Brew Boss - Electric Homebrewing Systems www.brew-boss.com
India Pale Ale (or IPA) is a popular staple of homebrewers, microbrewers and hopheads who enjoy brewing some of the hoppiest beers on the planet. This week we look at India Pale Ale beer recipes, how to brew an IPA recipe and its history.
According to Wikipedia, India Pale Ale traces its origins to the 17th century in England with the earliest pale ales. In fact, new malting techniques developed at the start of the 17th century using coke-fired as opposed to wood-fired kilns enabled production of the first pale malts, and subsequently paler beers. One of the popular pale styles was a beer called October beer, which was highly hopped and designed to be stored for an extended period. Note that this October beer bears no relation to German Oktoberfest beer.
George Hodgson, owner of Bow Brewery brewed a version of October beer that was popular among the traders of the East India Trading Company in the late 1700’s. East India traders subsequently started trading many of Hodgson’s beers including his October beer. The highly hopped, high gravity, highly attenuated pale ale actually benefitted from the long trip to India and became popular with consumers there.
Other brewers, including several large Burton breweries like Bass, Alsop and Salt lost their European export market in Russia due to new high tarrifs on beer. They quickly emulated the October beer of Bow Brewery and also started exporting to India. The style, which now was now commonly called “India Pale Ale” became popular in England as well around 1840.
IPA is a hoppy, fairly strong pale ale traditionally brewed with English malt, hops and yeast. The American version has a slightly more pronounced malt flavor and uses American ingredients. The BJCP style guide for 2008 places original gravity at between 1.050 and 1.075, and highly attenuating yeasts are used to drive a final gravity between 1.010 and 1.018 for 5-7.5% alcohol by volume.
Multiple hop additions dominate the flavor profile in IPAs. English IPA’s typically have 40-60 IBUs, though the slightly stronger imperial IPA versions can have hop rates as high as 120 IBUs.
Color is similar to many pale ales – golden to deep copper color – varying between 8-14 SRM for the finished beer. Moderate carbonation is often used, though some English IPAs are lightly carbonated.
Hops dominate the flavor of an IPA, so careful selection of the hop additions is critical to success. Traditional English IPAs use popular English hops such as Fuggles, Goldings, Northdown, Target, though sometimes noble hops are also used in finishing. Higher alpha English hops are also popular for bittering. American IPAs use the rough American equivalents such as Cascade, Centennial, Williamette, though again higher alpha hops are often used in bittering.
Multiple hop additions are almost always used for IPAs including bittering hops at the beginning of the boil, often several additions of finishing hops in the last 5-15 minutes of the boil, and dry hops to provide a hoppy aroma. In general, higher alpha hops are used for the base boil addition while aromatic lower alpha hops are used in finishing and dry hopping, though some traditional IPAs use lower alpha English hops throughout.
Traditional English 2-row pale malt makes up the bulk of the grain bill (or two row American malt for the American IPA), usually around 85-90% of the total. Crystal and caramel malts are traditionally used to add color and body to achieve the desired overall color both in extract and all-grain recipes.
Chocolate and black malts are not often used in commercial examples though they occasionally make their way into home-brewed recipes. Personally I prefer moderately colored caramel/crystal malt. Occasionally you will see wheat, flaked barley or carapils malt added to enhance body, though these are rarely used and only in small quantities.
As many IPAs were first brewed in the English city of Burton, they share much with their English Pale Ale cousins, including the unusual Burton water profile which accentuates the hoppy profile. The Burton water profile has extremely high concentrations of calcium carbonate and bicarbonate. Depending on your local water source, a small addition of Gypsum (CaSO4) can sometimes help to simulate the hop-enhancing high carbonate Burton waters.
IPAs are most often made with traditional English ale yeasts, though care must be taken to choose a highly attenuating yeast and avoid some of the lower attenuating, fruity British ale yeasts. Many brewers bypass the problem entirely by choosing a highly attenuating American or California ale yeast for a cleaner finish.
All grain IPAs should be mashed at a lower temperature than pale ales to achieve the high attenuation desired. A mash temperature around 150F for 90 minutes will aid in breaking down more complex sugars for a clean finish that accentuates the hops.
IPAs are fermented and stored at the traditional ale temperatures, usually around the mid 60’s F. Long storage periods are sometimes required to achieve the proper hop-malt balance.
http://beersmith.com/blog/2009/09/13/brewing-india-pale-ale-recipes-ipa-beer-styles/
India Pale Ale (or IPA) is a popular staple of homebrewers, microbrewers and hopheads who enjoy brewing some of the hoppiest beers on the planet. This week we look at India Pale Ale beer recipes, how to brew an IPA recipe and its history.
History
According to Wikipedia, India Pale Ale traces its origins to the 17th century in England with the earliest pale ales. In fact, new malting techniques developed at the start of the 17th century using coke-fired as opposed to wood-fired kilns enabled production of the first pale malts, and subsequently paler beers. One of the popular pale styles was a beer called October beer, which was highly hopped and designed to be stored for an extended period. Note that this October beer bears no relation to German Oktoberfest beer.
George Hodgson, owner of Bow Brewery brewed a version of October beer that was popular among the traders of the East India Trading Company in the late 1700’s. East India traders subsequently started trading many of Hodgson’s beers including his October beer. The highly hopped, high gravity, highly attenuated pale ale actually benefitted from the long trip to India and became popular with consumers there.
Other brewers, including several large Burton breweries like Bass, Alsop and Salt lost their European export market in Russia due to new high tarrifs on beer. They quickly emulated the October beer of Bow Brewery and also started exporting to India. The style, which now was now commonly called “India Pale Ale” became popular in England as well around 1840.
The IPA Beer Style
IPA is a hoppy, fairly strong pale ale traditionally brewed with English malt, hops and yeast. The American version has a slightly more pronounced malt flavor and uses American ingredients. The BJCP style guide for 2008 places original gravity at between 1.050 and 1.075, and highly attenuating yeasts are used to drive a final gravity between 1.010 and 1.018 for 5-7.5% alcohol by volume.
Multiple hop additions dominate the flavor profile in IPAs. English IPA’s typically have 40-60 IBUs, though the slightly stronger imperial IPA versions can have hop rates as high as 120 IBUs.
Color is similar to many pale ales – golden to deep copper color – varying between 8-14 SRM for the finished beer. Moderate carbonation is often used, though some English IPAs are lightly carbonated.
Brewing an IPA
Hops dominate the flavor of an IPA, so careful selection of the hop additions is critical to success. Traditional English IPAs use popular English hops such as Fuggles, Goldings, Northdown, Target, though sometimes noble hops are also used in finishing. Higher alpha English hops are also popular for bittering. American IPAs use the rough American equivalents such as Cascade, Centennial, Williamette, though again higher alpha hops are often used in bittering.
Multiple hop additions are almost always used for IPAs including bittering hops at the beginning of the boil, often several additions of finishing hops in the last 5-15 minutes of the boil, and dry hops to provide a hoppy aroma. In general, higher alpha hops are used for the base boil addition while aromatic lower alpha hops are used in finishing and dry hopping, though some traditional IPAs use lower alpha English hops throughout.
Traditional English 2-row pale malt makes up the bulk of the grain bill (or two row American malt for the American IPA), usually around 85-90% of the total. Crystal and caramel malts are traditionally used to add color and body to achieve the desired overall color both in extract and all-grain recipes.
Chocolate and black malts are not often used in commercial examples though they occasionally make their way into home-brewed recipes. Personally I prefer moderately colored caramel/crystal malt. Occasionally you will see wheat, flaked barley or carapils malt added to enhance body, though these are rarely used and only in small quantities.
As many IPAs were first brewed in the English city of Burton, they share much with their English Pale Ale cousins, including the unusual Burton water profile which accentuates the hoppy profile. The Burton water profile has extremely high concentrations of calcium carbonate and bicarbonate. Depending on your local water source, a small addition of Gypsum (CaSO4) can sometimes help to simulate the hop-enhancing high carbonate Burton waters.
IPAs are most often made with traditional English ale yeasts, though care must be taken to choose a highly attenuating yeast and avoid some of the lower attenuating, fruity British ale yeasts. Many brewers bypass the problem entirely by choosing a highly attenuating American or California ale yeast for a cleaner finish.
All grain IPAs should be mashed at a lower temperature than pale ales to achieve the high attenuation desired. A mash temperature around 150F for 90 minutes will aid in breaking down more complex sugars for a clean finish that accentuates the hops.
IPAs are fermented and stored at the traditional ale temperatures, usually around the mid 60’s F. Long storage periods are sometimes required to achieve the proper hop-malt balance.
http://beersmith.com/blog/2009/09/13/brewing-india-pale-ale-recipes-ipa-beer-styles/
by
Saturday, January 9, 2016
How to Choose a Yeast Strain
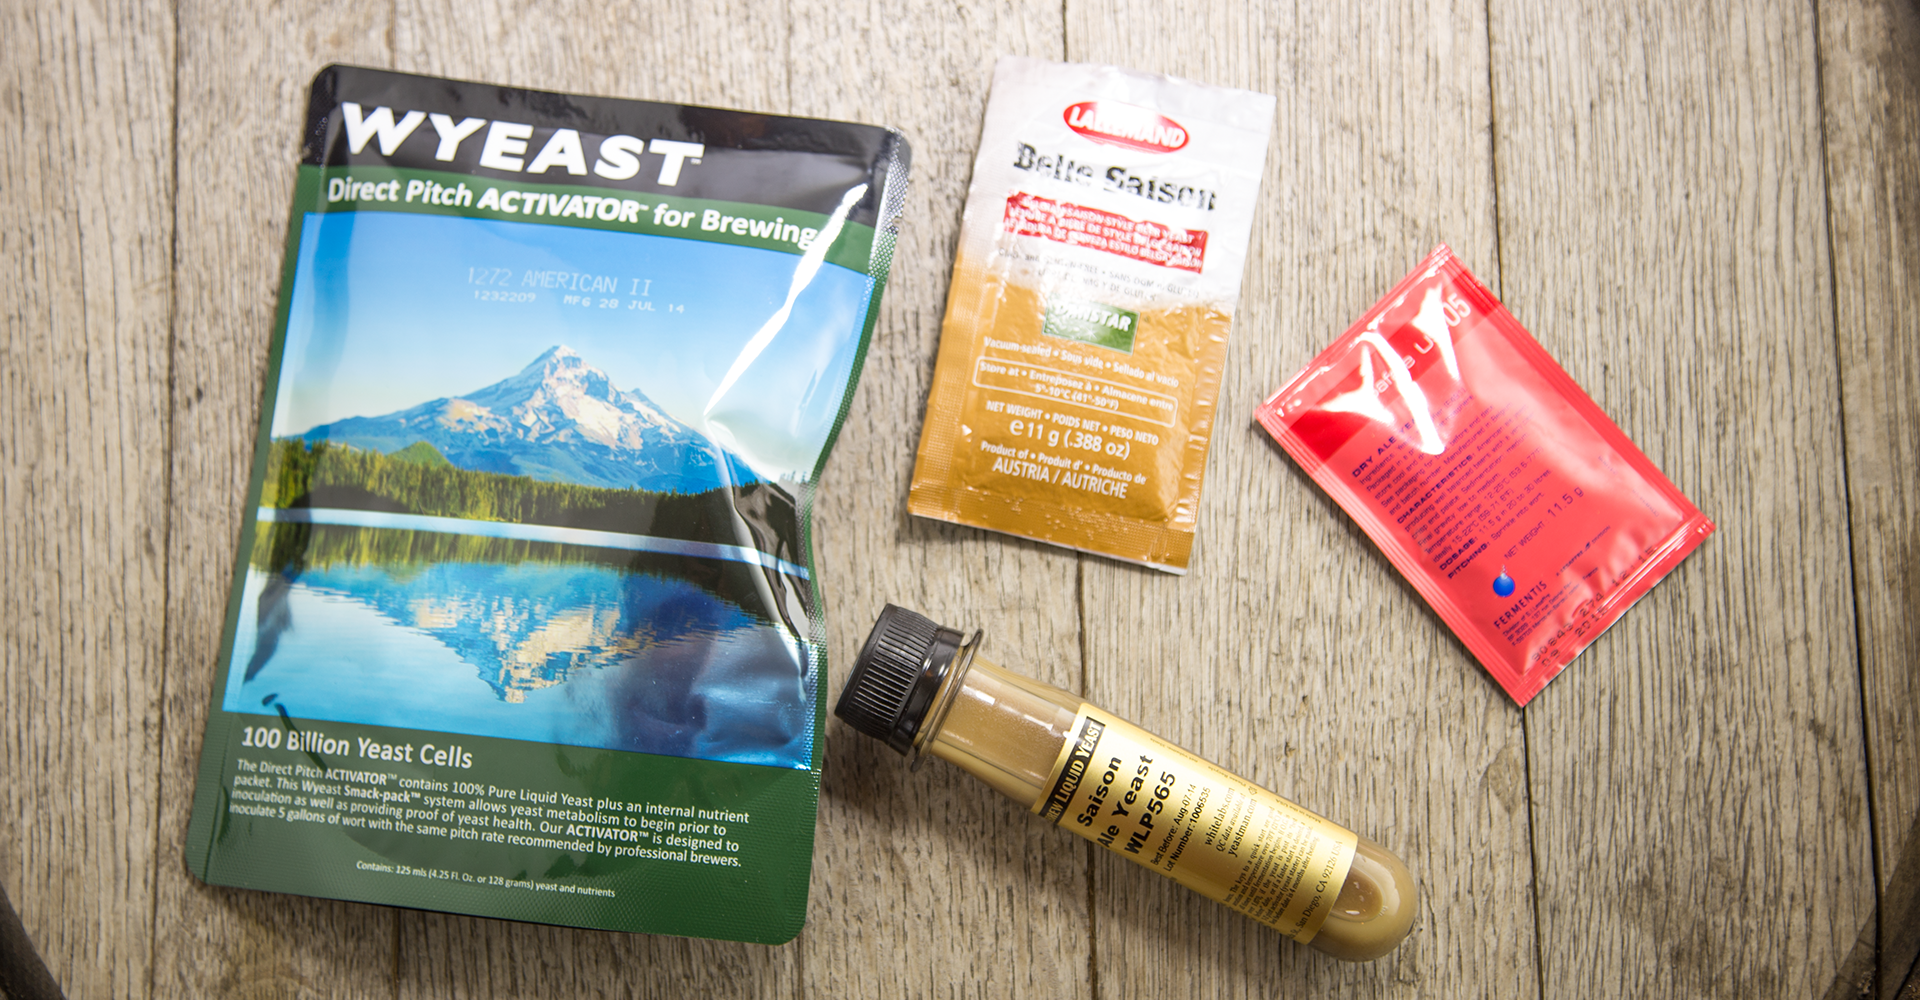
Selecting the right yeast for the job is simple, right? Just pick one with a name that echoes what you’re brewing: American ale for pale ale, Scottish ale for wee heavy, Czech lager for Pilsner, and so on. Nothing to it!
Well, yes and no. Choosing a strain by name alone isn’t a bad way to start. After all, there’s a reason for the names, and selecting a yeast according to its name is unlikely to steer you too far away from where you’d like to be. But it’s also important to look at certain performance indicators to make sure your chosen strain is up to the job.
Here’s what to look for when deciding on a yeast.
Attenuation
Attenuation refers to the percentage of available wort sugars that a yeast strain actually ferments. More commonly, brewers talk in terms of apparent attenuation, which is the attenuation calculated purely from hydrometer readings. Typical values are
Low: 72 percent and lower
Medium: 73 to 77 percent
High: 78 percent and up
The desired degree of attenuation is partly a matter of style and partly one of personal preference. Using a low-attenuation yeast for a saison or a high-attenuation yeast for a mild ale is likely to disappoint. But I’ve discovered that I tend to prefer a drier finish in most of my beer, so I tend to err on the side of more attenuation than less.
TAKE-AWAY: Select a yeast strain that exhibits the right level of attenuation for the beer style and for your palate.
Flocculation
Flocculation is the readiness with which yeast cells clump together and, having reached a critical mass, drop to the bottom of the fermentor. British strains are famously flocculent: After fermentation is complete (and sometimes before!), yeast cells form a compact cake on the floor of the fermentor that comes off in chunks. Strains that demonstrate low flocculation, such as Weizen yeasts, tend to laze about and remain in suspension well past the end of the party. In extreme cases, the beer has to be refrigerated (or, in a commercial setting, centrifuged) to separate the yeast.
TAKE-AWAY: Select a yeast strain that flocculates in a manner appropriate to the beer you’re brewing.
Alcohol Tolerance
Alcohol tolerance describes how much alcohol a yeast strain can tolerate before it stops working. Brewers have selectively pressured yeast strains over the years to adapt to different conditions, and breweries that have favored high-alcohol beer will typically have yeast strains that have risen to the challenge. A cold-fermenting Pilsner strain works well for lagers with less than 10 percent alcohol, while Rogue’s famous Pacman ale yeast can easily carry you into barleywine territory.
TAKE-AWAY: Select a yeast strain that can survive beyond your beer’s estimated alcohol level.
Temperature Range
Temperature range is the—wait for it—range of temperatures in which a yeast works best. Note that I said “best.” Virtually all yeasts will continue to ferment at temperatures well above the indicated limit, but you probably won’t like the results: Think overpowering esters and off flavors. Below the recommended range, you might experience a sluggish fermentation. Knowing a yeast’s optimal temperature range is important for a couple of reasons:
Your equipment (or lack thereof) may limit you to fermenting at certain temperatures.
Depending upon the flavor profile you want, a cooler or warmer fermentation may be desirable.
TAKE-AWAY: Choose a yeast that satisfies your needs for both fermentation environment and flavor profile.
And speaking of flavor profile...
Sensory Profile
Sensory profile is a major driver of the flavor and aroma profile of the finished beer and also the hardest to describe. Attenuation, flocculation, alcohol tolerance, and temperature range are all quantifiable, but sensory descriptors are imperfect and subjective. And a yeast strain’s sensory characteristics change depending on temperature, pitch rate, oxygen levels, and other variables. In short, the only way to really know is to brew with it. Read the descriptors to get a general idea, and then take notes on how you perceive the results.
TAKE-AWAY: Practice, practice, practice!
AUTHOR: DAVE CARPENTER
Thursday, January 7, 2016
3 Things to Check Before You Buy a Refractometer
Want the best electric home brew system? www.brew-boss.com #homebrew #BIAB
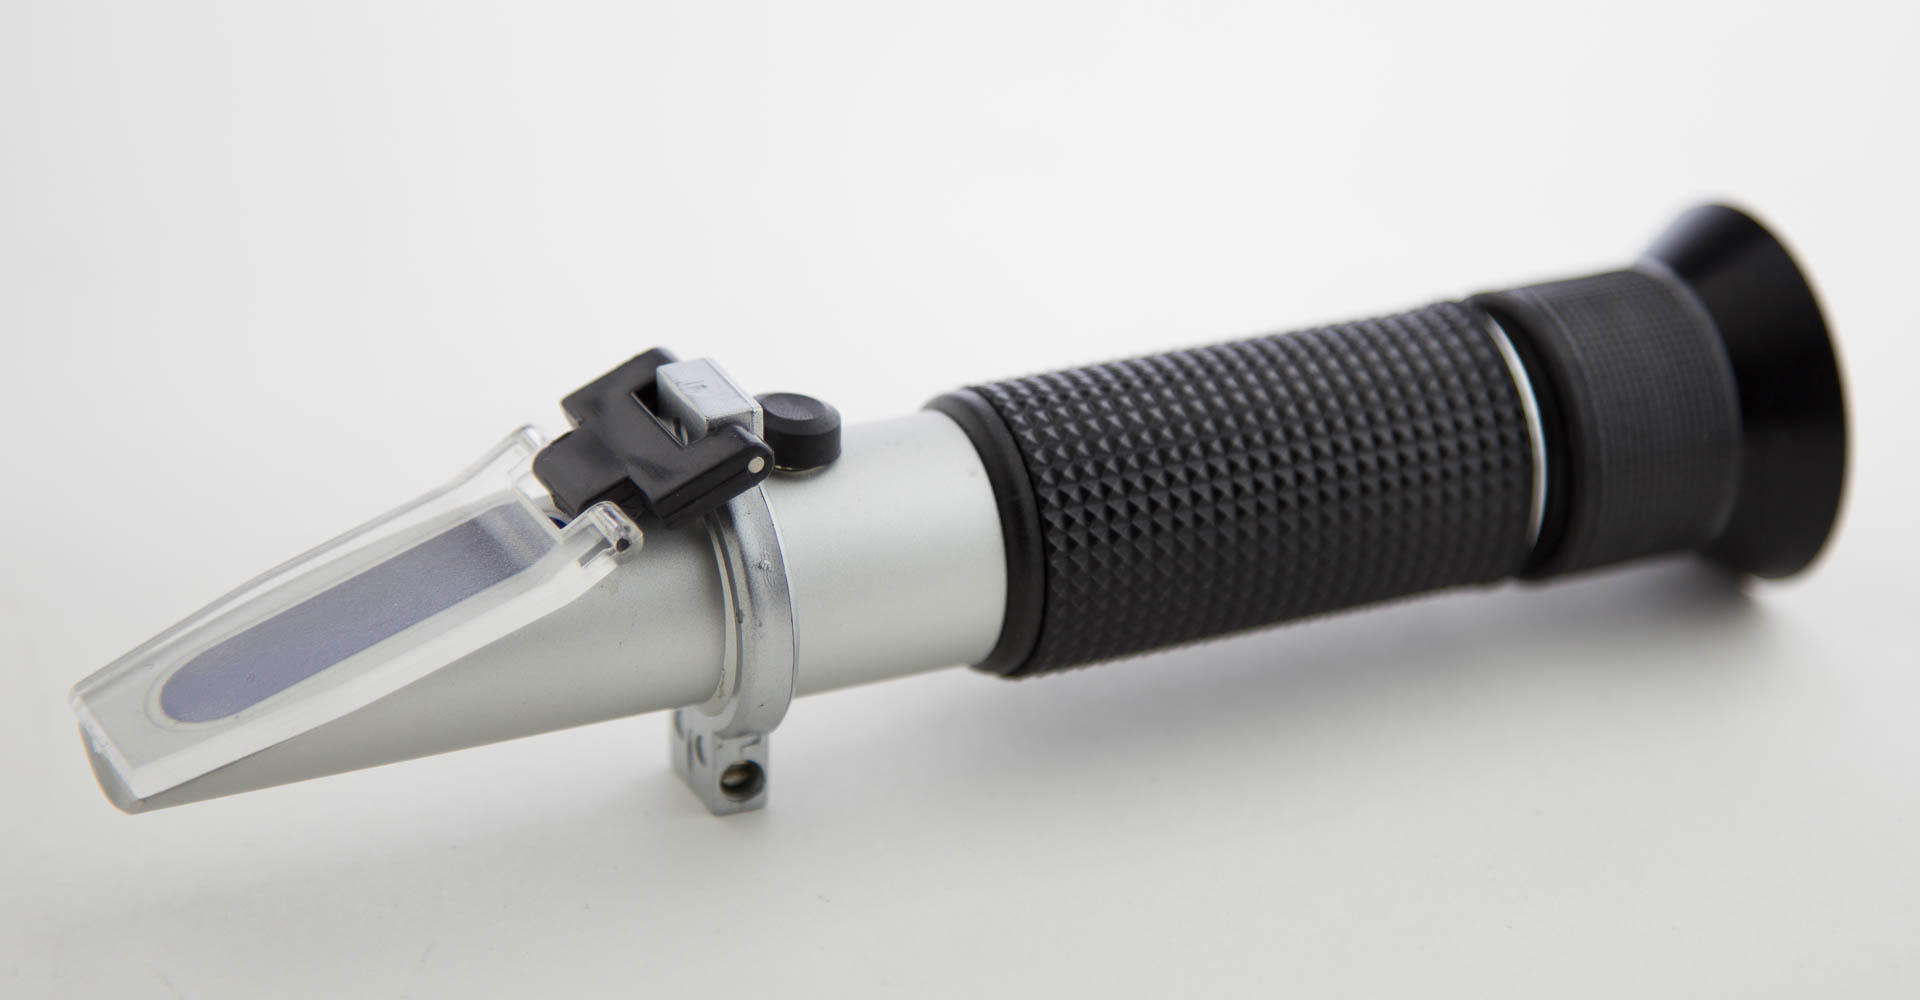
When you remove the daily post from your mailbox, how often do you find a catalog chock full of shiny new homebrewing toys? Anywhere from four to six of these arrive at my house per month, and although the products remain mostly the same from one issue to the next, I never fail to browse the whole thing cover to cover every time. The siren’s song of new gadgets is simply too beautiful to ignore.
I managed to ignore the #refractometer for a long time. After all, a #hydrometer is much cheaper and measures wort specific gravity just as well. But refractometers do offer some nice advantages. Only a small wort sample is needed, a couple of drops rather than a test tube’s worth. A refractometer won’t roll off the counter and onto the floor, shattering into countless shards of glass. Also they look cool.
The refractometer operates on the optical principle that light passing through a liquid refracts at different angles according to the density of that liquid. Rephrasing that statement, light passing through a small sample of wort refracts at different angles according to the concentration of dissolved sugar in that wort. The refracted light illuminates a scale, upon which is printed a range of wort densities. You peek through an eyepiece and read the wort density from the scale.
The refractive index of a liquid doesn’t just change with density; it also changes with temperature. Most good refractometers feature automatic temperature compensation (ATC) and will report the same value over a wide range of practical temperatures, usually between 55 and 85°F (13 and 29°C). ATC is a convenience well worth seeking out because a couple of drops of even boiling wort will quickly cool to within this range. This is of particular advantage to all-grain brewers who want to monitor the gravity of runoff, which is typically around 170°F (77°C).
Most refractometers available to homebrewers these days are dual-scale instruments that report results in both Brix and specific gravity units of measurement. Brewers usually prefer to express density in either specific gravity or Plato units, while winemakers often prefer Brix. In fact, Brix and Plato are closely related, and the two units may be considered equal to within 5 percent.
If you are accustomed to working in specific gravity (SG) units, then take a second look before pulling the trigger on a too-good-to-be-true refractometer bargain to make sure it includes a specific gravity scale. Working in Brix isn’t terribly inconvenient, but you don’t want to be surprised on brew day.
One area where the hydrometer remains superior to the refractometer is in measuring final gravity (FG). Unlike reading a hydrometer, which simply floats in the mixture of water, sugar, and ethanol that we call beer, using a refractometer to get FG is a little tricky. To wit, you’ll need to know the gravity of the original wort, and then you have to perform a conversion. You can calculate it by hand (not recommended), or numerous tools such as BeerSmith include refractometer calculators that will do it for you. This shouldn’t make or break your decision to purchase one of these optical wonders, but keep it in mind so that you have realistic expectations.
Ultimately, the refractometer is simply another tool for your homebrewing arsenal. It won’t replace the trusty hydrometer, but in the hands of an educated brewer, it can be a valuable investment.
When you remove the daily post from your mailbox, how often do you find a catalog chock full of shiny new homebrewing toys? Anywhere from four to six of these arrive at my house per month, and although the products remain mostly the same from one issue to the next, I never fail to browse the whole thing cover to cover every time. The siren’s song of new gadgets is simply too beautiful to ignore.
I managed to ignore the #refractometer for a long time. After all, a #hydrometer is much cheaper and measures wort specific gravity just as well. But refractometers do offer some nice advantages. Only a small wort sample is needed, a couple of drops rather than a test tube’s worth. A refractometer won’t roll off the counter and onto the floor, shattering into countless shards of glass. Also they look cool.
The refractometer operates on the optical principle that light passing through a liquid refracts at different angles according to the density of that liquid. Rephrasing that statement, light passing through a small sample of wort refracts at different angles according to the concentration of dissolved sugar in that wort. The refracted light illuminates a scale, upon which is printed a range of wort densities. You peek through an eyepiece and read the wort density from the scale.
Temperature Compensation
The refractive index of a liquid doesn’t just change with density; it also changes with temperature. Most good refractometers feature automatic temperature compensation (ATC) and will report the same value over a wide range of practical temperatures, usually between 55 and 85°F (13 and 29°C). ATC is a convenience well worth seeking out because a couple of drops of even boiling wort will quickly cool to within this range. This is of particular advantage to all-grain brewers who want to monitor the gravity of runoff, which is typically around 170°F (77°C).
Units of Measurement
Most refractometers available to homebrewers these days are dual-scale instruments that report results in both Brix and specific gravity units of measurement. Brewers usually prefer to express density in either specific gravity or Plato units, while winemakers often prefer Brix. In fact, Brix and Plato are closely related, and the two units may be considered equal to within 5 percent.
If you are accustomed to working in specific gravity (SG) units, then take a second look before pulling the trigger on a too-good-to-be-true refractometer bargain to make sure it includes a specific gravity scale. Working in Brix isn’t terribly inconvenient, but you don’t want to be surprised on brew day.
Final Gravity Adjustment
One area where the hydrometer remains superior to the refractometer is in measuring final gravity (FG). Unlike reading a hydrometer, which simply floats in the mixture of water, sugar, and ethanol that we call beer, using a refractometer to get FG is a little tricky. To wit, you’ll need to know the gravity of the original wort, and then you have to perform a conversion. You can calculate it by hand (not recommended), or numerous tools such as BeerSmith include refractometer calculators that will do it for you. This shouldn’t make or break your decision to purchase one of these optical wonders, but keep it in mind so that you have realistic expectations.
Ultimately, the refractometer is simply another tool for your homebrewing arsenal. It won’t replace the trusty hydrometer, but in the hands of an educated brewer, it can be a valuable investment.
AUTHOR: DAVE CARPENTER
Tuesday, January 5, 2016
Better Bottling
Electric Homebrew Systems EBIAB Brew Boss www.brew-boss.com

They say you can’t judge a book by its cover, but I must admit to being a complete sucker for beer poured from a sparkling-wine bottle. Uncorking a 750 ml bottle of saison, lambic, or imperial stout just feels special, and truth be told, I would probably award industrial macro-brews extra points on theUnfiltered beer app if I could open them with such fanfare.
We homebrewers often encourage one another to take up kegging as the next logical step toward pouring the perfect pint. But even if you keg most of your beer, some occasions simply call for bottles. Whether you want to submit to a competition, offer homebrew as a gift, or simply stash a few beers in the trunk to enjoy after a hike, bottles let your beer go anywhere. Here are three steps you can take to step up your bottling game.
Formulating your own recipes is an enjoyable part of homebrewing, but sometimes you don’t want to think too hard: You just want to get some beer into the pipeline. That’s why novice and advanced homebrewers alike appreciate the convenience of beer kits.
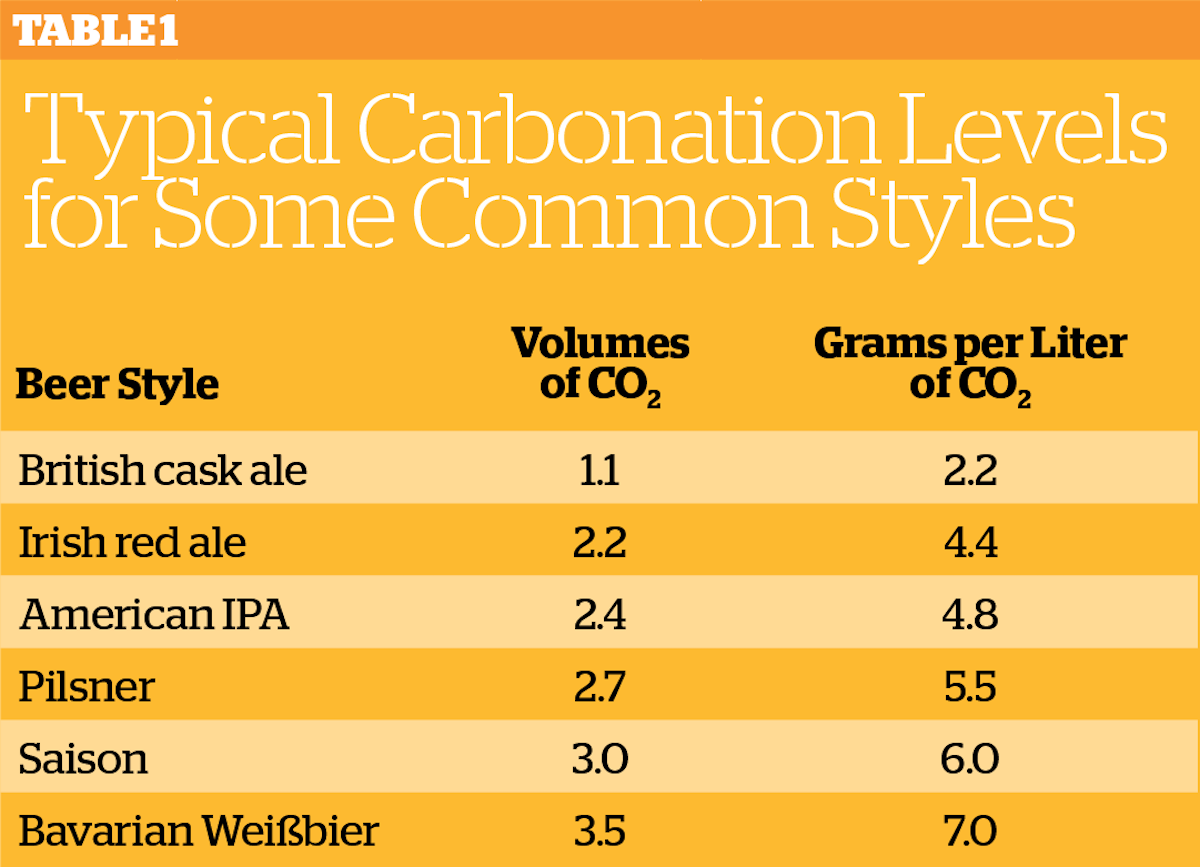
Those prepackaged kits usually include little premeasured bags of priming sugar, and—in most cases—said bags contain 5 ounces (142 grams) of corn sugar. This carbonates 5 gallons (19 liters) of beer to about 2.5 to 2.7 volumes (5.0 to 5.4 grams per liter), which is a good all-purpose level of fizz if you don’t have a good reason to do otherwise.
But there is a very good reason to do otherwise: Different beer styles taste best at different carbonation levels (see Table 1, below). British cask ales might barely breach 1 volume (2 grams per liter), while some Belgian styles approach 4 volumes (8 grams per liter) of CO2 or more.
It’s not just a matter of numbers. Carbon dioxide reacts with water to create carbonic acid, which is what gives tongue-tingling life to effervescent beverages. That carbonic bite plays an important role in our perception of the malt, hops, esters, and phenols that lie within.
Achieving a precise level of dissolved carbon dioxide is easy when you force carbonate in a keg: Just set the regulator pressure according to the serving temperature for your desired level of fizz. You can even adjust it as you empty the keg. But doing it right in bottles takes a deft hand.
Detailed calculations are best left to brewing software, and I highly recommend taking the time to get to know BeerSmith, Brewer’s Friend, or one of the many other programs that do all of the math for you. But, roughly speaking, fermented beer already contains about 0.8 to 1.0 volumes of carbon dioxide from fermentation itself. The warmer the beer gets, the less CO2 remains in solution when you go to bottle, but assuming 0.8 to 1.0 volumes to start will get you in the ballpark.
Then, for each additional volume of carbon dioxide, you need to add about two gravity points (1.002) worth of fermentable sugar. One ounce (28 grams) of corn sugar per gallon (3.8 liters) of beer contributes about three gravity points, ergo a priming rate of 5 ounces of sugar per 5 gallons yields an additional 1.5 volumes of carbon dioxide, giving roughly 2.5 volumes total when added to what’s already there. If you wanted to carbonate to 2 volumes instead of 2.5, then you’d adjust the amount of corn sugar proportionally to add just 1 volume on top of what’s already there.
But seriously, just get the brewing software.
Kräusening is a German technique in which carbonation is achieved by adding actively fermenting wort to finished beer before packaging. German brewers do it to remain compliant with the Reinheitsgebot,under which the addition of simple sugars is verboten. But there’s a good reason to try it as a homebrewer.
Just as making a starter helps ensure that you have a healthy population of yeast cells going into fermentation, adding fermenting wort to beer before packaging is a good way to ensure that the yeast cells you need for carbonation will be up to the task. This is especially helpful for high-gravity styles and lagers, in which the yeast cells that remain in solution after fermentation may be poor in health or low in number.
Introducing active yeast can also help reduce certain off-flavors such as diacetyl. Remember, yeast cells will often clean up after themselves if offered the chance. Kräusening is a way to give them that chance. Once again, the math is complex, and I strongly recommend spending some time with brewing software. But, here’s a very approximate and simple way to try your hand at it.
Prepare a 2.5-liter (2.6-quart) yeast starter using the golden rule of 100 grams (3.5 ounces) of dry malt extract for every liter of starter, so 250 grams (8.8 ounces). Inoculate it with fresh yeast, preferably the same strain that fermented the beer you want to carbonate, but don’t agitate it or place it on a stir plate. As soon as you see visible signs of fermentation in the starter, add the whole thing to the bottling bucket along with your beer, and bottle it. This will introduce enough active yeast and malt sugar to achieve roughly 2.5 volumes of carbon dioxide in a 5-gallon batch of beer, again assuming that there’s already about a volume in there.
Purists will recognize that isn’t technically Kräusening in the traditional sense because one would traditionally inoculate with wort of the same composition as the beer being bottled. This is simple to do in a commercial setting, where brewers make the same products day in and day out. But most homebrewers don’t have that luxury, which is why I recommend at least starting with a simplified technique to see whether you like it.
Carbonating to style and Kräusening might make your beer taste better, but packaging in a fancy bottle will make it look better. And in my opinion, nothing beats a sparkling-wine bottle for the extra bit of class that makes ordinary beer look extraordinary. After all, check out what 750 ml bottles of beer sell for.
To package in sparkling-wine bottles, you’ll need
There are two types of sparkling-wine bottles, and they’re incompatible with one another. European sparkling-wine bottles, including those that hold authentic champagne, have a slightly larger opening (29 mm) than American sparkling-wine bottles (26 mm). As always, seek out brown bottles for their light-blocking properties, unless you have a particular affinity for lightstruck flavors.
You can, in fact, seal either type of bottle using a good old-fashioned crown cap, provided you purchase the right-size cap for the bottle (most homebrew stores sell both 26 mm and 29 mm caps). Some brewers cap sparkling-wine bottles using the same wing-type handheld capper that you’d use to seal any other beer bottle, but your mileage may vary. For stability, leverage, and speed, I like to use a bench capper.
If you’d like to seal those bottles with a cork, however, you’ll need a floor corker. Now, you can certainly buy a dedicated champagne floor corker if you prefer to use traditional Belgian-style corks, but there are two other solutions as well.
Plastic T-stoppers can be pushed in by hand, or you can use a regular bench capper to push them right into the neck with virtually no fuss. And plastic stoppers are reusable to boot. Sure, plastic lacks the elegance of cork, but not purchasing a special corking device makes up for it in my book.
The cages that secure the corks in place aren’t just traditional; they’re necessary to keep the cork from popping right off the top of the bottle as carbonation pressure builds. They’re easy install: Just place the cage on top of the cork and use a wire-cage tool, a chopstick, or even a pencil to turn the little wire. As the wire turns, the cage will tighten around the cork. Tradition dictates six half-turns, but what’s most important is that the bottom of the cage securely grabs the underside of the lip.
Packaging in Belgian bottles is similar to packaging in sparkling-wine bottles. There’s a bit of finesse required to keep just the right amount of cork above the neck, but if you already own a floor corker (if you’re a regular winemaker, say) you can bottle in Belgian bottles just as easily.
Another solution is to follow the lead of brewers like Cantillon and Fantôme, and cork the bottle with a standard wine cork before capping it. There’s no science that supports the benefit of this redundant closure method, but if evoking romantic notions of Brussels is your goal, there’s no better way. One added benefit of this method is the ability to use less-expensive wine corkers rather than the more expensive champagne corkers.
Keep in mind that competitions usually require regular 12-ounce longnecks, so if you plan to submit entries, you’ll want to bottle at least some of your batch in the conventional manner. But popping the top on an elegantly bottled 750 milliliters of homebrew instantly turns an ordinary evening into something memorable.
When I started homebrewing, I dreamed of owning a home-draft setup with on-demand kegged beer at the ready (and I eventually got it). But as I’ve progressed, I’ve come to appreciate the elegant simplicity that accompanies well-conditioned bottled beer. You can cellar it. You can give it away as gifts. And yes, you can even drink it while watching the game. Most importantly, you can take it anywhere.
Ultimately, it’s about taking that last step to pouring the perfect pint, whether it flies out of the business end of a stainless-steel faucet or gently gurgles from the mouth of a glass bottle. But once you figure out the bottling method that’s right for you, I guarantee that no amount of shiny stainless steel will ever quite compete.
http://beerandbrewing.com/VkUjXSQAAPcLaONM/article/better-bottling
They say you can’t judge a book by its cover, but I must admit to being a complete sucker for beer poured from a sparkling-wine bottle. Uncorking a 750 ml bottle of saison, lambic, or imperial stout just feels special, and truth be told, I would probably award industrial macro-brews extra points on theUnfiltered beer app if I could open them with such fanfare.
We homebrewers often encourage one another to take up kegging as the next logical step toward pouring the perfect pint. But even if you keg most of your beer, some occasions simply call for bottles. Whether you want to submit to a competition, offer homebrew as a gift, or simply stash a few beers in the trunk to enjoy after a hike, bottles let your beer go anywhere. Here are three steps you can take to step up your bottling game.
1. Carbonate to Style
Formulating your own recipes is an enjoyable part of homebrewing, but sometimes you don’t want to think too hard: You just want to get some beer into the pipeline. That’s why novice and advanced homebrewers alike appreciate the convenience of beer kits.
Those prepackaged kits usually include little premeasured bags of priming sugar, and—in most cases—said bags contain 5 ounces (142 grams) of corn sugar. This carbonates 5 gallons (19 liters) of beer to about 2.5 to 2.7 volumes (5.0 to 5.4 grams per liter), which is a good all-purpose level of fizz if you don’t have a good reason to do otherwise.
But there is a very good reason to do otherwise: Different beer styles taste best at different carbonation levels (see Table 1, below). British cask ales might barely breach 1 volume (2 grams per liter), while some Belgian styles approach 4 volumes (8 grams per liter) of CO2 or more.
It’s not just a matter of numbers. Carbon dioxide reacts with water to create carbonic acid, which is what gives tongue-tingling life to effervescent beverages. That carbonic bite plays an important role in our perception of the malt, hops, esters, and phenols that lie within.
Achieving a precise level of dissolved carbon dioxide is easy when you force carbonate in a keg: Just set the regulator pressure according to the serving temperature for your desired level of fizz. You can even adjust it as you empty the keg. But doing it right in bottles takes a deft hand.
Detailed calculations are best left to brewing software, and I highly recommend taking the time to get to know BeerSmith, Brewer’s Friend, or one of the many other programs that do all of the math for you. But, roughly speaking, fermented beer already contains about 0.8 to 1.0 volumes of carbon dioxide from fermentation itself. The warmer the beer gets, the less CO2 remains in solution when you go to bottle, but assuming 0.8 to 1.0 volumes to start will get you in the ballpark.
Then, for each additional volume of carbon dioxide, you need to add about two gravity points (1.002) worth of fermentable sugar. One ounce (28 grams) of corn sugar per gallon (3.8 liters) of beer contributes about three gravity points, ergo a priming rate of 5 ounces of sugar per 5 gallons yields an additional 1.5 volumes of carbon dioxide, giving roughly 2.5 volumes total when added to what’s already there. If you wanted to carbonate to 2 volumes instead of 2.5, then you’d adjust the amount of corn sugar proportionally to add just 1 volume on top of what’s already there.
But seriously, just get the brewing software.
2. Try Kräusening
Kräusening is a German technique in which carbonation is achieved by adding actively fermenting wort to finished beer before packaging. German brewers do it to remain compliant with the Reinheitsgebot,under which the addition of simple sugars is verboten. But there’s a good reason to try it as a homebrewer.
Just as making a starter helps ensure that you have a healthy population of yeast cells going into fermentation, adding fermenting wort to beer before packaging is a good way to ensure that the yeast cells you need for carbonation will be up to the task. This is especially helpful for high-gravity styles and lagers, in which the yeast cells that remain in solution after fermentation may be poor in health or low in number.
Introducing active yeast can also help reduce certain off-flavors such as diacetyl. Remember, yeast cells will often clean up after themselves if offered the chance. Kräusening is a way to give them that chance. Once again, the math is complex, and I strongly recommend spending some time with brewing software. But, here’s a very approximate and simple way to try your hand at it.
Prepare a 2.5-liter (2.6-quart) yeast starter using the golden rule of 100 grams (3.5 ounces) of dry malt extract for every liter of starter, so 250 grams (8.8 ounces). Inoculate it with fresh yeast, preferably the same strain that fermented the beer you want to carbonate, but don’t agitate it or place it on a stir plate. As soon as you see visible signs of fermentation in the starter, add the whole thing to the bottling bucket along with your beer, and bottle it. This will introduce enough active yeast and malt sugar to achieve roughly 2.5 volumes of carbon dioxide in a 5-gallon batch of beer, again assuming that there’s already about a volume in there.
Purists will recognize that isn’t technically Kräusening in the traditional sense because one would traditionally inoculate with wort of the same composition as the beer being bottled. This is simple to do in a commercial setting, where brewers make the same products day in and day out. But most homebrewers don’t have that luxury, which is why I recommend at least starting with a simplified technique to see whether you like it.
3. Corks, Cages, and Caps
Carbonating to style and Kräusening might make your beer taste better, but packaging in a fancy bottle will make it look better. And in my opinion, nothing beats a sparkling-wine bottle for the extra bit of class that makes ordinary beer look extraordinary. After all, check out what 750 ml bottles of beer sell for.
To package in sparkling-wine bottles, you’ll need
- Sparkling-wine bottles (obviously)
- Sparkling-wine corks
- Wire cages, sometimes called hoods or muselet
- A bench capper or floor corker
- A wire-cage tool or (my cheap solution) a chopstick or pencil
There are two types of sparkling-wine bottles, and they’re incompatible with one another. European sparkling-wine bottles, including those that hold authentic champagne, have a slightly larger opening (29 mm) than American sparkling-wine bottles (26 mm). As always, seek out brown bottles for their light-blocking properties, unless you have a particular affinity for lightstruck flavors.
You can, in fact, seal either type of bottle using a good old-fashioned crown cap, provided you purchase the right-size cap for the bottle (most homebrew stores sell both 26 mm and 29 mm caps). Some brewers cap sparkling-wine bottles using the same wing-type handheld capper that you’d use to seal any other beer bottle, but your mileage may vary. For stability, leverage, and speed, I like to use a bench capper.
If you’d like to seal those bottles with a cork, however, you’ll need a floor corker. Now, you can certainly buy a dedicated champagne floor corker if you prefer to use traditional Belgian-style corks, but there are two other solutions as well.
Plastic T-stoppers can be pushed in by hand, or you can use a regular bench capper to push them right into the neck with virtually no fuss. And plastic stoppers are reusable to boot. Sure, plastic lacks the elegance of cork, but not purchasing a special corking device makes up for it in my book.
The cages that secure the corks in place aren’t just traditional; they’re necessary to keep the cork from popping right off the top of the bottle as carbonation pressure builds. They’re easy install: Just place the cage on top of the cork and use a wire-cage tool, a chopstick, or even a pencil to turn the little wire. As the wire turns, the cage will tighten around the cork. Tradition dictates six half-turns, but what’s most important is that the bottom of the cage securely grabs the underside of the lip.
Packaging in Belgian bottles is similar to packaging in sparkling-wine bottles. There’s a bit of finesse required to keep just the right amount of cork above the neck, but if you already own a floor corker (if you’re a regular winemaker, say) you can bottle in Belgian bottles just as easily.
Another solution is to follow the lead of brewers like Cantillon and Fantôme, and cork the bottle with a standard wine cork before capping it. There’s no science that supports the benefit of this redundant closure method, but if evoking romantic notions of Brussels is your goal, there’s no better way. One added benefit of this method is the ability to use less-expensive wine corkers rather than the more expensive champagne corkers.
Keep in mind that competitions usually require regular 12-ounce longnecks, so if you plan to submit entries, you’ll want to bottle at least some of your batch in the conventional manner. But popping the top on an elegantly bottled 750 milliliters of homebrew instantly turns an ordinary evening into something memorable.
A Return to Basics
When I started homebrewing, I dreamed of owning a home-draft setup with on-demand kegged beer at the ready (and I eventually got it). But as I’ve progressed, I’ve come to appreciate the elegant simplicity that accompanies well-conditioned bottled beer. You can cellar it. You can give it away as gifts. And yes, you can even drink it while watching the game. Most importantly, you can take it anywhere.
Ultimately, it’s about taking that last step to pouring the perfect pint, whether it flies out of the business end of a stainless-steel faucet or gently gurgles from the mouth of a glass bottle. But once you figure out the bottling method that’s right for you, I guarantee that no amount of shiny stainless steel will ever quite compete.
http://beerandbrewing.com/VkUjXSQAAPcLaONM/article/better-bottling
Sunday, January 3, 2016


Friday, January 1, 2016

Subscribe to:
Posts (Atom)