Sunday, August 30, 2015

How Malt Extract is Made


Malt extract is quite a powerful homebrewing ingredient, especially for beginners, as it takes out some of the variables like hitting mash temperatures and volumes. While more seasoned homebrewers can use it to supplement sugars in a “big” brew or help reach a target gravity if you fell short.
Malt extract most commonly comes in liquid or dry form. Liquid malt extract (LME) is a molasses-like consistency, while dry malt extract (DME) is more of a fine powder. Extracts come in different types depending on the grains used in production. Extra-pale, pale, amber, pilsner, wheat and Maris Otter are just a few of the options available to homebrewers. Liquid malt extract can also come as pre-hopped, though much less common in the homebrewing community.
Believe it or not, the malt extract making process is much like the beginning of an all-grain brew day.
Liquid Malt Extract Production


First, a large mash tun is filled with strike water and heated to the appropriate temperature. The amount of water needed is kept to a minimum, since extracts are low in water content. Once the liquor is heated, the grains are milled and sent to the tun for mash in. The grains undergo a standard mash, typically single step, where enzymatic activity breaks down components of the grain to create fermentable sugars, as any all-grain homebrewer or pro-brewer would do before moving to the boil. For extracts, the goals are usually a low water to grist ratio and quick yet efficient mash rest.
Liquid Malt ExtractOnce the mash is complete, the sugary-sweet wort is sent through a pipe to a filter. The filter helps separate out the spent grain sediment, while sending the sediment-free wort to holding tanks. If a malt extract is hopped, it will often times undergo a boil in one of these tanks to promote isomerization.
From the tanks, the wort is sent to evaporators. This is where the process starts to really differ from your typical homebrew day.
The evaporators rid of 80 percent of the wort’s water content, leaving a syrupy, 20 percent liquid malt extract. Dry malt extract requires one additional step where the evaporated malt extract is sent through a centrifuge to further separate water from the malt. What is left is a powder-like substance.
That’s it! Essentially malt extract is made by mashing and dehydration.

Friday, August 28, 2015

5 Sugar Adjuncts to Include in Your Brew


Homebrewers always start with malt when sourcing fermentables, but it doesn’t have to stop there. Specialty sugars and other sugar sources can create unique characteristics when included in a recipe. Here are a few things to keep in mind before dosing your wort with more sugar:
  1. Most sugars ferment out completely, increasing the alcohol content without adding any body.
  2. Keep specialty sugar additions below 20 percent of the total fermentables, with 5-15 percent being ideal.
  3. Flavorful and pungent sugars can lose a lot of their favor characteristics when added to the boil or before vigorous fermentation. If you want to preserve these qualities, secondary is a good option.
  4. As with any ingredient, taste everything in its raw form to see how it might work in a recipe before using.

1. Honey

Honey has long been on the fermentation scene as the main sugar source in mead and is even mentioned in the famous 18th century BC Hymn of Ninkasi. Varieties vary depending on the nectar source and processing, and honey is ultimately graded into four categories. Homebrewers should stick Grade A and B honeys that are locally produced and have been treated with little to no heat. Be wary of cheap, mass-produced and/or heat treated honeys, as they tend to have low levels of flavor and aroma.
While honey can be added at most points of the beer making process, the flavor and aroma compounds have a boiling point around 180°F, and anything above that results in these characteristics being blown off. Add honey towards the end of the boil or during/after fermentation. Honey will ferment out completely, so if you want that raw honey character to shine, consider backsweetening techniques used in mead and cider making.

2. Jaggery

Made from the sap of palm trees, jaggery is a popular sugar in Asia and Africa that can be found in ethnic and specialty markets. It typically is gold to brown in color because it has not undergone the process to remove the molasses and crystals, with the lighter color typically indicating a higher quality sugar with fewer impurities.
Jaggery was commonly used by English brewers starting in the early 18th century during periods when malt was expensive and/or hard to obtain. It can add subtle yet complex notes of fruit and nuts, along with a silky texture. Typically added during the boil, it can add crisp, smooth drinkability to homebrew. Try out this jaggery pale ale recipe!
Homebrewing Sugars

3. Fruits

While some fruits may shine in a beer, others may ferment out into something flavorless, or worse, offensive. Browse the recipe archive and Homebrewopedia to find successful recipes that include fruits.
Whether frozen or raw, select high-quality, ripe fruit to include in a recipe. It is also important to recognize that along with a fruit’s sugar comes quite a bit of water content. This means when added to beer, the alcohol content will likely go up very little if at all as the water increases the volume. Using fruit concentrates free of preservatives can help prevent the water dilution.
Fruit is often added to the boil or in the primary fermenter—both instances will likely result in much of the flavor and aroma being lost. Adding the fruit to secondary and racking the fermented wort on top is a good choice to retain fruit character, but watch out for revigorated fermentation.

4. Molasses

Molasses is a byproduct of the sugar refining process and has been the source of fermentables in beer for quite some time. Just take a look at George Washington’s infamous “small beer” recipe, which uses molasses in place of malt altogether.
It comes in colors ranging from light to dark, depending on when the molasses was collected during production. All molasses tends to have strong flavor and aroma, but generally the darker the molasses the bolder the characteristics. Avoid molasses that has been sulfured, and always do a taste test before using it in a beer. If there are prominent metallic notes, continue the search.
Molasses is usually added during boil, but be sure to not to let it scorch. Start with small quantities as not to overpower other flavor components of the beer. Generally, lighter molasses will add subtle complexity, while the darker types are much richer and full flavored. Avoid dark molasses in lighter beers as it can overpower the beer’s overall flavor profile and add a lot of dark color.

5. Maple Syrup

Holes are drilled in maple trees to allow sap to escape, which is boiled down to make maple syrup. It can take anywhere from 25-35 gallons of sap to make one gallon of syrup, earning it the name “Yankee Gold” because of its high price tag. Quality maple syrup comes in two grades, and brewers should be on the lookout for B grade syrup, which is typically darker and more flavorful. Avoid all cheap maple syrups.
Brewers typically add syrup after primary fermentation to avoid blowing off the delicate woody and nutty aromas. Adding to secondary is recommended. If you are after prominent maple character but don’t want to purchase a lot of Yankee Gold, fenugreek can be used to mimic maple syrup with great results.

Wednesday, August 26, 2015

Fruit Beer Tips from Dry Dock Brewing


Dry Dock Brewing Co. of Aurora, Colo. brews Apricot Blonde, which is one of the Centennial State’s favorite fruit beers. The golden-blonde ale is fermented with “shiploads” of apricot puree for a well balanced, crisp beer.
First brewed in 2006 on Dry Dock’s original 7 barrel brewhouse, Apricot Blonde has gone on to earn awards worldwide, including a recent bronze medal for fruit beer in the 2014 Great American Beer Festival.
We spoke with Dry Dock founder Kevin Delange to find out what advice he has for homebrewers pursuing fruit beers:
1. Don’t Fear the Can
While many brewers opt for fresh fruit, it’s easiest to use aseptic fruit from a can or package. This way you don’t have to worry about wild yeast that is present on fresh fruit. High quality beer with great fruit character is absolutely achievable with frozen or canned fruit options.
2. Mind the Krausen
Fruit is rich with sugars, and if added to the fermenter before primary fermentation you can have substantial krausen (the foam that appears on the surface of fermenting beer) formation and temperature swings. If you add the fruit a few days after fermentation has begun, it is easier to control the krausen and manage fermentation.
3. Pasteurize Fresh Fruit
If using fresh fruit, I found that it works well to add the fruit right after the boil so that the high temperature is able to pasteurize the fruit, but it’s not so hot that you set up the pectins. This reduces the risk of potential wild yeast contamination when brewing with fresh fruits.
4. Embrace the Haze
Don’t fear a foggy fruit beer. Instead, embrace the haze. Although crystal clear fruit beers (especially if the fruit color comes through), or any beer for that matter, it’s sometimes just easier to accept a hazier appearance in exchange for a great tasting brew.

Monday, August 24, 2015

How to Brew Russian Kvass

kvass-featured

The beauty of folk beer styles is the degree of variation they can take from one brewer to the next. Recipes are dictated by what grows locally and what is in season, making for a beer that reflects the true local flavor.

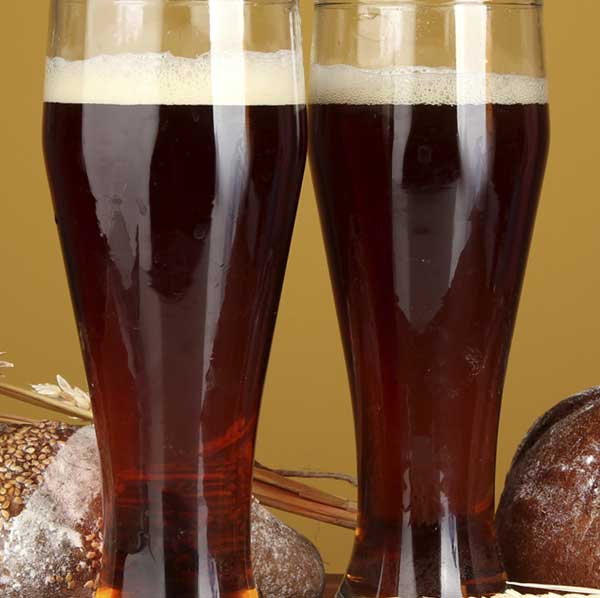
Kvass, an ancient Russian beer, is one of those styles that can take many forms depending on where and at what time of year it is brewed, but at its core it’s always a low alcohol (<2% ABV) bread-y beer with a slight sour tartness.

A Drink for the Masses

Kvass, like many of the oldest-known beer styles, was likely discovered by accident. Some lucky person drank the water-bread mixture that had been sitting out for a few days and decided what it had turned into was something worth making again.

In its earliest form, loaves of old bread and/or flour were simply soaked in hot water. Wild yeast was relied upon to spontaneously ferment the concoction, which gave it the signature reserved tartness. In some instances, some of the small batch breweries would add whatever ingredients were available locally, but it wasn’t uncommon to go without.

After a few days, the bread-y mixture ferments up to 2% ABV and the entire contents—solids and all—would be consumed. This made for a great source of nutrition, while also turning undrinkable water into something potable.

As the allure of kvass shifted from a thing of utility to a lively beverage to be imbibed, the process was refined. Wild fermentation was ditched for something cultured. The commercial kvass breweries would sometimes use brewer’s yeast, but the small batch and home breweries would typically use a baker’s yeast culture. Then, local ingredients were added to add interesting flavors.

Fruits like strawberries and dried grapes added more intriguing sweetness to the flavor, while also balancing some of the Lactobacillus sourness. Lemon is a more recent addition that has become popular to add a citrus compliment to the Lacto, and even herbs and spices like peppermint have been used.

Eventually, kvass reached a point of popularity in Russia and its neighboring countries that spanned from common peasant to royalty. Street vendors pushed carts equipped with a large cask-like tanks to peddle kvass to passerbys. Some even say kvass is one of Russia’s most treasured culinary tradition, second only to sauerkraut.

Today, commercial breweries continue to brew kvass in Russia and homebrewers carry on with the tradition of putting their own twist on an ancient style by using unusual ingredients and pushing the strength up towards 5% ABV. The popularity of kvass even led to a non-alcoholic version that essentially captures some of the flavor qualities in a soda-like beverage.

Making Kvass

One of the oldest known kvass recipe is quite simple, and is still easily made today with varying results. A loaf of rye bread, typically something about to go bad, is placed in a vat and boiling-hot water poured over it. The bread soaks in the water for 24 hours, after which sugar and a yeast starter of baker’s yeast and flour are added. As soon as fermentation begins, it is bottled to add a bit of carbonation and is consumed fresh 2-3 days after.

A lot of kvass brewers would forgo the bread and use flour as the base, but a rye loaf can add lots of interesting crusty bread and other sour qualities that flour might not achieve.

One of the other key components of kvass flavor is the Lactobacillus sourness. It is not lip puckering, but adds a refreshing hint of tartness that really compliments the flavors of a rye bread. While you can still rely on a 100% wild fermentation, some brewers will try to cultivate their own wild yeast or use a combination of ale yeast and a Lactobacillusculture. Others have simply forgone the bugs, sticking with ale yeast and relying on ingredients like lemon juice to achieve a sour component.

From there, you can add other ingredients you think might compliment the profile. In addition to what was mentioned above, grains, hops, different yeast styles, herbs, spices, fruits vegetables and just about everything else could make its way into the recipe. If you want to hold true to kvass traditions, utilize ingredients that are grown locally and are in season at the time of brewing.

Being a low gravity beer, kvass finishes fermentation fairly quickly and has always been intended to be enjoyed fresh. There’s no need to let this one sit. Carbonation levels vary and traditionally was achieved through bottle conditioning.

Check out this kvass recipe, which uses modern techniques to create a brew that honors the Russian drink. It even includes a recipe for making your own rye bread!
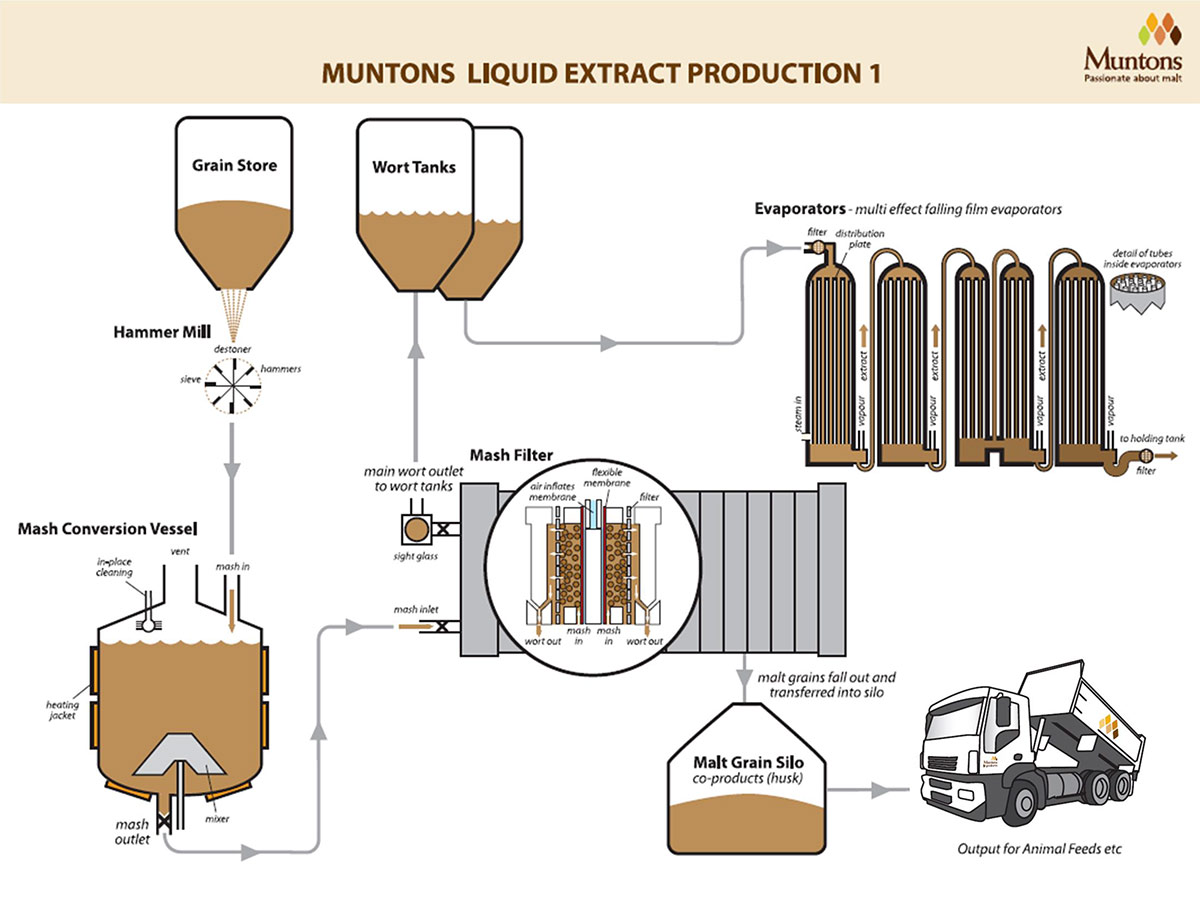
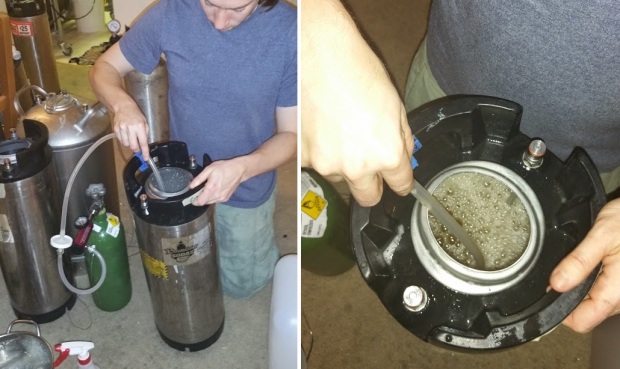
Thursday, August 20, 2015

CaraMunich isn't Caramelized Munich, and 9 Other Homebrewing Myths Debunked


CaraMunich and Munich malts, close up.
Homebrewing has a host of hotly debated topics when it comes to how to brew: hot-side aeration, dry yeast rehydration, aluminum pots, the need to rack to secondary etc.  What I want to highlight is 10 things I’ve heard repeated over-and-over again, that annoy me because they either aren't true or don't match my experience. While the internet deserves credit as a great resource to homebrewers, it has also lead to ideas and “facts” being repeated by people who assume they are true "because someone on a message board said so."

1. CaraMunich is made by caramelizing Munich malt.
I've heard a couple people say that CaraVienna or CaraMunich are very different from standard caramel/crystal malts (e.g., Crystal 60) because they are made from Vienna and Munich malt, rather than pale malt. In fact, all of these malts start as green malt (barley that has been soaked and sprouted, but not yet dried). The Weyermann FAQ says: "Caramel malts are produced from green malt (directly after germination) in special designed roasting drums." CaraVienna® and CaraMunich® are simply the copyrighted names for Weyermann’s medium-light and medium-dark caramelized malts. I like them, but find them to be mostly similar to other caramel/crystal malts, although there are certainly subtle flavor differences maltster-to-maltster.

My current stash of Citra hops.2. Citra tastes pretty much the same as every other “C” hop.
Citra hops contain higher concentrations of two essential oils (geraniol and linalool) than hops like Cascade, Centennial, and Chinook. Yeast activity converts geraniol into citronellol, which along with linalool is a key component of the characteristic flavor that Citra imparts. Leaving the chemistry behind, Citra produces a different aromatic quality with more tropical/melon notes compared to the classic orange/grapefruit flavor of most Pacific Northwest varieties. Stan Hieronymus talks a great deal about hop chemistry  and the creation of new varieties by breeders in his new book For the Love of Hops, interesting stuff.

3. Entering homebrew contests is the best way for new brewers to get feedback on their beers.
Homebrew judges’ primary role is to pick the best beers, feedback is secondary. Judges have to work relatively quickly, describing what they see, taste, feel, and smell within only a few minutes. Beers are often too cold, drank out of small plastic cups, and consumed in a setting not conducive to enjoyment. If flaws are detected it is nearly impossible to give constructive feedback, because the judge doen’t know anything about your recipe or process. If you want constructive feedback, share your beer with a BJCP judge or experienced brewer at a homebrew club meeting. That way you can talk about your process and what you might want to tweak.

On the other hand, competitions are a great place to get blind feedback on what you think are excellent beers. Tasting multiple beers of the same style next to each other allows judges to really tease out the subtle differences in a way impossible at a homebrew club meeting where you might sample 15 beers of 15 different styles.

4. Craft brewers do (insert technique) or use (insert equipment) so homebrewers should aspire to as well.
Many choices are made for commercial production that aren’t worth the effort for homebrewers. The huge volumes and immense pressures of commercial fermentors necessitate different techniques. For example the heat generated by the huge amount of spent yeast in the cone of a cylindro-conical fermentor can cause autolysis in a couple days. The thin layer of yeast at the bottom of a carboy or bucket allows the yeast to live longer, delaying the contribution of off-flavors by weeks or even months, depending on the strain/temperature. Higher pressure also suppresses ester production, so a craft brewer will often get a cleaner fermentation at a higher temperature than a homebrewer. The same goes for equipment, just because breweries use sparge arms, conical fermentors, steam boilers etc. doesn't mean these are the ideal choice for a smaller scale brewer (even if cost weren't a constraint).

5. I can’t taste a difference from (insert process), so no one should bother with it.
The sensitivity of the human tongue and nose to different compounds can be wildly variable. Studies have found that large numbers of people can’t sense diacetyl, for example. Just because you can’t taste the difference between two ingredients or processes doesn’t mean that no one can. What is valuable is learning for yourself what compounds you are or aren’t sensitive to. That way you’ll know what is worth the effort and what isn’t, and what you’ll need to work on even though it doesn’t bother you. Want to know if decoctions are worth it? Brew the same recipe with and without one and see which you prefer. I know many people don't think decoctions are worthwhile, but Jason Oliver (Devil's Backbone - 8 medals at the 2012 GABF) gave Nathan and I this quote for the Jan-Feb BYO article we wrote about dark lagers "Also, if you tell me that specialty malts can create the same flavors [as a decoction], please give me the formula." With that said, I'm sure there are cases where brewers are wasting time/money on things that almost no one can taste, that's where a large double-blind study would come in handy.

6. Kegging is a huge timesaver over bottling.
I really enjoy kegging. I think it's especially valuable for beers I want to serve quickly, and the ability to flush with CO2 keeps my hoppy beers fresher longer. The ability to control and adjust the carbonation as you drink. However, one advantage kegging doesn’t have is saving much time compared to bottling. While it allows you to spread out the tasks over several days, the total time spent is similar. Sure kegging feels fast when you sanitize a keg, rack a beer into it, snap the lid on, and hook it up to the tank, but you had to clean that keg after it kicked, disassemble the tap/lines for cleaning and sanitation, run to the store to fill your tank with CO2, clean your kegerator etc. I’m not saying it isn’t worthwhile, I’m just saying time savings isn’t one of the primary advantages.
HopRocket as hop-back in action.
7. How hop-backs work.
I've read a huge number of posts by people looking to use a hop-back in ways that negates its benefits. For example, pumping wort through the hop-back and returning it to the kettle, or using it on the wort after chilling. I'm not suggesting that these are completely ineffective ways to add hop character, but they will not accomplish the same thing as a hop-back where the hot wort passes through the hops on its way to the in-line chiller, and then the fermentor (as I did with my third batch of Fortunate Islands). The correct configuration allows the heat to extract essential oils from the hops, and the chiller drops the temperature before they are destroyed or driven off.

8. Brettanomyces makes beers sour.
Too many people think that because a beer is fermented with Brett, it will be sour. Brettanomyces (a yeast) produces hugely aromatic esters and phenols, but very little acidity. In a sour beer it is bacteria like Lactobacillus and Pediococcus that are responsible for producing the lactic acid. When exposed to oxygen, Brettanomyces can produce a small amount of acetic acid, but in a vinegary beer it is usually Acetobacter doing the heavy lifting. As a result, 100% Brett beers are usually no more sour than a beer fermented with brewer's yeast. I suspect much of the issue is beer nerds who don't brew, writing negative reviews of 100% Brett beers for being too clean, but I've heard similar complaint from some homebrewers who have entered their 100% Brett beers in BJCP competitions!

9. Sugar should be included in recipes as a percentage by weight of the grain bill.
The percentage of sugar (table, candi, brown, maple etc.) added to a recipe by weight is a relatively meaningless indication of its contribution. For example, let’s think about a Belgian tripel with 20% beet/table sugar by weight. Is that a good amount? If I get 85% efficiency from my mash of Pilsner malt, the sugar works out to 26.5% of the fermentables. If the mash ended up with only 60% efficiency on the other hand, we’d be getting 33.6% of our fermentables from the sugar. Dealing with sugar as a percentage of the fermentables, rather than weight, is the best way to think about the amount you should be adding.

10. Boiling wort for a long time caramelizes it.
The temperature (~213 F at sea level) experienced by the wort during a standard boil isn’t hot enough to significantly caramelize the sugars; of the common sugars, fructose has the coolest caramelization temperature at 230 F. On the other hand, the temperature of the boil is hot enough for Maillard reactions, which result from the reaction of sugars and amino acids and produce similar results to caramelization (darker color and complex flavors). Still, the flavor contribution from adding 30 minutes to a boil are generally rather slight. German hefe-weizens are often boiled close to two hours, lambic/gueuze closer to four, and neither is thought of as especially richly malty. Boiling the first runnings to syrup, or aconcentrated boil accelerate the Maillard reactions considerably. As I suggested above, try it for yourself to see if it is worth the extra fuel/time.

Those are the 10 myths that came to me during the last week of thinking about this post. Happy to hear any additions that anyone else has in the comments!

http://www.themadfermentationist.com/2013/02/caramunich-isnt-caramelize-munich-and-9.html

Tuesday, August 18, 2015

Hops-Boss Automated Pellet Hops Feeder


The Hops-Boss is an automatic pellet hops feeder that interfaces wirelessly to the Brew Boss controller and allows you to dispense up to seven (7) different hops additions at the times you specify during the brew session. It can also be used to dispense other finings such as Irish Moss, etc.

You simply set your times and the Hops-Boss will do the rest.

An optional Heat Shield is also available for those that are still brewing with gas :(

The Hops-Boss is constructed from 304 Stainless Steel with specially machined plastic Hops-Cups (we call them Mortar Shells) and simply sits on the edge of nearly any kettle.

The Hops-Boss is supplied with a power supply.

Get yours today at Brew Boss.  http://www.brew-boss.com/product-p/hb-slave.htm

WORT AERATION – SHAKEN VS. PURE OXYGEN | EXBEERIMENT RESULTS!

Years ago, during one of my frequent moments of homebrew soul searching (i.e., coming up with excuses to buy shiny new gear), I got it in my head that the key missing ingredient in my process was oxygen (O2). Like many homebrewers, I’d been employiong the shake method since I first started homebrewing, a rudimentary process that involves shaking the living hell out of a fermentor full of chilled wort. A couple minutes of this and voila, it’s oxygenated.

As I progressed in the hobby, the shake method began to seem like a less viable option. First of all, it’s difficult to know just how much shaking is required to add the proper amount of oxygen to the wort. Then I had the realization this method relies on dissolving air from the immediate environment into a liquid I would later be ingesting… dirty, contaminated air.
This is when I decided go with pure O2 and was convinced I’d found the missing piece of the puzzle. I bought myself a lovely set-up and have used it for every batch since. I’ve been so committed to the idea pure O2 is an essential component to good beer that I’ve delayed brewing due to an empty tank. And you know what? It was worth it, my beers got better! The forum posts were right, pure O2 really did make a difference. I basked in the glory of my shiny new rig, confident I’d made a worthy investment.
Or at least that’s what I thought at the time.
Years later, I developed a nagging feeling inside, a deep inner questioning about my process– is pure O2 really necessary? Is it really the huge factor I thought it was years ago? Only one way to find out!

| PURPOSE |

To evaluate the differences between shake aeration and the use of pure oxygen on a split-batch of the same beer.

| METHOD |

For this xBmt, I decided to go with a light but aromatic Cream Ale recipe originally intended to be a light, easy drinker with strong hop aromatics. I’d brewed it a few months earlier using all Cascade hops and the result was a surprisingly delicious success. Keg depleted and interested in playing with other hop varieties, I swapped the Cascade for the ever popular Amarillo in this batch. The name pays homage to my organoleptic experience with this beer.

Cat Piss and Cream Recipe

Batch SizeBoil TimeIBUSRMOGFGABV
9 gal60 min7.8 9.71.053 SG1.012 SG5.37%

Fermentables

NameAmount%
Maris Otter14 lbs76%
Instant Rice1.5 lbs8%
Flaked Maize1 lbs5%
Munich (10L)1 lbs5%
Acid Malt12 oz4%
Carapils6 oz2%

Hops

NameAmtTimeUseFormAlpha %
Amarillo2 oz4 minBoilPellet8.5%
Amarillo6 oz40 min steepWhirlpool at 185˚FPellet8.5%

Yeast

NameLabAttenuationFerm Temp
Safale US-05Fermentis77%66°F
This brew day would have been a real struggle due to some leg pain if it weren’t for the assistance of my brew buddy, Maggie, whom I reluctantly agreed to refer to as the Brew Bitch (her request, she’s a wonderful person). Thanks to her doing the heavy lifting, the day went swimmingly. We mashed at 151˚F and recirculated for an hour before transferring the wort to the kettle. After a quick batch sparge, I brought the full volume of wort up to a boil and let it rip for another hour. On a whim, I added the first aroma hop charge at 4 minutes until flameout. Once the boil ended, I was excited to finally test out my new homemade counterflow chiller (CFC).
01_pureo2_chiller
I cut the chiller off at 185˚F and added the remaining hops to the kettle for an extended 40 minute steep. The entire batch was then cooled and split equally between 2 corny kegs that would be used as fermentation vessels.
02_pureo2_filling keg
Maggie graciously volunteered to prepare the shake method batch, putting her CrossFit training to good use as she shook the crap out of the keg for a solid 90 seconds.
03_pureo2_maggie shakes keg
I, on the other hand, chose the much less physically demanding route and prepared the pure O2 batch by dropping in a tube with a .5 micron stone, opening a regulator valve, then waiting 2 minutes.
04_pureo2_oxygenate
With both batches aerated in their respective ways, I pitched the rehydrated yeast and placed the fermentors in my chamber controlled to 66˚F.
One downside to fermenting in kegs is the fact you can’t see the typical signs things are going well, so my solution is to monitor fermentation activity by periodically checking the bubbles coming from the blowoff tubes. I was surprised to find both batches showed signs of fermentation at an identical time, progressed similarly, then finished at nearly the same FG simultaneously.
05_pureo2_shake-O2
I have to admit, I was hesitant to continue this xBmt because of the strong cat piss aroma I got from these samples. But in the name of science, I forged ahead! Both beers were force carbonated and shared a similar appearance by the time they were presented to tasters.
08_pureo2_beer

| RESULTS |

Data for this xBmt was collected at a Pacific Gravity Homebrew Club monthly meeting where 21 members were kind enough to volunteer their tasting devices to the cause. All participants were provided 3 samples, 2 from the shake aeration batch and 1 from the pure O2 batch, then asked to select the odd-beer-out. Establishing a statistically significant result at this sample size would require 12 tasters (p<0.05) to accurately select the different beer in the triangle test; only 9 tasters (p=0.36) were capable of doing so, suggesting the beer aerated via shaking was largely indistinguishable from the one dosed with pure O2. Some may find it interesting to note that one of the similar samples was endorsed with an equal frequency as the different sample, while only 3 tasters selected the other similar sample.
06_pureo2_tasters
Immediately following the triangle test, participants were asked to select how confident they were in their selection, the results of which left me somewhat confounded.
Level of ConfidenceCorrectIncorrect
Not very confident10
Somewhat confident63
Very confident16
Absolutely confident13
Taken at face value, this data appears to indicate an inverse relationship between level of confidence and likelihood of being wrong– killed by confidence! Go figure. I originally lobbied the team to add this question because I thought perhaps some “super” tasters might be able to discern subtle differences in triangle tests that the average person could not. I hoped I might discover these superior palates using this question as they would be more certain about their selection, but unfortunately multiple xBmts have failed to support this notion, hence our decision to drop it from the survey.
My Impressions: My experience testing these beers mimics the data above in that I couldn’t reliably tell a difference. I tried triangle testing myself multiple times and repeatedly failed. The fact of the matter is I was keenly aware of my own bias and fully expected to fail. I originally hypothesized the pure O2 batch would be the first to take off fermenting and do so with greater vigor. When this clearly didn’t occur, I couldn’t help but speculate that both batches likely had “enough” oxygen and therefore wouldn’t be noticeably different. A small part of me still thought perhaps some contaminated air particles might create differences in the shake batch, but for the most part, I was expecting them to be about the same, and I was right.

| DISCUSSION |

This xBmt did not yield statistically significant results, something I believe may be due to the lower O2 requirements of the moderate OG base beer. Would the outcome have been different if the wort was of a higher OG? Given the results of Ray’s recent shaken vs. no oxygen xBmt, I’m keen on testing the differences between the same high OG wort hit with pure O2 vs. no aeration at all. Consider it added to the top of the xBmt list!
As for me, I will continue to use pure O2, not only because I like knowing the yeast are well taken care of, but it also alleviates my hypochondriacal fears of some evil contaminant making it into my beer and spoiling a batch. Plus, I already have the fancy gear and it’s easy enough to use, no reason it should collect dust!
On a final note, please be cautious when interpreting these results as they are merely a single data point from a single xBmt. In no way am I claiming the use of O2 isn’t important, but rather that a group of participants were unable to reliably distinguish between samples of a particular beer in a particular setting. Cheers!

Sunday, August 16, 2015

Whiskey Barrel Jockey Box


IOne of the challenges that homebrewers often face is portability; bottles are tedious and kegerators are even less mobile. The solution has always been to retrofit coolers with draft hardware, but why not think outside the box? After all, so much effort goes into perfecting the brewing process, so why not take the same approach to presenting our work?
Before the development of modern kegging and draft systems, draught beer was served from wooden barrels until being replaced by metal casks and kegs. As a believer in brewing being not only craft but also art, I wanted to allude to what serving beer used to be; to get back to basics.

Building a Draft Barrel

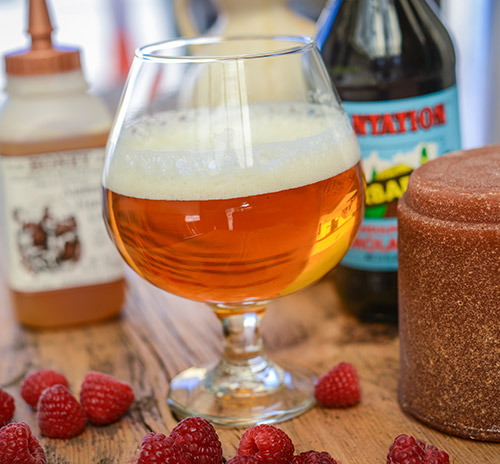
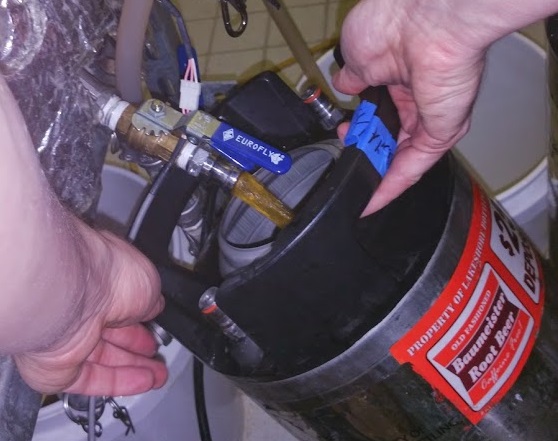
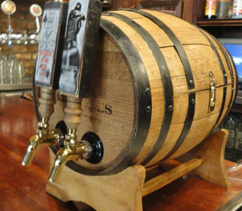
The process of building a draft barrel was a bit more difficult than converting a cooler, however the hardware and tools required were essentially the same.
Supplies
Wood stain (optional) paint for the barrel rings (optional) 1/2” stainless wood screws spray on sealer wood saw and some type of wood-to-metal adhesive
I had originally intended to use stainless steel bulkheads for the beer lines coming in, however the overnight shipping I purchased resulted in the hardware arriving many days later than the first event I chose to use my draft barrel.
Given the design of an ice immersion-type heat exchanger, a door was required to add ice along with a drain for excess water. The drain was easy to install, however cutting out the door has instilled in me a deep respect for Coopers and their craft.
The design of a barrel is a simple yet effective design, but its effectiveness is dependent upon all staves being intact. Luckily I had already numbered the staves before cutting so when the barrel collapsed like a Jenga game I knew where each piece went. It was clear that the barrel rings would not hold in place with the modifications, a problem easily alleviated with 1/2” stainless steel wood screws. Spray on sealer was used on the interior to ensure the device is waterproof.
The next step was to decide if it would use a plate chiller or stainless tubing for heat exchange. Given the shape of the barrel and the availability of plate chillers, I chose to use tubing. Using some rough math, the thermal conductivity of 304SS and the space limitations of the barrel, I concluded that 35 ft. per coil would be sufficient to produce a serving temperature of 45 degrees or less depending on keg temperatures.
In retrospect a larger barrel would’ve been more appropriate if only a little more cumbersome. In coiling the tubing I had to make effective use of every inch inside of the barrel while avoiding the faucet tailpieces and drain. One was made to an 8.5 inch diameter and the other to 10 inches. This allowed for some gaps between coils and also a gap for adding ice.
To complete the look I borrowed a DIY tap design using magnets and removable metal fascias for ease of keg swapping. I also chose to include hinges and a latch for the door if only to allow one to not have to set down ones beverage whilst loading ice.
I have used this draft barrel several times and none of the anticipated issues with serving temperature or durability have arisen. I simply adjust the ice on the kegs to get the serving temperature I am looking for. Being smaller than your average ice cooler, it is incredibly portable yet brings a little extra charm to further the experience given to others.

https://www.homebrewersassociation.org/pimp-my-system/whiskey-barrel-jockey-box/