Saturday, April 30, 2016

Video: Brew Boss Tips and Tricks Brew Boss Software Manual vs Automatic Brew Mode

Brew Boss Tips and Tricks Brew Boss Software Manual vs Automatic Brew Mode


Explanation of how the Automatic and Manual BrewModes operate in the Brew-boss software.

Brew Boss Electric Homebrewing Equipment - Forget the rest and get the Best!  Brew Your Beer, Your Way!!


Thursday, April 28, 2016

Calculating Original Gravity for Beer Recipe Design

www.brew-boss.com Brew Boss Electric Homebrew Equipment #ebiab #homebrew
Hydrometer

by BRAD SMITH

Original Gravity is a key parameter for beer recipe design. The #originalgravity of a #beer is a measure of the potential sugars, about 60-75% of which will be converted into alcohol during fermentation. So original gravity drives both the alcohol content and the residual body of the beer. This week we’ll cover how to estimate OG by hand, though in practice most people use brewing software to do the calculation more easily.

What is Original Gravity?


Original gravity is a measure of the sugars dissolved in the water in your unfermented wort. It is typically measured with a #hydrometer or #refractometer in the fermenter when brewing is complete but before fermentation has started. The gravity measurement is most often done on a unitless scale that measures the relative density of the wort compared to water. So water would have a specific gravity of 1.000, and beers often start in the 1.030-1.060 range.

OG can also be measured in degrees plato. You can do a rough conversion (its not exactly linear) by taking the “points” of a unitless measurement, and dividing by four. For example a reading of 1.048 is 48 “gravity points” which is roughly 48/4 = 12 degrees plato.

Understanding Grain Potential


First I would like to apologize in advance to those using metric units – this is one of the rare cases where working in English units (gallons and pounds) makes the math easy.

To calculate OG for a recipe, you need to know the “potential” contribution that each grain or extract in the recipe will make. This corresponds to the contribution that a pound of grain or extract will add if dissolved in a gallon of water. The maximum potential is approximately 1.046 which would be a pound of pure sugar in a gallon of water.

Liquid extracts typically have a potential of around 1.036, dry extracts run around 1.044, and pure sugar runs close to 1.046. Grains vary tremendously – from a low of 1.025 up to highs in the 1.040 range. Even Pale malt (which is often around 1.036-1.038) varies depending on the maltster.

You can find good values for the “potential” of various grains from the maltster’s web site or using software like BeerSmith which has hundreds of grains available (including dozens of add-ons).

Estimating Original Gravity Points


Once we have the grain bill and potentials for each extract or grain in the recipe, the next step is to calculate the “points” for each grain contribution and total them up. This is done simply by multiplying the potential points for each grain by the weight of the grain.

Recall that points are simply the fractional part of the potential – so an extract with a potential of 1.046 is simply 46 points. So for a simple stout with 8 lbs of pale malt (1.036 potential) and 1 lb of roast barley (1.025 potential) would give us:

36 points * 8 lbs = 288 points
25 points * 1 lb = 25 points
Total = 313 points.

The next step is to apply an “efficiency” factor to our process. The potentials given for the grain are the maximum possible amount you could draw from the grains if you crushed them under laboratory conditions with no losses. Real mashing processes and subsequent sparging, boiling and transferring are not ideal – so a typical brewhouse has an efficiency number far less than 100%. The brewhouse efficiency number includes all of the losses in the system into the fermenter including mashing, lautering, boiling, trub loss and transferring the finished wort to fermenter. A typical brewhouse efficiency number for a home system is 70-75%. In this case we’ll use 72%

313 points * 72% efficiency = 225.4 points

Now we just divide by the “into fermenter” volume which in this case is 5 gallons:

225 points / 5 gallons = 44.8 points/gal

And that is the original gravity estimate if we convert it back to specific gravity – 44.8 points gives us an OG of approximately 1.045

Using Original Gravity


Now that we have our OG estimate, we can measure our OG when we brew the beer and see how well we did. Assuming you hit your target volume (which also has a large effect on OG) and your OG comes in low, you can reduce your brewhouse efficiency number next time (which will make you use more grains) to drive it up again. Similarly if your OG comes in high you can raise your efficiency number (making you use less grains) to get back on target.

We can also use the OG to get a rough estimate of the final gravity (FG) for our recipe. The simplest way to do this is to apply the average yeast attenuation to the OG to get the FG. For example a yeast strain with an attenuation of 72% would leave about 28% of the remaining sugars unattenuated, giving us 44.8 * 0.28 = 12.5 pts which is a final gravity of 1.012.

What about Mash Efficiency?


You can also estimate the OG using mash efficiency (which accounts only for losses in the mash) instead of brewhouse efficiency. To do this we start with the estimated pre-boil gravity, which is done the same way as we did above, but using the pre-boil volume instead of the “into fermenter” batch volume. This calculation will give us a good estimate of pre-boil gravity.

Next you would need to account for all of the losses in the system from boiling forward. This would include boiling, which concentrates the wort (losing volume, but not gravity points), trub loss (which takes both gravity points and volume away) and any top up water added (which dilutes the wort). The calculation is a bit more complex, but can be done by tracking the changing volumes as well as gravity points remaining in the wort.

That is quick overview of calculating original gravity. As I mentioned earlier, most people use software like my BeerSmith application to make this a bit easier, but its good to know how to calculate by hand.

http://beersmith.com/blog/2015/01/30/calculating-original-gravity-for-beer-recipe-design/

Wednesday, April 27, 2016

FILL-BOSS COUNTER PRESSURE BOTTLE AND GROWLER FILLER


http://www.brew-boss.com/Fill-Boss-Counter-Pressure-Bottle-Filler-p/fill-boss.htm


#FILL-BOSS COUNTER PRESSURE BOTTLE AND GROWLER FILLER


Thanks for the overwhelming support of this product!!!

Fill-Boss is the first "Automated" counter pressure bottle filler that is affordable enough to be purchased by home brewers but strong and fast enough to be used by nano and micro brewery operations as well. It is built like a tank from laser cut and formed 12 ga 304 stainless steel. Fill-Boss is microprocessor controlled, so it fills bottles and growlers to exactly the right level every time, just by pressing one button! The simple design can be used for nano and microbrewery operations as well as brew-pubs that want to add inexpensive bottling and growler filling to their operations.

The innovative spring loaded adjustment system can adjust to most bottle sizes, including 1.5l wine bottles and growlers!


  • Spill free automated counter pressure filling.
  • Bottle non-carbonated or fully carbonated beverages from 5 Gallon Cornelius Kegs (Cornelius Keg, CO2 tank, and regulator required but not included)
  • Adjustable fill speed bleed valve.
  • Includes Ball Lock connectors and tubing for Ball-Lock Cornelius kegs.
  • Contact us for special connections for Sanke Kegs and Brite Tanks. We will find a way to connect to your vessel!

We've received calls from a prospective customers asking "what is wrong with these units?" Why are they 1/3 the cost of other automatic fillers? The reason Fill-Boss is less costly than other options is that it was designed from the ground up to be an affordable and reliable filler. We use the Fill-Boss in our brew-on-premise operation daily and it has never hiccuped! One Fill-Boss commercial customer reports a 3-1/2 day payback when he switched to Fill-Boss! Yes, it is for real!

We have designed a conversion kit for the Fill-Boss that will allow filling of the new Synek system bags! Stay tuned for this kit on the web site as well. We are working with Synek to make this available on their web site as well


Tuesday, April 26, 2016

#Astringency from Grains – #Oversparging and Hot Sparging Your Beer

Brew Boss Electric Homebrew Equipment www.brew-boss.com #homebrew #brewboss


by BRAD SMITH

#Astringency, which is a dry, vinegar like off-flavor in your beer, can be caused by #oversparging or sparging your grains too hot while brewing. Take a look at astringency, oversparging and sparging your grains too hot.

Astringency

Astringency in the finished beer is usually the result of excess tannins extracted from the grains during the sparge process. Tannins are a phenolic category of polyphenols that naturally occur in grain husks. During the mash and sparge you can extract excessive tannins which will affect the flavor of your beer.

Grain Crush and Mash pH


One potential cause of astringency is crushing your grains too fine. In particular if you crush the husks to a fine powder it can result in excessive tannin extraction. Usually this is the result of using a “flour mill” or corona type mill or simply setting the mill gap to be too narrow. A proper crush will finely crush the grain core but leave large pieces of the husk intact. That’s why I recommend using a dual roller mill. A dual roller mill will crush the grains but still leave large pieces of husk intact.

Another risk factor is simply mashing with the pH too high. Your mash pH should be in the 5.2-5.5 range after mixing in the grains. If the mash pH is too high, more tannins will be extracted into your beer. In particular, pH levels above 6.0 during the sparge are associated with tannin extraction. You can use a variety of methods to measure and adjust your mash pH to keep it in the desired range. This is primarily a problem in lighter colored beers as dark grains are acidic and tend to drive the mash pH down.

Oversparging and Astringency


Water tends to drive the pH of the mash higher, and grains (particularly dark grains) will lower the mash pH. So if we look at the case where we’re mashing in the proper pH range, it is pretty easy to see that as we run more water through the grain bed during the sparge, the pH of the runnings will go up over time. Similarly as we extract more sugars from the mash the gravity of the runnings will go down.

So as the pH of the mash runnings go up and gravity of the runnings go down we again run the risk of extracting tannins near the end of the sparge. In particular pH levels above 6.0 and running gravity readings below roughly 20% of the target gravity are associated with tannin extraction. The most common method to avoid oversparging is to monitor the gravity of the runnings and stop sparging when the gravity falls below 1.008 for an average strength beer. Obviously that number would be higher or lower if brewing a very high gravity or low gravity beer. Some brewers with a pH meter also have the option of monitoring the pH of the runnings and stopping when the pH rises above 6.0.

Hot Sparging and Astringency


Sparging at excessively high temperatures can also result in astringency in the finished beer. Sparging at a moderately temperature has some benefits as it improves the flow of wort through the grain bed. However sparging too hot will result in tannin extraction in the finished beer.

The maximum temperature for sparging is 170 F (77 C). Sparging above that can result in tannin extraction. Some people do use higher temperature sparge additions, but only to raise the temperature of the mash as a whole during the initial phase of the sparge. In no case do you want to raise the grain bed or runnings above 170 F (77 C).

http://beersmith.com/blog/2015/10/25/astringency-from-grains-oversparging-and-hot-sparging-your-beer/


Sunday, April 24, 2016

Malt Conditioning

www.brew-boss.com Brew Boss Electric All-Grain Brewing Equipment

#MaltConditioning

by Chris Colby
IMG_2584
Steaming malt for 30 seconds is an easy way to condition your malt in your home brewery.
When a homebrewer crushes his or her malt, he or she must consider two opposing factors when determining how finely to crush. The more finely he crushes, the more the malt endospermwill be broken into small pieces and the better his extract efficiency will be. On the other hand, if the husks are broken into pieces that are too small, lautering may become more difficult and the possibility of extracting too many tannins rises. So, when setting the mill gap, the brewer chooses a compromise setting that gives an acceptable level of extract efficiency without interfering with the ability to lauter.
For homebrewers willing to put in a little more effort, there is a way to crush the endosperm more finely, but not break the husks into too many pieces — malt conditioning. In malt conditioning, the husks are moistened just enough to make them slightly leathery and hold together a bit better when they pass through the rollers of a grain mill.
Malt conditioning is fairly common in commercial breweries, but it is easy to adapt to a home brewery. If you have the right equipment, the simplest way to condition malt is to steam it. If you have a heatable mash tun with a false bottom, add enough water to fill about half the space under the false bottom and bring it to a hard boil. Place your (uncrushed) grains in a large nylon steeping sack and place the sack in your mash tun. Put the lid loosely on the mash tun, leaving a small gap to let steam escape. After only 30 seconds, pull the bag out and pour them into an empty container, like a brewing bucket. Stir them with your hand and let them sit for about 2 minutes (or long enough so any liquid on the surface of any of the grains gets absorbed). While the husks are still faintly “leathery,” proceed with milling. Don’t let the malt sit for an extended amount of time after steaming it — do this immediately before crushing.
To fully take advantage of the mat conditioning, experiment with adjusting your mill gap to find a new compromise between crushing the endosperm and breaking up the husks.
IMG_2587
Conditioned malt (left) vs. dry milled malt (right). Note the larger husk size on the conditioned side.
This method is simple, presuming you have the equipment, and fast. (The actual steaming part goes by very quickly.) Plus, it is reliable. First of all it uses hot water. Malt takes up hot water (in this case, steam) faster than it does cold water and steaming ensures a reasonably even uptake of water. The grains on the very bottom of the bag may get a little wetter than the rest, but that’s not a problem. And, if you want to ensure a more even conditioning, you can process your malt in small batches, so that the “grain bed” getting steamed is only 3 to 4 inches high. Just steam some of the grain, crush it and go steam the next portion and repeat until all the malt is crushed. In addition, it is hard to overdo it with this method.
Of course, dry milling works well for most homebrewers. If you are getting results that you consider acceptable from that, going through the added step of malt conditioning may not be worth your time. However, if you’d like to either increase your extract efficiency or routinely experience lautering problems, give malt conditioning a try.

Friday, April 22, 2016

Declining Extract Efficiency at Higher Original Gravities

Brew Boss Electric Homebrew Equipment www.brew-boss.com #homebrew #beer
IMG_2935

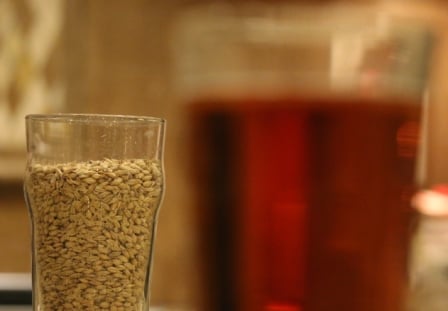
You will frequently hear #homebrewers complain of losing extract #efficiency when #brewing higher gravity beers. The reason for this is not widely understood in homebrewing circles and not incorporated into recipe formulation software. A loss of extract efficiency at higher original gravities is not inevitable. When it occurs, it is the result of the techniques chosen by the brewer.  It is of particular relevance to brew-in-a-bag (BIAB) brewers, but affects any homebrewer who collects and boils the same amount of wort regardless of the size of his or her grain bill.  In this article, I’ll explain the problem and how to fix it. 
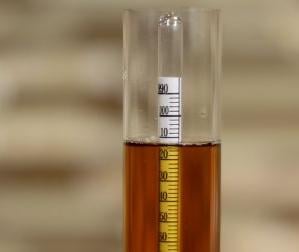
Let’s start by stepping through the relevant portions of wort production when brewing a normal gravity beer (say, around OG 1.048, 12 ° Plato, for an alcohol content of approximately 5% ABV). Let’s say a brewer typically gets around 70% extract efficiency and so mashes around 9 lb. of grain for his 12 °Plato beer. (The exact numbers aren’t important, just the relative differences compared to later examples.) Let’s say he collects about 6 gallons of wort — for a pre-boil volume around 10 °Plato — and boils it down to 5 gallons to hit his target OG.
Now lets take a second example. This time the same brewer is trying to brew a barleywine. He wants the OG to be 22 °Plato, so he mashes 17 lb. of grain. At 70% extract efficiency — which he achieved with the 12 °Plato beer — he should hit this target. He collects 6 gallons of wort, boils it down to 5 gallons and . . . his OG is lower than expected. Why?
The reason his OG is lower is simple — he did not fully sparge the grain bed (as he did with the 12 °Plato beer). In the case of the 12 °Plato beer, his grain bed weighed 9 lb. and he collected 6 gallons of wort from it. In the case of the 22 °Plato beer, his grain bed weighed 17 lb. — nearly twice the weight as before — yet he only collected the same 6 gallons of wort from it. Had he collected an equivalent amount of wort per unit of grain, his efficiency would have been the same (assuming all other variables are equal.) Specifically, if he had collected a little over 11 gallons of wort and boiled it down to 5 gallons, his extract efficiency would not have suffered. In this case, the pre-boil gravity of his wort would have been around 10 °Plato. In the case in which he only collected 6 gallons, it would have been higher. However,  the total amount of sugar the brewer yielded would have been less because he left sugar behind by not fully sparging (rinsing) the grain bed.
Sometimes it is good to look at things from more than one angle, so here’s another way to visualize the problem. If you mash at the same thickness for every brew, but collect the same volume of wort (regardless of the weight of your grains), the volume of strike water goes up for bigger brews, but your volume of sparge water actually decreases. This is because — with larger mashes — you collect more first wort. As such, you need less sparged wort to hit the same kettle volume. But of course, less sparge water means the grain bed is not rinsed as thoroughly.
The solution to this problem is that the volume of your pre-boil wort should scale with the weight of your grain bed. If you have more malt in your mash tun, you’ll need correspondingly more strike water to mash with and also more sparge water to rinse the grain bed. If you collect the same amount of wort per unit of grain every time (and don’t oversparge), your pre-boil wort gravity will be the same for every brew (around 10–11 °Plato). You will then boil it down to the correct volume and gravity. When I brew, I find that my grain bed is fully sparged when I collect around 0.65 gallons per pound (5.8 L/kg) of grain. Your number might be different — depending on your crush and other variables — but that’s a good place to start. When the grain bed is fully sparged, the brewer has rinsed out all of the sugars possible before excess tannin extraction begins.
So, the solution to the problem is conceptually simple, but you can see why many homebrewers don’t scale up their pre-wort boil volume accordingly. In some cases, the limitations of their equipment won’t let them. In others, they wish to avoid the excessively long boil times associated with bigger beers and simply compensate by adding more grain or supplementing their wort with malt extract. Tomorrow, I’ll show you one way to anticipate the degree your extract efficiency will drop so you can compensate for it during recipe formulation.

Thursday, April 21, 2016

Brew-Boss Customer Endorsements/Reviews

www.brew-boss.com Electric Homebrew Equipment #homebrew #brewboss #BIAB


I love my brew boss. I've seen a lot of EBIAB systems but the COFI system and custom software puts brew boss over the top from all its competitors
@SchumacherDavid Twitter


"I'm absolutely sold on this system. I must say as well that the 40 min video on YouTube is the absolute best example of an innovator who is certainly passionate about their product. The brew boss with cofi filter is simple where it should be and technical where it needs to be. Ultimately I want to brew the best beer with the shortest amount of cleanup and amount of gear. This seems to fit the bill perfectly."
Franklin C


"This system has kept my passion for homebrewing. I was sick and tired of all the tanks, water temp mangement, pumping and pouring back and forth, 4+ containers to decontaminate, multiple pumps etc. This system is incredibly well engineered and built. The welding and bonding quality was far above expectations and really makes me feel confident I can use this system for decades. It's so intuitive, I recommend it to people just starting brewing, because they will end up putting their money into coolers, heaters, burners, etc just to end up where they could be with this system with 0 frustration and 6 times the cleaning. It's not just making great beer once, it's making that great beer over and over for years to come and your system does it."

Sincerely,
Richard T.


"I was just sitting here enjoying another of my fine beers when it struck me to email you. This time its not with a question or issue but with a compliment. I've now brewed about 50 sessions on the Brew-Boss and the thing is just great. The repeatability of my process has never been better and I am brewing better beer because of it. I've got my efficiency dialed in at 80% and my last 10 brews i've hit my expected numbers exactly.

If you are ever in the Pittsburgh area you need to look me up because I seriously owe you a beer (or more). Thanks for the great support and a great product. If you ever need anything from me, please don't hesitate to ask"


Justin S.


"I have about 15 or so batches on my Brew Boss with bag system and can't say enough how pleased I am with it. From support by Darin to streamlining my brew-days and most of all the quality of beer from my system. always experimenting and have been trying to brew some big beers with the 15 gal. system. Have tried all 3 recipes that came with the system and all came out great. Hope to hear from all the new Brew Boss owners, you made a great choice!"

"Smacker" - Homebrewtalk


"I have to say the thing I really like about the system is the consistency and quality (of the beer). I dialed the system into Beer Smith, I put the grains etc. into the program and I pretty much do not have to check my gravity or water levels. If I brew 5.5 gallons, it gives me 5.5 gallons in the carboy, with the exact gravity that I want, and half the time that it is brewing I wonder away and do other things and check in on the system or throw in hops. In addition I find with the no sparge in the COFI the quality of my beer has went up, not to mention I can hold a consistent mash temp when it is 15 F outside.

Overall I am very happy with my purchase and I wish I would have bought a Brew Boss sooner than I did."


"mcgimpkins" - Homebrewtalk


"Amazing, easy to brew, easy to clean. FANTASTIC customer service. 20 minutes to heat strike water vs. an hour with a blichmann burner. Only 1 pot to clean instead of 2 and rinsing out the 3rd, an hlt. Running pbw in the EXCHILERATOR vs using a toilet brush on an immersion chiller. Steady no fuss mash temps vs. turning on and off the propane on my RIMS system. Anybody want to buy my 3x 15 gallon, 2 pump, 3 burner RIMS setup?"

"OkashiiBrew" - Homebrewtalk

"Another great brew session tonight the system is amazing! Thank you Brew boss!"

Hugh C - Facebook

"The Brew-Boss worked outside last night at -6. Pretty dang impressive. I have to brew outside due to some constraints. This was the first test without any extra help like insulation on the kettle etc."

Andy B - Facebook

**
Get Your Own Brew Boss Electric Homebrew System Today!


Wednesday, April 20, 2016

Barrel Souring

#sourbeer, #homebrew Brew Boss Electric Homebrewing Equipment www.brew-boss.com

BARREL SOURING

Unlike traditional beer-brewing, which is done in a sterile environment to guard against the intrusion of wild yeast, #sourbeers are made in wooden barrels that allow wild yeast strains or bacteria into the brew. Traditionally, Belgian brewers allowed wild yeast to enter the brew naturally through the barrels – an unpredictable process that many modern brewers avoid. The most common microbes (referred to as “bugs”) used are Lactobacillus, Brettanomyces, and Pediococcus.

It is not recommended to use lactic acid for tartness in your barrel aged beer. Natural tartness can be achieved using Lacto and Pedio correctly. Some homebrewers achieve a tart flavor from fruit additions – most commonly cherries (to produce kriek) or raspberries (to produce framboise) – during the aging process, to cause a secondary fermentation.

Barrels are a great place to experiment with sour beers using fruits like cherries, peaches, plums, apricots, strawberries, blackberries and raspberries. The combination of toasted oak, fruit and sour/tart can create some truly unique homebrews.

Blending

Make a little extra homebrew and be ready to blend your sour beers with a similar beer fermented with standard brewing yeast (saccharomyces cerevisiae). Because of the uncertainty involved in using wild yeast and souring bacteria, the sour beer brewing process is extremely unpredictable. Having a base beer for blending helps you temper some of the extreme characteristics in a beer like sourness, bitterness or alcohol level.

Keep the beer away from O2 as much as you can when you’re blending — keep the oxygen exposure to a minimum. The barrel beer takes months to ferment and can take years to mature. Blending beer is an art form and takes a brewer a lifetime to master.

Separate Equipment

Remember that any piece of equipment that comes in contact with your sour beer should be isolated from any “clean” brewing in the future. Brett, Lacto and Pedio and very resilient and are difficult to completely sanitize off equipment. If you don’t do this you may end up with every beer you make being a sour beer. Isolate plastic transfer hoses, airlocks, bungs, connectors, glass/plastic carboys, transfer gaskets and siphons. Basically any soft rubbers should not be used again for clean brewing in the future.

Saturday, April 16, 2016

Simple Style Guide: Brewing Irish Stout

#homebrew #irishstout www.brew-boss.com Brew Boss Electric Homebrew Equipment


Irish Stout With Clovers
Something about the colder months conjures up imagery of wood fires, roasted meats on the table, and, in my case at least, roasty beer. It can be a nice break from some of the fruity, hoppy, and lighter beers of summer.

An Irish stout fits the bill perfectly. An Irish stout is a dark, robust ale, technically considered a dry stout. (Other types of stout include sweet stout, oatmeal stout, American stout, and Russian Imperial stout.)
We can’t talk about Irish stouts without mentioning Guinness. Since the late 1700s, Guinness has been brewing dark, flavorful ales in Dublin. They now distribute their famous stouts all over the world. Murphy’s is another example of Irish stout. It’s somewhat less bitter than Guinness. Try both, as well as a stout from your local brewery, to get a sense of the flavor characteristics that you enjoy in an Irish stout.

Grain Bill and Fermentables
An Irish stout gets its dark color and dry, bitter flavor from roasted barley. When brewing Irish stout roasted barley is a "must". Roasted barley is not malted. Instead, it is steeped in water and then kilned at a high temperature, giving the grain a very dark brown, nearly black, color. This will affect the color of the beer, and can also give the head on the beer a nice tan color. Roasted barley also imparts the dry, bitter flavor of coffee that stouts are known for. It doesn’t take much – Briess recommends using roasted barley for just 3-7% of the total grain bill.
Replace a portion of the roasted barley with black malt or chocolate malt to reduce to dry bitterness. Try Murphy’s, Guinness, and other Irish Stouts to judge how much bitterness you would like.
These ingredients can be combined with mild ale malt or light malt extract to form the majority of your grain bill. Your original specific gravity shouldn’t exceed 1.050.
One defining characteristic of Irish stouts is their creamy mouthfeel. Sometimes this is achieved through the use of flaked barley (Guinness uses about 25% flaked barley in their Guinness draft). Sometimes these Irish stouts are given an extra creamy mouthfeel by using nitrogen instead of CO2 to “carbonate” the beer. Nitrogen forms smaller bubbles than CO2, so they’re less prickly on the tongue. It can be difficult to accomplish this as a homebrewer, though if you’re set up to serve your beer on draft, it can be done with sanitary nitrogen instead of CO2.

Hops
English hops work best when brewing Irish stout. The majority of hops in Guinness is Kent Goldings, while Murphy’s uses mostly Target. Shoot for 30-45 IBUs. Since hop aroma is low to none, emphasize the early additions.
Shop Home Brew Starter Kit

Yeast
Irish stouts typically have some mild fruity aromas, which come from esters produced by the yeast. Wyeast 1084: Irish Ale is the best option here. Prepare a yeast starter to achieve a complete fermentation and the dry finish you’re looking for.
With these basics, you’ll brewing Irish stout fit for the pub in no time. What tips do you have for brewing a stout?
by David Ackley
- See more at: http://www.eckraus.com/blog/brewing-irish-stout#sthash.zaH91aRI.dpuf

Thursday, April 14, 2016

5 Rookie Mistakes Made By Beginning Homebrewers

#beginnerhomebrewer, #brewboss Brew Boss Electric Homebrew Equipment www.brew-boss.com

Beginning Home Brewers Makeing Beer
Let’s face it: Anyone can mess up a batch of beer. That said, people have been brewing beer for thousands of years and have learned a thing or two about how to do it. As a beginning home brewer, you have a wealth of information at your disposal to help you avoid making some common pitfalls when you’re just starting to learn how to make beer. To help you avoid them, here are five of the most common home brewing mistakes made by beginners:

  1. Lax cleaning and sanitation – Most homebrewers have heard that cleaning and sanitation are among the most important parts of homebrewing, yet it’s hard to know exactly what to do when you’ve never brewed before. Soak in One Step. Wipe down every surface with a damp cloth. Scrub with a non-abrasive brush if needed. Check all the nooks and crannies (especially bottling spigots!). No visible debris should remain. Sanitize using Star San or Iodophor following the manufacturer’s specifications. After the boil, aerate, pitch yeast, and don’t let anything else contact your brew that hasn’t been properly sanitized. Follow these steps and you will be fine.
  2. Adding 5 oz. of priming sugar no matter what – Rant warning: This is sort of a pet peeve of mine. Most homebrew recipe kits come with five ounces of priming sugar and they instruct the brewer to mix it all in on bottling day. It only takes a couple batches of foaming bottles to figure out something isn’t right. Get a digital scale and read this post to learn how to avoid over-carbonating your homebrew.
  3. Brewing without temperature control – The very first batch I brewed was a German Oktoberfest. The salesperson at the shop where I bought the kit said I could just use an ale yeast. Sure, the beer turned out fine, but it was a stretch to call it a true Oktoberfest. Don’t sell yourself short and try to brew a lager as an ale. Even when you are brewing ales, pay attention to fermentation temperature and try to keep it within the recommended range for the yeast strain you’re using. Your beer will be immensely better for it. To control temperatures, use the Brew Boss Electric Brew System. www.brew-boss.com
  4. Shop Liquid Beer Yeast
    Underpitching yeast – Another one of the most common home brewing mistakes is underpitching. A lot of people will tell you that liquid yeast is the way to go because it offers more options and better flavor. This may be true in some cases, but you will almost never want to pitch just one pack of liquid yeast into your homebrew. This is because beer requires a certain number of yeast cells for a healthy fermentation, and a liquid yeast culture rarely contains enough. If you must use liquid yeast, prepare a yeast starter the day before. Alternatively, a 11.5-gram pack of dry yeast contains enough cells to ferment a standard five-gallon batch. Read more about pitching rates at Mr. Malty.
  5. Worrying – There’s a reason Charlie Papazian’s mantra is known by homebrewers the world over: worrying is the exact opposite of what homebrewing is all about! Granted, there are occasions when you should be concerned about what’s happening with your brew, but you can prevent further mistakes by just letting go of worry. If you’re dealing with an infection or some mishap that may force you to throw out your beer, so be it, but nine times out of ten your batch will come out just fine. Read how Bryan Roth learned how to “Relax, Don’t Worry, and Have a Homebrew” in his guest post, Hops, Malt, & Zen.
Surely there are other things that can go wrong, but these are the top five most common home brewing mistakes. What mistakes did you make when you were first starting out?
- See more at: http://www.eckraus.com/blog/most-common-home-brewing-mistakes#sthash.dEPgfnPq.AiEHCvNg.dpuf

Sunday, April 10, 2016

Holy Chit! Who Shot My Malt?!

#homebrew, #malt, #brewboss Brew Boss Electric Homebrew Equipment www.brew-boss.com

Have you ever looked closely at a kernel of malt? I mean really closely? Depending on the variety of barley the malt was sourced from, you might have observed a teeny tiny hole on the side of some of the kernels – as if they were shot by a Leprechaun wielding the world’s smallest gun!
Anyone who has a general understanding of the insect pests that are harmful to stored grains may already think they know where this article is heading. We must obviously be discussing Granary Weevils, the beetles that carry out their life cycle inside stored grains and emerge from the kernels as flightless adults who remain amongst the grain to feed and reproduce, right? Wrong! In this article, we will explore a lesser known, but much more interesting cause of holes in malt. We will also discuss the signs of a true Weevil infestation so that you will be able to understand whether or not your holy malt is a serious problem or not.
So let’s get down to the nitty, gritty, nerdy science of it all. Some barley varieties, such as Copeland and Conrad, are especially desirable for malting due to their strong, resilient husks that provide some protection against kernel breakage during malthouse movements and bulk transportation. As a side effect of that extra husk strength, these same varieties can sometimes be pierced by their own acrospires as they grow in the germination compartment. Much like a stubborn flower that will eventually emerge through the sidewalk that resists its path of growth toward the sun, a growing acrospire will eventually pierce through a stubborn husk that refuses to budge. What results is a small, round hole in the dorsal side of the kernel. Figure 1A below shows this phenomenon in a sample of Copeland barley. Figure 1B shows the same kernel after it has been dried and the acrospire has fallen away. When this type of growth occurs, the flavor and function of the resulting malt kernel is unaffected and the quality is in no way compromised.
Figure 1A: Copeland malt kernels that have been pierced by the growth of their own acrospires during germination.

Figure 1B: Copeland malt kernel from Figure 1A that has been dried and cleaned.
Figure 2: Weevil infestation in malt.
Compare the images shown in Figures 1A and 1B to that of the weevil infestation shown in Figure 2. In this picture, you see that the adult weevil emergence holes are randomly placed and are affecting much of the grain. Even more importantly, the adult weevils can be seen as they remain to feed on the grain.
When holes are observed in malt kernels, suspicions should indeed be raised. However, careful observation will reveal the true culprit. If holes are observed randomly throughout many of the kernels and insects are present, this is a very serious issue and customers are advised to keep the infested malt sealed and separated and to contact their pest control agency and supplier immediately. Yet, if holes are observed in the dorsal side of some of the kernels, but insects are nowhere to be found, you can breathe a sigh of relief. These types of holes are not a sign of weevil infestation, but rather the result of a very determined acrospire overcoming a strong, stubborn husk.

Friday, April 8, 2016

Is the Lupulin Threshold Shift Fact or Fiction?

#homebrew, #brewboss, #hops Brew Boss Electric Homebrew Equipment www.brew-boss.com
Do #beer drinkers build up a resistance to hops? It’s a question that’s surrounded by controversy and uncertainty, with experts from all over giving their input on the matter. In 2005, Vinnie Cilurzo at Russian River Brewing coined the phrase “lupulin threshold shift,” to describe when a once extraordinarily hoppy beer now seems pedestrian.
Hops are wonderful. Believe it or not, there was once a time when beer wasn’t hopped. Instead, medieval brewers used spices, flowers and other herbs to give beer flavor (think gruit). In the 13th century, brewers started using Humulus #lupulus (female hops) to improve flavor and aroma, which soon became commonplace as it improved beer’s head retention and shelf life. Today you’d be hard-pressed to find a beer that was made without hops.
Our ability to taste #bitterness evolved as a way of detecting poison. It’s interesting that we’ve developed an acquired taste for bitter food and drink as it seems rare elsewhere in nature. Is it this contrast that has driven us to crave a good IPA?
Is the Lupulin Threshold Shift Fact or Fiction?
Because of the lupulin threshold shift, it seems as though we’ve built up a tolerance to hoppiness and bitterness. Beers that once impressed you with their flavor, bitterness and hoppy aroma don’t seem as interesting or have the same punch that you’ve come to expect and desire.
Two years after Cilurzo coined the term, it came up during a Q&A session at the First International Brewers Symposium. Following a presentation detailing results of research related to bitterness quality, an attendee explained the concept of lupulin threshold shift to Tom Shellhammer and drew an analogy to spicy food. “When you get used to hot food you have to put in more and more spice to get the same perceived spicy heat; the same analogy applies to beer and bitterness, in my opinion,” he said.

Lupulin Threshold Shift

1. When a once extraordinarily hoppy beer now seems pedestrian.
2. The phenomenon a person has when craving more bitterness in beer.
3. The long-term exposure to extremely hoppy beers; if excessive or prolonged a habitual dependence on hops will occur.
4. When a “Double IPA” just is not enough.
Shellhammer replied: “I use the same analogy to describe temporal and qualitative effects of bitterness. For instance, the heat from ginger is different than the heat from chili peppers. But in regard to what you described as lupulin threshold shift, we don’t see a shift in how the panelists perform over time.”
However, human olfactory psychophysics, the study of how humans perceive odors, indicates that the impact of an aroma may change. Andreas Keller and colleagues at Rockefeller University discovered that the perceived smell of an odor at a given concentration changes over time and depends on prior experience. In other words, the more you’re subjected to a smell, the more you adapt to it, thereby raising the threshold of that smell. Although this does not completely apply to nonvolatile bitter components, it has been shown that the brain, smelling hoppy aromas, expects a more bitter drinking sensation, or a lupulin threshold shift.