Wednesday, July 29, 2015

Fining Agents: Tips from the Pros

Beer clarity can be improved by adding various fining agents. Two pros discuss their favorite fining agents for making lovely lagers and awesome ales.

Matthew Brynildson attended the Siebel Institute of Brewing Technology and joined the Goose Island Beer Company in 1996 as Head Brewer of their Chicago, Fulton Street production facility. In 2000 Matt moved to Central Coastal California to Join the SLO Brewing Company as Brewmaster. In July of 2001, Firestone Walker Brewing Company acquired the Paso Robles production brewery and asked Matt to stay on as Brewmaster and General Manager. 

Kettle finings are coagulating agents added to hot wort, typically toward the end of boil, to aid in the precipitation of cold break. They are also referred to in the industry as copper finings because they are typically utilized in the kettle: often called the copper in the UK.
There are several types of finings. One is Irish moss, a  red seaweed or algae that is  rich in carrageenan. Irish moss contains polysaccharides that carry a negative charge that readily binds with positively charged proteins in the wort. This binding activity results in precipitation of these proteins after the wort is cooled. These finings are utilized predominantly in the ale brewing world and are not as common in the lager world. They are considered a process aid and are not technically an ingredient since it precipitates out of solution or is filtered out of finished beer.
We utilize kettle finings to aid in producing clear (cooled) wort and ultimately clearer finished beers. Utilizing kettle finings results in beer that is much easier to filter, or if you don’t filter, beer that naturally drops much cleaner.
Kettle finings also improve the physical stability of beer by removing haze potential proteins. These proteins, if left in the beer, will eventually combine with tannins and form haze. In other words, the removal of potential haze-forming proteins results in a beer that is not only less hazy when finished or filtered, but stays bright for a longer period of time after it is packaged.
These finings are excellent at binding with these proteins and work to remove them from solution through precipitation. The resulting complex tends to settle out and is removed with the yeast at the end of fermentation.
We use Whirl-Floc in our beers. Whirl-Floc is the trade name for a product produced by Kerry Bio-Science. We utilize a granular form of the product that is very easy to handle and is contains high grade carrageenan. A tabular form is made for the small scale brewer.
There are other Irish moss products that are readily available. They are typically dusty and a little more difficult to handle than the granular or tab forms. They are derived from similar starting material and act in the same manner. Any time you are looking for good clarity, kettle finings are, in my opinion, a good option to exercise. If we are brewing a wheat beer or something that we want haze or turbidity in the finished product, we omit kettle finings from the process.
When we do use them, we add kettle finings 10 min before the end of boil by adding the material into the kettle. Boiling them for 10 minutes seems to be a perfect amount of time. You can draw a sample of finish boiled wort from the kettle and cool it down for visual inspection. You should be doing this anyway to measure your starting gravity. Allow the sample to sit and observe the clarity of the wort and the nature of the precipitate. You are looking for brilliantly clear wort with a relatively compacted precipitate.
I also know a number of small scale brewers that have very good results with gelatin finings for finished beer clarification. There are other aids like PVPP and silica-gels (generally referred to as beer stabilizers) that can be used to remove haze-forming compounds as well.
With all of this in mind, I live by the brewing rule that less is usually more. I tend to utilize as few inputs as possible to gain my desired end result. Each fining product has a specific mode of action. For example: If I wanted to deal with protein haze issues I would start with kettle finings. They are negatively charged and bind with positively charged protein helping to remove protein haze by binding with them in the kettle.
To get yeast out of suspension, I would choose a fining agent for that purpose. Isinglass is positively charged and binds to negatively charged yeast cells aiding in yeast precipitation in the conditioning vessel. These two fining steps will result in very clear finished beer.
 Chris Buckley is the Brewmaster at Red Oak Brewing Company in Greensboro, North Carolina. 
There are many additives that will speed up the clarification of beer. Due to my background as a Bavarian brewer and maltster, I will concentrate on the traditional method — additive free — the way Red Oak lager beers are produced. This method lends itself well to homebrewers who are also not in a hurry to produce the beer.
To me, time is the key to success with this method. What do I mean by this? You will need to dedicate four to six weeks of lagering at 30–32 ºF (~0 ºC). Cold conditioning of beer clarifies and increases the colloidal stability of it. You cannot skip this step if you want a clear beer in the traditional method.
The amount of trub material in the wort affects the rate of clarification. Boil vigorously as this helps to coagulate proteins. Remove the hot break prior to fermentation by means of a whirlpool (this is the modern method).
Transferring the fermenting beer off the cold break and into a secondary vessel to complete fermentation yields a beer of better clarity and flavor. Careful transfers that avoid agitation are important. One of the most common mistakes made by homebrewers is agitating during racking, which can cause oxidation.
Beer with a pH of 4.2 to 4.4 will clarify more rapidly. Adjust the pH during mashing and wort boil with sour malt or food grade phosphoric acid to achieve a pH of 5.3 to 5.6 in the pitching wort (unless of course, the pH is naturally in the proper range).
As for fining agents: Adsorption is the process most used in the fining of beer. Finings have an electrostatic attraction to haze forming particles, thereby making the particles heavier to promote sedimentation and/or larger to aid in the removal by filtration. The most common additives to promote clarification are:
Irish moss: Use 1/2 tsp. per 5 gal. This is a dried algae added to the boil 10 minutes before cast out, which helps coagulate hop tannins and protein in the boil resulting in a greater hot break.
Isinglass. This is the dried swim bladder of fish, mostly sturgeon, soaked in cold water and added to the fermented beer to quickly drop out yeast and other suspended particles from the beer. Amounts to be used in beer vary from one product to another.


Monday, July 27, 2015

What really happens in the brewpot?

Wort Boiling: Homebrew Science

How wort is transformed in the kettle


Boil Basics

Many new all-grain brewers are prepared for the added difficulty of mashing. They already have read about the effects of different temperatures, mash thicknesses and rest combinations. However, because the techniques for wort boiling are very straightforward, they may not have learned about the important benefits that boiling the wort correctly brings to their beer. When asked for advice on what it takes to make great beer, a famous German brewer listed four things: Buy the best ingredients you can possibly afford, clean everything all the time, boil the kettle well and pray.
There are several reasons why a good wort boil is important.

Wort sterilization
Boiling your wort provides enough heat to render the wort free from any bacterial contamination. The principle wort bacteria are Lactobacillus and they are easily killed by heat. The low pH and the antibacterial action of certain hop constituents will ensure that the pathogenic and spore-forming organisms that would otherwise survive are precluded.
Enzyme inactivation

Most of the enzyme action ceases early during wort collection, either due to raising the mash temperature for mash-off or by sparging at a higher temperature in an infusion mash. Boiling ceases the remaining enzyme activity and fixes the carbohydrate composition of the wort, and hence the dextrin content of the final beer. Dextrins are complex carbohydrates. In the absence of enzyme activity to break them down into simpler sugars, brewers yeast cannot ferment them.

Boiling’s effect on proteins
Under the favorable conditions of wort boiling, proteins and other polypeptides present in the wort will combine with polyphenols or tannins. The rate and extent to which this occurs is influenced by several factors. Since the meeting of the components depends on chance encounters, the rate is increased by the mixing action of the wort, and also by their relative concentrations. Protein-tannin complexes collide with other protein-tannin complexes and stick together until they achieve a certain mass and precipitate out of solution.

Boiling also can destroy a protein’s three-dimensional structure. Proteins are large molecules made from smaller molecules called amino acids. In a protein, amino acids are linked end to end to form a “string.” This string is coiled, folded and looped into a three-dimensional structure. In addition, some proteins are actually complexes formed from several different protein strands. The three-dimensional shape of a protein determines the protein’s function. Thus, when boiling destroys the three-dimensional shape of protein, it also destroys its function. (This is, in fact, why wort boiling stops enzyme functions. Enzymes are proteins.)

Protein and tannins are the primary constituents of the hot break in the kettle. The hot break is the brown scum that forms on top of the wort as boil approaches and is also known as hot trub. Its formation is aided by the addition of kettle finings, usually extracted from seaweed. Irish moss can be added to the kettle 15 minutes before the end of the boil; the moss is negatively charged and can attract positively charged proteins in the wort. Although boiling for extended periods can increase the amount of trub formed, boiling for too long creates “shear forces” that break up the larger flocs back into smaller ones, making their ultimate removal more difficult. Lower pH causes flocs to be larger and more stable, and the presence of calcium ions aids protein aggregation by binding proteins together.

Hot break must be removed so that the hot wort can be clear. Most commercial brewers whirlpool their wort and leave the hot break behind when the hot wort is moved to the heat exchanger. Other proteins are precipitated by cooling and this material is called cold break.

Cold break is very similar in makeup to hot break except that the flocs are much smaller. Opinion is divided on the need to remove this prior to fermentation. Some brewers feel that removal provides cleaner flavor, but cold break contains some unsaturated fatty acids required for yeast nutrition.

Irish moss is a seaweed-derived polymer of the sugar galactose. Individual galactose molecules are linked to other galactose molecules through alpha 1-3 or alpha 1-4 linkages. In Irish moss, some hydroxyl (OH) groups are substituted with sulphate groups, giving it an overall negative charge. Irish moss acts like a net that falls through the wort and traps any positively charged proteins by binding to them. It is usually added to boiling wort around 15 minutes from the end of the boil.

There is an optimum rate of use for Irish moss, and tests should be done using different rates of addition. Most homebrewers add between 3/4 and 1-1/2 teaspoons per five gallons of wort. Too much Irish moss will form very clear wort, but results in a fluffy sediment that leaves behind a lot of wort in the trub. Excessive levels of Irish moss in the boil can reduce the levels of proteins responsible for head formation.

Solubilize and isomerize hops
Although there are a great many reactions occurring during the kettle boil, the principle one of interest is the isomerization — and subsequent solubilization — of alpha acids. Isomerized alpha acids are the molecules responsible for the bitter flavor in beer. The chief component of alpha acids is the compound humulone.

The isomerization of humulone to isohumulone is facilitated by the presence of magnesium ions. The extraction and isomerization are very inefficient, however, and as many as 70% of the alpha acids remain unconverted, and hence insoluble.

Other reactions have secondary effects on bitterness. For example, the oxidation of the beta acids — including the oxidation of lupulone to hulupone — produces a molecule that is much more bitter and is probably responsible for more lingering unpleasant bitterness in beer.

Factors affecting hop utilization
There are many factors that affect hop utilization. Boil intensity is one such factor. The longer and more intense the boil is, the more alpha-acids isomerization occurs. The pH of the wort also has an effect. The higher the wort pH, the greater the isomerization and solubility of humolone.

It is generally accepted that hop utilization is better in low-gravity worts than in high-gravity wort. This is why homebrewers are told to decrease the amount of hops in a recipe if they switch from boiling a concentrated wort to conducting a full-wort boil.

The amount of hot break present can also influence hop utilization. Hops are associated with proteins that precipitate during boiling. For this reason, some brewers wait until the hot break begins before adding their first charge of hops.

The form of hop used is yet another factor. Hop extracts produce the most bitterness, follow by pellet hops and whole-leaf hops.

High hopping rates reduce hop utilization. Adding more hops always increases hop bitterness, but — beyond a certain point — you get decreasing returns with greater hop additions.

Oxidation of lupulone
Beta acids are insoluble, but they can oxidize during storage to a variety of compounds that are soluble and bitter in boiling wort. While it is accepted that the bitterness of oxidized beta acid is different from isomerized beta acid, opinions are divided as to its quality. Some researchers insist that the oxidized beta acids are more mellow than isomerized beta acids, while others say that oxidized beta acids are more harsh. Either way, oxidized beta acids go some way to replacing the bittering potential of alpha acids that are lost during storage.

Volatalize aromas
Dimethyl sulphide (DMS) is an intensely aromatic compound present in most beers. When it’s present in amounts large enough for it to be tasted and smelled, it can be an important flavor characteristic or defect. At low levels it smells of corn or sweet corn. When it is more intense it can resemble over-stewed vegetables or even garlic. In some European lagers, it is an important part of the flavor profile; a large regional brewer in the United States (Rolling Rock) also features it.

DMS is formed from s-methyl-methionine (SMM), which in turn is produced from amino acids during malting. SMM is converted to DMS by heat and then the DMS is volatilized and whisked away with the steam during wort boiling. Some homebrewers who leave a lid on the kettle find that this compound is re-introduced when the steam condenses on the lid and drips back in. Unless the precursor is all removed, then more DMS can be formed during wort clarification and this DMS will survive to the final beer. This is a problem in commercial breweries using whirlpools. For this reason, homebrewers should attempt to cool their wort as quickly as possible after the boil is complete.

Hop aroma
Hops also contain an essential oil component, which is responsible for the characteristic hop aromas. Each oil imparts its own smell, and hop aroma is made up from the combinations of many smells. The oils are soluble in hot wort and are very volatile. So, they are soon boiled away in the steam from the kettle. This is why many brewers add a charge of hops as late in the boil as possible to try to trap the aroma before it is evaporated away. Dry hopping is another technique designed to avoid losing volatile hop compounds.

Color development
Color pick-up in the kettle is a combination of several factors. The caramelization of wort sugars darkens the wort as it boils. Loss of an H2O molecule from the complex sugar molecule forms a double bond inside the sugar molecule, which changes the way the sugar molecule absorbs light, thereby affecting the color. Drive off all water and you’re left with carbon.

Color development also comes from melanoidin production from polymerization of reductones. (These Maillard reactions are described in more detail in the November 2001 “Homebrew Science” article on crystal malts.) These reactions also contribute some flavor compounds. The rate that these reactions occur is slow due to the unfavorable pH and temperature conditions in boiling wort.

Finally, the wort can be darkened due to charring or burning from excessive heat at a heat transfer surface. Homebrewers can experience this if their brewpot has a thin bottom.

Concentration of the wort
In a large brewery, up to 10% of the kettle contents can be lost due to evaporation during a boil of normal duration. This increases the original gravity of the wort accordingly. This is important when brewing some high-gravity beers, such as barleywines, made only from grains. In order to achieve their high original gravities, the wort is boiled for an extended period — often up to three hours.

Good place for the addition of syrups and sugars
Some recipes call for an increase in wort gravity above that which can be obtained by the mashing system. Alternatively, when nitrogen-rich malts are used, it may be necessary to add an adjunct that contributes no nitrogen. In that case, corn syrups or brewing sugar can be added in the kettle. Home brewers can also add flavorings and other adjuncts, such as fruit.

pH
Wort pH will fall from 5.6–5.8 at the start of boiling to around 5.2–5.4 at the end. This is primarily due to the precipitation of calcium phosphate. Calcium ions in brewing water reacts with phosphates from the malt to form calcium phospate and hydrogen ions, which lower wort pH.

This demonstrates the importance of excess calcium ions in the wort after mashing. For this reason, it is sometimes a good idea to add gypsum to the kettle. If your mash pH is fine, but the pH does not drop to at least 5.4 by the end of the boil, add 1/4–1/2 teaspoon of gypsum per five gallons.

Saturday, July 25, 2015

What's Happening in Your Beer Now? Bottle Conditioning

One more week to go until your beer is ready to drink! Are you feeling tempted to sample a bottle a little early? Totally understandable. Today, let's talk about what's really happening inside that bottle right now, and why it's best to resist the temptation to open it early.


What Happens After Bottling


The most important thing that's happening in that bottle right now is that you're beer is carbonating. The yeast is eating the last bit of sugar you added during bottling and releasing carbon dioxide. The carbon dioxide will first float to the top of the bottle, and then, as that space gets crowded, it will be gradually forced back into the beer itself. This is how carbonation works (science!) and why you see streaming bubbles all the way through the liquid once you pull off the cap.

This carbonation process takes between seven and 14 days, depending on factors like room temperature, active yeast left in your beer, the kind of sugar you used to prime the beer, and a few other things. It's not an exact science, which is why I generally recommend waiting a full two weeks before sampling your beer.

In addition to carbonating, your beer is continuing to clear and condition. As they finish consuming the priming sugar, the last yeast will fall out of suspension and collect on the bottom of your bottle, along with any other leftover solid bits that haven't cleared yet. This little bit of trub is unavoidable in homebrews — it won't generally affect the flavor of the beer unless there's more than a quarter-inch of it (usually it's just a very thin layer).

Beers also sometimes go through a bit of bottle shock when they're first bottled. If you taste the beer early, you might pick up some harsh notes or sulphuric flavors; these dissipate after about two weeks in the bottle.

The flavor of the beer also keeps changing — and will actually continue to change (usually for the better!) over the months to come. You might notice that your beer tastes different two months from now than it did when you first tried it. With most beer styles, I actually find that the flavor continues to improve over the months, and then starts to deteriorate after a year.

http://www.thekitchn.com/whats-happening-in-your-beer-now-conditioning-the-kitchns-beer-school-2015-217271?crlt.pid=camp.yoWh8DwDclRA

Thursday, July 23, 2015

THE FLAVORS IN YOUR FAVORITE BEERS VISUALIZED

As we know, beer is fragrant and delicious, but the actual aromas and tastes found in beer vary a ton from brew to brew. We decided in order to make those scents more easily identifiable, why not visualize them. How many of these smells and tastes have you recognized while drinking your favorite beer?

IPA

This is what an IPA smells/tastes like

Known for their hoppy sweetness, IPAs (India Pale Ales) are often filled with tropical fruit flavors like banana and pineapple. Many IPAs have floral qualities, as well as a touch of grapefruit, wood, and herbaceousness. You might find tangy pepper notes and sweet caramel as well. A little bit of barley or malt will also stand out.

Porter & Stout
This is what a porter/stout tastes/smells like

Porters and stouts often have dark fruit flavors like dried cherries. You’ll commonly taste coffee, toffee, and nuts. Bold cereal flavors like barley and oats will assert themselves. Like IPAs, caramel is also often a front-running taste.

Wheat Beer
This is what a wheat beer tastes/smells like

A pint of wheat beer will likely be full of clove and banana, a wonderful combination of mild sweetness and light zest. Due to (of course) being made of wheat, wheat beer has bready and yeasty flavors. Sweet honey – a little less heavy than caramel – will also make its way into sips.

Brown AleThis is what a brown ale tastes/smells like

Roasty brown ale is chock full of fruit flavors like crisp apple, succulent plum, and sweet raisins. Like stouts and porters, you’ll pick up on some coffee, as well as malt and toasted biscuits. All of the fruitiness is rounded out with caramel.

PilsnerThis is what a pilsner tastes/smells like

Simple pilsners are often noted for their bitter quality. You might taste earthy grass, oats, barley, and a hint of lemon tang.

Saison

This is what a saison tastes/smells like
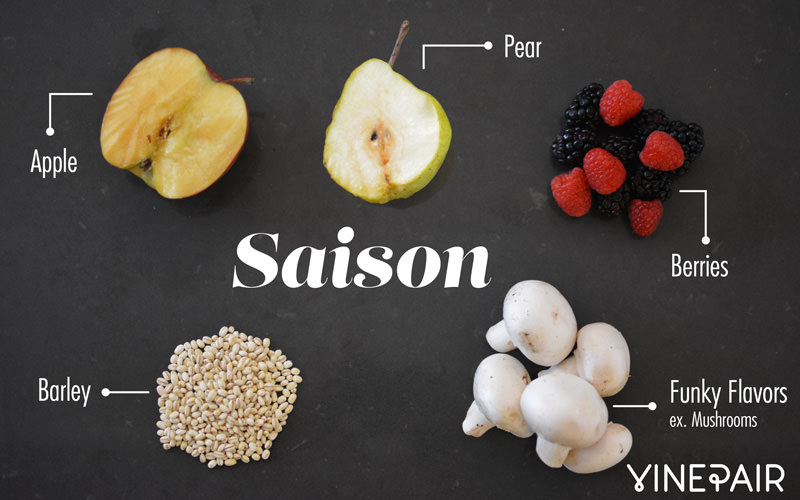
Saison beers will typically have tons of fruit, including but not limited to berries, apples, and stone fruits like pears or peaches. A little bit of malt or barley will dance with funky, non-traditional flavors as crazy as mushrooms.

Tuesday, July 21, 2015

Beer Basics: Difference between an Ale and a Lager

What exactly is the difference between an ale and a lager, and where does your favorite beer fit on the spectrum? Our comprehensive beer guide breaks down the tastes you love and the labels you’re slightly confused by.
All beers are classified as either ales or lagers. The distinction between the two lies in the type of yeast used to brew the beer, along with the conditions under which each type is brewed. The following graphic explains each type in more detail:

beginner's guide to beer


Sunday, July 19, 2015

Guide to Describing Beer

Much line wine, every craft beer is different and describing them like a pro can be a little daunting.

This infographic breaks down beer into six categories - malt, hop, fermentation, conditioning, body and mouthful - and offers a range of words to describe each characteristic of the beer.

From toffee like malts to juniper hops and musty fermentation - this is a great guide to how to describe your next taste of beer.


Friday, July 17, 2015

Hops Alpha Acid Table

Alpha Acids from hops contribute to the bitterness in beer. During the boil alpha acids are isomerized and increase international bittering units (IBUs). .

Hops also contain beta acids, which contribute to aroma only. The more alpha acids the more bittering potential per ounce. For example, one ounce of Northern Brewer (8.5) is roughly equivalent of two ounces of Domestic Hallertau (3.9) in terms of bittering potential.

This chart is a general guideline only. The actual AA varies from year to year depending on the weather, harvest conditions, and storage. This chart is from 2009.


HopsAverage Alpha Acids
Admiral14.5
Ahtanum5.5
Amarillo®8.6
Aquila7
B. C. Goldings5
Banner10
Bramling Cross6.5
Brewer’s Gold9
Bullion7.5
Cascade7
Centennial7.8
Challenger8.5
Chinook13
Citra11
Cluster6.5
Columbus15
Comet10
Crystal4.3
Domesic Hallertau3.9
East Kent Goldings5
Eroica12
First Gold7.5
Fuggles4.5
Galena13
Glacier5.5
Goldings4.5
Hallertau Mittelfruh3.75
Hallertau Hersbrucker4
Herald12
Hersbrucker4
Horizon12.5
Huller Bitterer5.75
Kent Goldings5
Liberty4
Lublin4.5
Magnum15
Millenium15.5
Mount Hood4.8
Mount Rainier6.2
Motueka7.0
Nelson Sauvin12.5
Newport15.5
Northdown8.6
Northern Brewer7.8
Nugget14
Olympic12
Omega10
Orion7
Pacific Gem15.4
Perle8.2
Phoenix10
Pioneer9
Pride of Ringwood10
Progress6.25
Record6.5
Saaz3.5
Santiam6.5
Satus13
Simcoe12.7
Sorachi Ace11.1
Spalt4.5
Sterling8.7
Sticklebract11.5
Strisselspalt3.5
Styrian Goldings5.5
Super Alpha13
Super Styrians9
Summit18.5
Talisman8
Target11.5
Tettnanger4.5
Tomahawk15
Ultra4.5
Vanguard5
Warrior16
Whitbread Golding6
Willamette4.5
Wye Target10
Yamhill Goldings4
Yakima Cluster7
Yeoman7.25
Zenith9
Zeus16


Wednesday, July 15, 2015

Brew In A Bag (BIAB) All Grain Brewing Method

BIAB is an acronym for Brew In A Bag. It is a dead simple all grain brewing technique. All it requires is a large grain straining bag, 15 gallon kettle and a heat source. This method is excellent for brewers who are wishing to convert from extract brewing to all grain, because you can make that leap for a very minimal cost. It will also save an all grain brewer 1.5-2.5 hours on a typical brew day.

BIAB utilizes THREE pieces of equipment:
  • The kettle: This kettle is the ONLY vessel required to BIAB. The only special requirement is that the kettle have a volume of at least 15 gallons for a 5 gallon brew session. This is because this one vessel will have to hold your entire water requirement as well as your grain bill. This volume will regularly exceed 10 gallons. You will mash and boil in this vessel.
  • The bag: This is a mesh bag that is large enough to conform to the inside diameter of the kettle and reach over the top lip. This bag is sometimes likened to a large pillow case, the kettle should be able to fit INSIDE it while still being able to close the top of the bag. Typically composed of “voil” or another mesh like material, this will hold your grain bill and must be strong enough to hold the water saturated grain when you lift it out of the mash water at the end of the mash.
  • The heat source: This can be the typical “turkey fryer” burner that is used widely by home brewers.  Also on the market and better for keeping consistent temperatures are electric brewing systems, utilizing heater elements that go right into the kettle. The heat source will be utilized to provide heat for strike water, maintaining mash temperature, mash-out and the boil.


Fig 1.
The process:
Crush your grain finer than you would with a typical all grain brew. This is because you no longer have to worry about a stuck sparge. The bag is the filter and the finer crush will improve your conversion efficiency.

Fill the kettle with the TOTAL water required to complete the entire brew session. Take into consideration that the water absorbed by the grain with this method is about HALF that of a typical all grain brew session that utilizes a MLT. Remember, when you remove the grain bag after the boil, the wort that is left is exactly what you are boiling, so calculate this carefully. Insert and secure the bag at this time.


Fig 2.
After heating the water in the kettle to your calculated strike temperature, pour your entire grain bill into the secured bag. Use a mash paddle to thoroughly mix the grain with the water so that there are no dough balls. There will be a very large volume in the kettle, so temperature control should be as easy as intermediate stirring and a couple quick firings of the burner if the temperature drops.
brew in a bag
Fig 3.
After the mash is complete you heat the mash to mash-out temperature, which is crucial to achieving good efficiency with BIAB since you are NOT rinsing the grains.

After mash-out, remove the grain bag and allow it to drain into the kettle. Some brewers will place a rope and a hook above the kettle to suspend the grain bag as it can become heavy with larger grain bills.
brew in a bag
Fig 4.
brew in a bag
Fig 5.
Finally, boil the wort just as you normally would.
brew in a bag
Fig 6.


Here are a few important points to make about BIAB:
**DO have a large enough kettle to accommodate about 9 gallons of water AND your grain bill.
**DO have a bag large enough that you can fit the kettle INSIDE it and still close the top.
**DO crush your grain fine, it will produce better conversion efficiency and there is no danger of a stuck sparge.
**DO NOT skimp on mash time, this is more crucial with BIAB, mash for 60-70 minutes to achieve full conversion.
**DO NOT allow your grain bag to come into contact with the bottom of the kettle when you are applying heat, it may melt! Some place a wire cake cooling rack in the kettle to lift the bag off the bottom.

Monday, July 13, 2015

Defy Gravity: Brewing High-Gravity Beers

Here are 3 common problems that can affect big beer and suggestions for how to overcome them and make high-gravity brewing your own.
While it’s impossible to make generalizations, I would wager good money that every one of us, at some point, gets a hankering to brew something strong. Aside from the entertainment value that comes with serving your friends a 12 percent ABV barley bomb, imperial stouts, barleywines, and Belgian strong ales make excellent gifts and can improve with age if done right.
But if you’ve ever attempted high-gravity brewing, you may already know that it has its challenges. Here are three common problems that can affect big beer and some suggestions for how to overcome them and make high-gravity brewing your own.

Low Efficiency

Extract brewers don’t need to worry about efficiency: As long as the right amount of extract goes into the correct total volume, you’re all but guaranteed to hit your original gravity. But because large grain bills require lots of mash water, all-grain brewers may find that their systems aren’t so efficient. More mash water means less sparge water, which means valuable malt sugars are left behind in the grain bed.
The solution? Plan for lower efficiency from the get-go and have a backup plan in place in case you don’t hit your numbers.
  1. Set the bar low. When formulating your recipe, assume a lower total efficiency than you normally would. If you typically achieve 75 percent efficiency on normal beers, assume you’ll get 70 percent for high-gravity beers. The bigger the beer, the lower the efficiency.
  2. Cheat. Keep some light dried malt extract (DME) on hand in case you don’t reach the intended original gravity. Then you can simply add enough DME to top up your wort to the desired strength.
  3. Burn, baby burn. If you have time and don’t mind using a little extra fuel, you can always conduct a longer sparge to pick up more of the malt sugars and then boil the wort down to the target volume. This method is especially well-suited to styles such as wee heavy, where some kettle caramelization is desirable.

Poor Attenuation

Wort with a high original gravity will almost certainly turn into beer with a correspondingly high final gravity. But 1.020 and 1.030 are miles apart on your palate, and insufficient attenuation will do your imperial stout no favors. Attenuation depends on yeast strain, yeast health, and wort composition, so try one of the following.
  1. Keep it simple. Replace a portion of the malt sugars with a simple sugar such as dextrose (corn sugar). These are 100 percent fermentable and can help dry out what would be an otherwise syrupy sweet beer.
  2. Oxygenate like you mean it. Give your yeast a fighting chance by aggressively oxygenating the wort at pitching time. This is the time to break out the pure oxygen and diffusion stone.
  3. Throw a powerful pitch. This almost goes without saying, but big beers call for big pitches. Make a huge starter or harvest yeast from another batch to ensure you have enough cells.
  4. Switch strains. Sometimes all you need is to choose another yeast strain. Different strains have different attenuation levels and tolerances for alcohol. Many British strains are notorious for giving up early, while saison strains could ferment a small house.
  5. Spring for the bubbly. Champagne yeast can sometimes unstick a stuck fermentation because it’s designed to ferment dry and work well in the presence of alcohol. If your primary strain doesn’t finish the job, toss in a packet or two of champagne yeast, and it may pick up where the ale or lager yeast left off.
  6. Funk it up. If all else fails, toss in some Brettanomyces, wait a few months, and tell everyone you made a wild beer.
Little to No Carbonation
Low carbonation is incredibly frustrating because you’ve already spent so much time and effort nurturing your high-gravity creation. If you find that high alcohol beers don’t quite pop as they ought to, then it’s likely that there simply isn’t enough healthy yeast remaining in suspension to finish the job. Here are some tricks to get you feeling the fizz.
  1. Open, dose, cap, repeat. To revive a beer that’s already bottled, open one bottle at a time and add a small amount of dry yeast. The amount of yeast is inconsequential because there are lots of cells in each grain of dry yeast, and the carbonation level is determined by the amount of sugar, not the amount of yeast.
  2. Take out insurance. On the other hand, if you haven’t yet bottled your high-octane ale but know from past experience that carbonation is a challenge, use bottling as an opportunity to include some insurance. Add a packet of dry yeast to the bottling bucket along with the priming sugar, wait 15 minutes, and gently stir (but don’t splash) before filling the bottles. That little bit of extra yeast is probably all you need to ensure that you’ll have well-carbonated bottles.
With a little patience, brewing a high gravity beer can be a real joy. As with all other aspects of the hobby, you simply need to experiment and find out what works best for your process.


Saturday, July 11, 2015

How to Remove Beer Labels


Although it’s absolutely possible to purchase brand new empty bottles to hold your beer, many (if not most) of us go down to the bottle shop or liquor store and spring for bottles that already have craft beer in them. Emptied of said craft beer, secondhand bottles can accommodate homebrew just as well as they do commercial ales and lagers. And you get to enjoy some great craft beer in the process.

Removing the label from a bottle of commercial beer, however, can try the patience of even the most even-tempered of Trappist monks. While some bottles might be simple peel-and-rinse affairs, others require more aggressive techniques. Here, then, are a few proven methods for ridding bottles of their former lives’ branding.

Peeling

In some cases, the label will simply peel right off. If this holds true for your favorite craft beer, then congratulations! You have found the Holy Grail of label removal. Most of us aren’t so lucky.

Soaking

The most commonly employed regimens involve some soaking. Immersing bottles in a soapy solution for as little as half an hour can loosen many labels, although more stubborn examples may require several days in the bubble bath. Soaking also loosens stuck-on residue that may lie at the bottom of the bottles. Common soaking media include
  • OxiClean
  • PBW
  • Ammonia
  • Star San
  • Baking soda

OxiClean and PBW should work for most labels, while an ammonia solution can encourage more troublesome ones. But take extra care when working with ammonia: Use gloves, work in a well-ventilated area, and never, ever combine ammonia with bleach (they produce a toxic gas when mixed).

Star San can usually remove those pesky screen-printed labels that are fused directly to the glass. Baking soda, while gentler than other options, works with some of the less stubborn labels out there.

On a related note, European beer bottles often employ less stubborn adhesives than their American counterparts. In many cases, the labels will lift right off and float to the top of the soaking solution in a matter of minutes.

Scraping

When all else fails, some steel wool or a razor blade paired with a little elbow grease will rid you of most beer labels. But if you have to resort to scraping, you may want to consider switching brands or purchasing new bottles from your local homebrew supply store.

Thursday, July 9, 2015

Which Unit of Measurement Is Best for Brewing?

Whether you’re weighing out specialty grains, calculating pre-boil volume, or timing the mash, measurement is at the heart of brewing.
At the risk of alienating readers whose childhood memories of math and science classes rank right up there with minor surgery, today we’re going to tackle units of measurement. Whether you’re weighing out specialty grains, calculating pre-boil volume, or timing the mash, measurement is at the heart of brewing. You simply can’t make good beer without it. But you don’t need a degree in astrophysics, just a little patience and a calculator or smartphone.
There are two primary systems of measurement you’ll come across as a brewer: metric and U.S. Customary. Now, a few brewers in Commonwealth countries might work in Imperial units, which are similar to U.S. Customary. But since equipment and ingredients outside the United States are sold almost exclusively in metric, we won’t discuss Imperial units. Just be aware that an Imperial gallon and a U.S. gallon are different, just as an Imperial pint and a U.S. pint are not the same thing.

Metric

The metric system is favored by most of the world’s governments and industries, and for good reason. All derivative quantities are expressed in terms of a base quantity and some multiple of 10. So, you have your meter, which consists of 10 decimeters, 100 centimeters, or 1,000 millimeters. Similarly, 10 meters is 1 decameter, 100 meters is 1 hectometer, and 1,000 meters is 1 kilometer. It’s nice and easy: All you have to do is move the decimal point around to switch between smaller and larger quantities.

U.S. Customary

U.S. Customary units are intimately related to Imperial units, upon which they are based. But quantities aren’t related by simple factors of 10, but rather by arbitrary and archaic conversion factors. So you have 12 inches in a foot and 5,280 feet in a mile. There are 2 cups in a pint and 2 pints in a quart, but 4 quarts in a gallon. And a pound is 16 ounces, which shouldn’t be confused with fluid ounces, which measure volume, not weight. Like learning vocabulary in a new language, you just have to memorize these things.

Consistency

In a brewing context, it’s generally advisable to pick one system and stick with it. If you purchase your malt by the kilogram and hops by the gram, then chances are you’ll want to brew by the liter. Similarly, if you make 5-gallon batches, you probably buy malt by the pound and hops by the ounce.
However, there are some exceptions to the whole consistency thing that can make things a little more convenient here and there. Even those of us who brew beer by the gallon almost always prepare our yeast starters by the liter. Why? Well, it’s a convenient little fact of nature that 100 g of dried malt extract (DME) dissolved in 1,000 ml (1 liter) of water will yield wort that has just about the right sugar concentration for propagating yeast. If I want to make a 2-liter starter, then I need 200 g of DME. Just divide by 10.

Precision

And then there’s the issue of precision. Take temperature, for example. The Fahrenheit scale has 180 degrees to express the differences in temperature between ice and steam (32°F to 212°F). The Celsius scale must do the same thing in just 100 degrees (0°C to 100°C). So, when we discuss mashing, in which small variations in temperature can have profound effects on the resulting wort, sometimes it’s more convenient to use Fahrenheit for the simple reason that each tick of the scale represents a smaller change in temperature. Sure, you can always work with decimal points in Celsius, but many analog thermometers don’t feature that kind of precision. I often measure hops by the gram for similar reasons.
In the end, it’s all about choosing a system that works for you. This might mean doing some conversion when you want to brew a published recipe or when working with a recipe from another country. The following table lists conversion factors for the measurements most commonly used in homebrewing, with a precision of four significant figures.

Density

Finally, there’s also wort density, which can be measured in Plato (°P) or in specific gravity units. That’s another topic unto itself, but a good rule of thumb is that 1 degree Plato is about 4 gravity points. So, 5°P is 1.020, 10°P is 1.040, and so on. This is accurate up to about 12.5°P, or 1.050, but even at 25°P (1.106), the error in using this approximation is a mere 6 percent. You probably won’t notice 6 percent difference in a beer that big.
As always, we highly recommend brewing software such as BeerSmith to do the math for you. Such software more than pays for itself in convenience and for eliminating the potential for error associated with hand calculations.