Sunday, May 24, 2015

Saturday, May 23, 2015

Whirlpooling Makes a World of Difference

Homebrewing Whirlpooling
Whirpooling is an easy process to include in your brew day that can greatly impact your beers. If you have a spoon, you can whirlpool!
The Benefits of Whirlpooling
Quicker Chilling: The time it takes to chill wort to yeast pitching temperatures is greatly decreased when whirlpooling. Because the wort is circulating, the cool and warm wort will constantly be churning and combining to promote quick chilling. Also, whirlpooling with a wort chiller can offer increased control of hitting an exact pitching temperature.
Clearer Wort: A whirlpool promotes clearer wort by collecting the cold break solids in the center of the brew kettle. The chilled wort can then either be siphoned from the side of the kettle or through the kettle valve to avoid transferring any particulate.
Improved Hop Flavor & Aroma: Because whirlpooling cools wort faster, post-boil hop additions instill more flavor and aroma without too much of the bitterness. Hops will continue to isomerize—the process which attaches alpha acids to water molecules creating bitterness—above 180°F (82°C). Being able to drop below this temperature will prevent isomerization in hop additions that are intended to instill just flavors and aromas.
Reduced DMS: The heat from the boil converts s-methyl methionine (SMM) in malt to dimethyl sulfide (DMS), which appears in beer as an unfavorable cooked or cream corn flavor. A longer, vigours boil—especially when using Pilsner malt, which contains eight times more SMM then typical base malts—can drive off DMS. When the boil is over, the heat continues to convert SMM to DMS until temperature drops below about 140°F (60 °C). Whirlpooling cools wort quickly, reducing the amount of DMS occurring in the post-boil.

How to Whirlpool

Whirlpooling involves creating a circular current in the brew kettle, and this can be done using various techniques and equipment.
Spoon
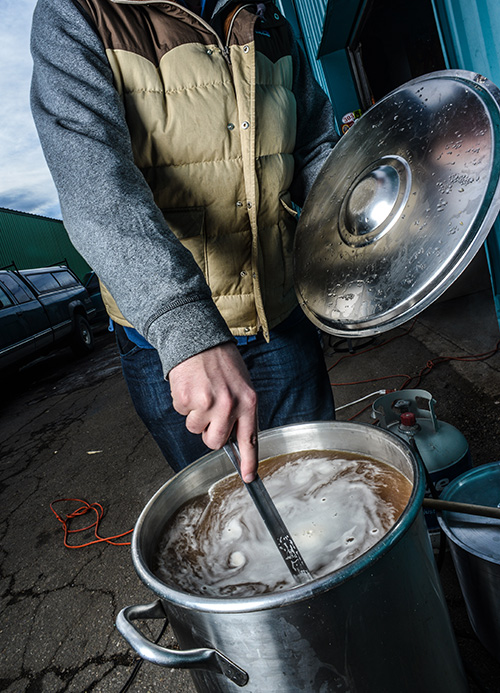
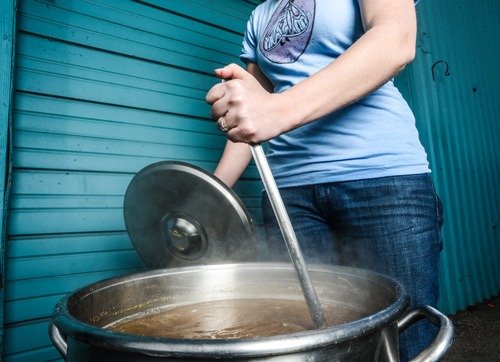
WhirlpoolingThe simplest way, whether using an ice bath, an immersion chiller or no formal chilling method, is to stir the contents of the kettle with a spoon rapidly until a circular current is achieved. Stir along the walls of the kettle for a few minutes, taking care not to splash to prevent any chances of hot side aeration, until a strong, lasting whirlpool forms. Depending on what your goals are (e.g., clarification, hop flavor/aroma), allow the whirlpool to stand for 10-30 minutes before racking.
Pump or Counterflow Chiller
If a pump is available, or you are using a counterflow chiller, a whirlpool can be created by angling the pump-out hose along the side of the kettle a few inches below the surface of the wort. This flow will cause the wort to spin in a circular current. Be careful when creating a whirlpool with a pump as it can cause hot wort to splash out of the kettle.
One of the most effective means of whirlpooling and chilling is highlighted by Jamil Zainasheff in “A New Spin on an Old Chiller” in the January/February 2007 Zymurgy(AHA members can access this issue instantly on eZymurgy or with the Zymurgy mobile apps). Zainasheff offers an upgrade to the typical immersion chiller that makes for effecting whirlpooling and chilling.

The Physics of Whirlpooling

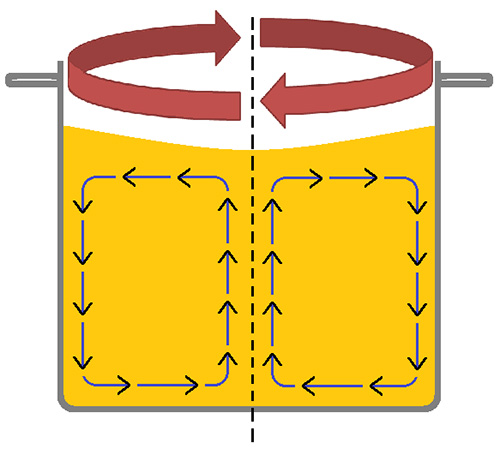
whirlpoolingIt may seem logical that a whirlpool would send the solid material to the outside of the kettle because of our child hood experiments with swinging a bucket of water around in circle without any falling on our heads. However, because the contents of the boil kettle are light enough, they will collect in the center due to something called the “tea leaf paradox.”
Basically, stirring the wort into a whirlpool is creating centripetal force, but because of friction caused by the liquid’s contact with the bottom and sides of the kettle, the liquid towards the bottom slows, creating a pressure gradient. This pressure gradient is lower than the upper portion of the liquid, so the solid materials in the kettle are pulled towards the center of the bottom (things move from higher to lower pressures). Isn’t physics phun?
Class dismissed!


Thursday, May 21, 2015

How to Create Your Own Homebrew Recipe

By 


When I started homebrewing, I was like the vast majority of people getting into the hobby: I learned as much as I could about cleaning and sanitizing, made sure to follow directions on the proper boil time and hop additions, and learned how to be patient by allowing the beer to ferment out completely before racking to a secondary. Being able to make my own recipe was light years away – or so I thought.

Like most, this hobby took me on by storm. I quickly was upgrading my equipment: dumped extract for all-grain, added a wort chiller, made yeast starters, and oxygenated my wort. I also found myself buying and reading more books to understand the full process of what was happening when I was brewing. One of the great things about buying brewing book is that they offer numerous recipes. Whatever book you buy regarding homebrewing or a particular craft beer style, there is at least one recipe that a homebrewer can use in an effort to recreate what the author intended.

While using recipes provided by others is a way to make fantastic beers, I often found myself wanting to create an entirely new beer by redesigning another recipe. Homebrewers are a creative bunch, and this is one way in which I sought to express my creativity. Some of the ideas turned out great (adding espresso to the secondary of a porter) while some were better ideas on paper than in practice (Fruity Pebbles Wit).

Tweaking Your Recipe

How does one go about tweaking a recipe without adding too much/too little of a particular ingredient without going overboard and having an end result that tastes disgusting? The short answer is: a lot of trial and error. While trial and error is one of the joys of homebrewing, it could end up leading to a costly mistake.


Let’s be honest, if you aren’t inclined to drink your homebrew, then nobody else will. Here are a few guides to follow when tweaking a recipe to call your own.

1. Ensure Balance Between Base Malts & Specialty Grains

Maintaining a proper balance between base malts and specialty grains is a very important step in being able to tweak a recipe to make it your own.

If the original recipe called for a ratio of 80% base malt (2-Row, Pilsner, Pale Malt, etc) and 20% specialty grains (Black Patent, Rye,Munich, etc), you’ll need to make sure that you don’t overdo changing the ratio around. If you decrease your base malt and increase your specialty malt, a number of things could happen.

First, the increase use of specialty malts will change the starting gravity (OG) of your beer, because specialty malts have less diastatic power than base malts.

Second, many specialty malts have distinct and characteristic flavors that will either become enhanced or muted by changing their proportion. For example, if you increase Black Patent while decreasing Pale U.S. 2-Row, you finished product may taste slightly more astringent than previously.

2. Be Careful When Adding Fruit Additions

Adding fruit is an easy way to turn one beer into a completely different brew, without the need for changing around the base malt/specialty ratio. However, depending on how you add the fruit, you also may be adding simple sugars that are highly fermentable.

If you don’t try to account for the added sugar, you could either end up with a beer that tastes cloyingly sweet or make a beer that has a higher alcohol by volume than anticipated. One way to combat this is by adding fruit to a secondary vessel after primary fermentation has completed. Be mindful that some fresh fruit have naturally occurring wild yeast on the skin. You can either dip the fresh fruit in StarSan or go to your local grocery store and buy frozen fruit.

Buying frozen fruit is an excellent way to add fruit flavor to a beer for a number of reasons. First, the frozen fruit is going to be free of any microbes that will infect your beer. Second, freezing the fruit helps break down cell walls within the fruit. This means that it is easier to get the juice from the fruit into your beer.

My preferred method is to buy a bag of frozen fruit, let it thaw, and throw it back in the freezer. Prior to adding to the secondary, I thaw the bag of frozen fruit again and then add directly to the secondary. This ensures that the cell walls have ruptured and your fruit of choice can flavor your beer quicker than normal.

3. When Adding Spices, A Little Goes a Long Way

Another simple way to tweak a recipe is by adding spice additions. One of my favorite homebrews is from a friend who makes an excellent porter. During the summer, after he harvests his jalapeƱo garden, he makes a smoked pepper porter. During the winter, he takes the base porter and makes a mint-chocolate peppermint porter.

While each beer has the same base, adding spices can dramatically alter the flavor of the beer – in each case above, they all were excellent! However, be mindful that certain flavors can easily overpower others. Smoked malts are an excellent addition to add to a recipe, but stay below 2% of your total grain bill or else your beer will end up tasting like you’re eating a campfire log. The same logic goes for mint, cinnamon, clove, or other holiday spices.

Spices can be added to the boil, secondary, or in the bottling bucket/keg.

How I Tweaked A ‘Silver Dollar Porter’ Recipe

One of my first ‘go-to’ books regarding homebrewing was Charlie Papazian’s “The Complete Joy of Home Brewing.” I own the 3rd edition, which has over 50 different recipes homebrewers can use.
Gold Dollar Imperial Porter
At the time I bought this book, I was head over heels for porters and stouts. They offer a nice balance of bready, chocolate, maltiness without being too heavy on the stomach and waistline.Under the ‘Advanced Homebrewing for the Practical Brewer’ section of Papazian’s book (p. 311-312), there is a recipe for a porter called ‘Silver Dollar Porter.’ This porter was excellent because it had a great balance of chocolate and roastiness while maintaining a medium body.

I wanted to ramp up the recipe and make an imperial porter, so I added more base malt to up the alcohol percentage and added more chocolate and black patent to bring out more of those flavors in the finished beer. Finally, I added fresh espresso to the secondary.

Coffee is an excellent pairing for any darker and maltier beer. There are a number of ways to add coffee to your brew. I choose to add the hot pressed espresso straight into the secondary. There are a few other ways to do it, but this was the fastest/easiest method for me at the time.

My New Recipe: Gold Dollar Imperial Porter
Ingredients:
Recipe Specs
Batch Size:5 Gallons
Original Gravity (OG):1.086
Final Gravity (FG):1.020
SRM:45
IBUs:55
ABV:8.5%
Apparent Attenuation:74.7%
  • 10.0 lbs Pale Malt (U.S.)
  • 1.50 lbs Black Patent
  • 1.50 lbs Chocolate Malt
  • 1.50 lbs Crystal 80
  • 1.50 lbs Munich Malt
  • 0.50 lbs Flaked Barley
  • 0.50 lbs Victory/Biscuit Malt
  • 1 oz Cascade (5.50% AA) @ 50 minutes
  • 1 oz Northern Brewer (8.5% AA) @ 50 minutes
  • 0.5 oz Chinook (13% AA) @ 30 minutes
  • 1 oz Perle (8% AA) @ 20 minutes
  • 1 Whirlfloc Tablet @ 15 minutes
  • 1 package Wyeast 1098 (British Ale Yeast)
Procedure:

  • Yeast Starter: Make a 1.5L starter 24 hours prior to brew day.
  • Mash Schedule
    • Protein Rest: 122°F for 30 minutes.
    • Saccharification Rest: 156°F for 30 minutes.
    • Mash Out: 168°F for 10 minutes.
  • Sparge with 170°F water to achieve preboil volume of 7.5 gallons.
  • Boil: Follow the hop/fining schedule outline above for a 60 minute boil.
  • Cool wort down to 70°F and pitch yeast slurry.
  • Ferment at 67-69° for 10 days, or until fermentation is complete.
  • After fermentation is complete, transfer to a secondary vessel. Add 12 shots (approximately 12 fl. oz.) of hot pressed espresso into secondary. Let sit in secondary for 7-10 days.
  • Bottle or keg to 2.3 volumes of pressure.

Tuesday, May 19, 2015

Homebrewing: How to Dry Hop Your Beer


20110325-144121-Homebrew-Dry-Hopping.jpg

Opening a sealed package of hops from the homebrew store gives a blast of that fresh aroma that sometimes seems to be difficult to capture in a beer. The truth is, the simple technique of dry hopping is all it takes to bring out those wonderfully fresh citrus, pine and earthy aromas in your homebrew.
Dry hopping is basically the ultimate late hop addition.
Traditional boiling changes the natural alpha acids in hops into iso-alpha acids—they're the stable compound that provides the bitter flavors in beer. Unfortunately, boiling also breaks down the volatile essential oils that comprise the aromas and much of the flavor of the hop itself. When we first talked about hops, I mentioned that the later the hops are added to the boil, the more they will affect flavor and aroma. This is because the less time hops are boiled, the fewer bitter iso-alpha acids are produced and the fewer aromatic essential oils are driven away. Dry hopping is basically the ultimate late hop addition. 
The phrase is a bit of a misnomer, since you don't keep the hops dry at all. Instead they are added to the beer in the conditioning phase, after the fermentation but before it's time to bottle. Usually this means you'll add the hops after the airlock has stopped bubbling. If you're doing a two-stage fermentation, then the dry hops would be added at the time you transfer your beer to a secondary fermentation vessel. Otherwise the rapid discharge of carbon dioxide will "scrub" the delicate flavors that we're trying to preserve. Since the beer is only around 65°F at this point in the process, the breakdown of essential oils occurs much more slowly, preserving the flavor and aromas of the hops.
Dry hopping is a great way to experiment with different recipes. You can always dry hop a Pale Ale or an IPA with the same variety of hops used in the recipe. Or you can try to find a variety that complements the flavors you're already using. In our Pale Ale, for example, dry hopping with the citrusy Amarillo hops would help bring out the grapefruit character of the Cascades added late in the boil. But you can also try dry hopping other, more unexpected styles to make a hoppy American-style Stout or a hoppy wheat beer.
When you do dry hop a homebrew, you'll want to drink it a little quicker than usual. The added aromas are still quite volatile, even at cooler temperatures, and they will dissipate within a few months of bottling. Some lasting flavors and aromas will remain after that, but you will notice that the first few bottles you open will have a much stronger aroma than the last ones in the batch.

Dry Hopping Instructions

The only equipment needed is a nylon hop bag, a few clean glass marbles, and about an ounce of hops. The job of the marbles is to sink the bag of hops to the bottom of the carboy or fermentation bucket. You can use as much as two ounces of hops for a five gallon batch, but one is enough to get the job done.
Sanitation is still important here, but since we add the hops after fermentation is complete, the alcohol present in the beer provides some protection against unwanted bacteria. Simply boil the hop bag and the marbles for about 10 minutes to sanitize. Hops are naturally antiseptic, which is one of the reasons they're used in the brewing process to begin with, so there is no reason to sanitize them. Now, just add the marbles and the hops to the bag, and put them in the fermentation vessel.

The majority of the benefits will occur within a week, but you can leave the dry hops in the fermenting vessel up to two weeks if you would like. After that, just transfer to a bottling bucket and bottle as usual.

Sunday, May 17, 2015

Home Brew Recipe: "Miller Like"

Home Brew Recipe (5 gallon batch) by www.Brew-Boss.com

Note: Hops in the recipes below are pellets.

 "Miller Like" This is a basic drinkable beer that resembles a typical American "blonde" beer. It is a lighter beer that everyone enjoys. If Malt is purchased in bulk (50-55lb) bags, you can expect this recipe to cost a little over $10!

8 lbs pale Ale Malt (2 Row)

1 oz Cascade Hops (Boiling)

½ oz Hallertau Hops (Aroma) added 15 minutes before end of boil

1 tsp Irish Moss added 15 minutes before end of boil

1 packets Safale US-05 Yeast or equivalent


Strike Temp 154F
Mash Time 60 Minutes @ 152F
Sparge Time 15Minutes at 168F
Boil Time 60 Minutes

Calculating Starting Water Volume
We've found that 9 pounds of grain absorbs about 1 gallon of water during mashing. We also lose about 1 gallon of volume per hour of boil. So, for the Miller Like recipe example above, we have 8 lbs of grain, so we'll lose about 1 gallon of water to grain absorption. We have a 1 hour boil, so we'll lose another gallon, totaling 2 gallons lost. If we want 5.5 gallons into our fermenter (allowing for trub loss), we'll need 7.5 gallons of water to start. This same calculation can be made for any recipe.


Friday, May 15, 2015

Homebrewing: Introduction to Mashing and All-Grain Brewing


Making the jump from extract brewing to all-grain brewing can be daunting. There is all new terminology to learn, a seemingly an endless supply of expensive equipment, and more science than most of us have done since high school. But the truth is, starting out in all-grain brewing doesn't really have to be hard or expensive.

The Brew-Boss® home brew system is an all electric home brewing system that allows home brewers to brew extract and all-grain recipes with complete and accurate automatic control of temperature and timing. 

Before we jump into recipes, we need to look at the biggest difference between brewing an extract beer and an all-grain beer. All the sugar in liquid or dry malt extract has been extracted from base malts. After the malt has been processed, it's condensed into a form that's easy to package and work with. When making an all-grain style recipe, the sugar extraction step is done by the homebrewer through a process called mashing. Mashing gives the homebrewer complete control over the type of sugar that is extracted and gives more flexibility with the varieties of grain that can be used.

Mashing simply means to combine crushed grain with hot water at a ratio of around 1.25 quarts per pound of grain. The grain will soak for about an hour, and then the liquid will be drained from the grain. Once the liquid is separated from the grain, you can proceed with your brew day in the same way you would an extract batch. While it sounds trivial, beneath the surface of that simple grain and water mixture is a myriad of complex chemical processes that produce fermentable wort.

Enzymes


Enzymes are proteins that speed up chemical processes. Mashing activates enzymes that naturally exist in the base malts. A wide variety of enzymes are present in base malt, and each one facilitates a different chemical process. The most useful enzymes for homebrewers are the ones that break down complex carbohydrates into simple sugars for the yeast to eat. Other enzymes in the mash will help eliminate proteins that cause haze, and some will produce nitrogen compounds that aid in yeast health during fermentation.

There are some enzymes that the brewer wants to avoid, such as ones that will destroy head retention or create watery mouthfeel. The challenge of the homebrewer is to coax out the enzymes that will improve the beer, and avoid the ones that will cause problems.

Mash Temperature and pH


Different enzymes will activate and deactivate depending on the temperature and pH of the mash.

Different enzymes will activate and deactivate depending on the temperature and pH of the mash. For the homebrewer just getting into all-grain style recipes, controlling the mash pH is not as big of a concern as controlling temperature. Mixing the right proportions of grain and hot water on a homebrewing scale naturally produces a pH that is between 5.1 and 5.5, which is ideal for the enzymes we want to activate. Testing the pH is as simple as picking up inexpensive testing strips from your homebrew shop. Remove a small ladle of liquid from the mash after it has been thoroughly mixed and immerse the testing strip for the length of time listed on the package.

Temperature control is key to proper mashing. In order to activate the enzymes that convert grain into simple sugar, the mash temperature must be between 145°F and 158°F. For most styles of beer, a mash temperature of 150-154°F is used, and will produce a wort that can be easily fermented by the yeast while retaining a medium body. If the mash temperature is in the 145-150°F range, the enzymes will produce highly fermentable sugars and the final product will have a drier finish. Mash temperatures in the 155-158°F range will produce sugars that are harder for the yeast to ferment, resulting in a fuller bodied beer. Mashing in the lower temperature range is appropriate for styles like a Saison or a Tripel, where the higher temperature range is used for Scotch ales and Sweet Stouts.

When first venturing into the world of mashing and all-grain brewing, proper mash temperature can be very difficult to achieve.  Using the the Brew-Boss system dials in the correct temperature.  If you don't yet have a Brew-Boss my rule of thumb for people just starting out is "Close is good enough". If the thermometer in your mash is reading within 5°F of your target, you have nothing to worry about. The thermometer was not even used in commercial brewing until at least the late 1700's, and widespread use didn't happen until much later. Prior to that, it was impossible for brewers to know exactly what temperature their mash was at, and presumably they were made able to make decent beer. You should always try to hit the proper mash temperature, but don't stress out if you miss it, get a Brew-Boss.

Mashout and Lauter


After the mash sits for about an hour, the next step is to stop all enzymes from working. Homebrewers usually accomplish this by adding hotter water to increase the mash temperature to 170°F. At this temperature, all enzymatic activity is stopped, and the sugar that was produced begins to flow freely like honey in the microwave. This step is called the mashout. The temperature shouldn't exceed 170°F, otherwise unpleasant tannins from the grain will leach into the wort.


Lautering is a brewing term for draining the liquid wort out of the grain. There is a lot of different homebrewing equipment that will help you with lautering, ranging from pre-made heavy strainers to a do-it-yourself braided hose for the more crafty homebrewers. The first recipes we'll be looking at will use the simplest and cheapest method of lautering, called the brew-in-a-bag method. After the the wort is separated from the grain, the brew day proceeds in the same way as when you brew with an extract-style recipe.


http://drinks.seriouseats.com/2011/05/homebrewing-introduction-to-mashing-how-to-all-grain-brew.html

Wednesday, May 13, 2015

Seven Easy Ways to Improve Your IPA!


Here are 7 easy ways on how you can improve your Home Brewed IPA!

1) Every Beer Starts with Water!

Never under estimate the importance of beers primary ingredient, water. The water that you are using to make your beer is critical, especially when it comes to all grain brewing. Water plays an important part in everything from the taste and the mouth feel of a beer to the sugar conversion and acidity in a finished beer.

If you are using city water that has been treated with chlorine, always make sure that you are removing the chlorine with a carbon filter or alternative method. It is also a good idea to check your city’s water report to see if you are lacking or have an over abundance of minerals in your water that may be impacting your beer. Vinnie suggests treating your water with gypsum in both your mash and your boil to heighten the hop flavor of your beer. You can also use low level sodium additions to have a similar effect. Before making these additions you should first examine your existing levels to make sure that it will not detract from the quality of your finished beer.

2) Dry Hop Until You Just Can’t Dry Hop Anymore!

Unlike adding hops early in the boil, dry hopping adds little to no bitterness to the finished beer but what it does add is a strong and fresh hop aroma! When dry hopping beer, I always recommend adding the hops after the airlock has stopped bubbling in fermentation. That ways the escaping CO2 will not carry the hop aroma out of the fermentor along with it. Vinnie suggests adding multiple dry hop additions at different times which may deliver additional hop aroma to your finished IPA!

3) Do Not Rush Your Fermentation!

We all want to try out our latest beer as quickly as possible, but there is allot to be said for patience in home brewing! If you have the ability to temperature control your fermentation, set the temp between 65F to 67F. Yeast loves a low stable temperature and produces far less off flavors than at higher temps. It will take longer to ferment at a lower temperature but your beer will come out cleaner tasting so that your robust hop profile can really shine in the finished beer! Also, cold crash your beer once your fermentation has completed. Try to crash at around 36F for 2 weeks if possible. This will help force any residual yeast out of suspension and leave you with a cleaner tasting and clearer beer!

4) Don’t Skimp On the Yeast!

Now a days home brewers have a huge variety of options when it comes to yeast. If you want your beer to be as good as possible, then you are going to have to use the best and most suitable yeast for the style of beer that you are brewing. A great West Coast IPA yeast strain is theWhite Labs WLP001 Ale Yeast.

Make sure that you create a yeast starter, insuring viability and that you pitch a sufficient quantity of yeast for the strength of beer that you are brewing.

5) Do Not Overload Your Beer With Crystal or Malty Grains!

Vinnie suggests that you add crystal malts sparingly to your grain bill. He remarks that the sweet flavors and aromatics derived from those grains can compete with the flavors and aromas of your hops. An IPA is a showcase for the hops and the other ingredients should complement them not detract from them.

6) Consider Adding Hop Resin Extract to Your Boil!

Pure hop resign extracts can be a great way of boosting the bitterness of your wort with out having to add an extreme amount of hop additions to your boil. Just like with actual hops, in order for the bitterness to be captured by the wort, the hop resign still needs to be boiled in the wort for a sufficient amount of time.

7) Opt For a Dryer Beer!

A dryer beer can really help the hops in your IPA stand out! Vinnie suggests supplementing approximately 5% of your grain bills sugars with dextrose. Dextrose is a very simple sugar that yeast can easily ferment. Another option would be dropping your mash temp down by a degree or two in order to create less complex sugars during the mashing process.


http://www.westcoastbrewer.com/BrewersBlog/home-beer-brewing-techniques/seven-easy-ways-to-improve-your-ipa/