
By Josh Pfriem http://www.homebrewersassociation.org/zymurgy/classical-lager-brewing/
Brewing classical lager beers is a balancing act that allows you to unleash delicate and subtle flavors while showing off beautiful raw ingredients. To drink a well-made German lager is like experiencing a well performed symphony; it is to experience balance and harmony.
Technical brewing is a combination of engineering, chemistry, biology, physics, mathematics and art. To brew fine and well-made classical lager beers, you will need to take all the elements of brewing and move them up to the next level. This article will show you some gear to step up your brew system and some techniques that will help you become a more sophisticated brewer. The precision of the equipment is very important so you can know what you did, when you did it, and then go back and make changes, if necessary.
Building Your Lager Beer
The beauty of lager brewing is that you subdue fermentation with lower temperatures so that you can showcase your raw ingredients and brewing techniques. The quality of your brewing ingredients is very important. Choose the highest quality grain (I prefer Weyermann over most domestic malted barley) and the greenest, freshest hops. There are many different types of lager yeast available from Wyeast and White Labs; have fun experimenting with different strains.
When building your recipe, take detailed notes of what you are doing and when you are doing it. Record yeast information, grain bill, mashing procedures, lautering procedures, boil additions and gravity information with times and temperatures.
Yeast
There are many ways to do yeast starters. Here is a simple but effective way to get your yeast healthy and pitching numbers up.
Boil 32 ounces (1 liter) of water, add half cup (0.12 liter) of dry malt extract and 3 grams of yeast nutrient. Boil for 15 minutes, cool to 50° F (10 ° C). Do not let the temperature rise above 54° F (12° C). Pour into a sanitized growler with airlock (use vodka in airlock). Pitch at least two packets of yeast from White Labs or Wyeast. Shake very well for aeration. Pitch yeast starter to wort within 24 hours. Pour off as much of the beer on top of yeast as possible, swirl, then pitch.
Brewing Salts
It is very important to understand your water chemistry and pH. There have been many articles and books on this topic; please refer to them for further information. Find out what is going on in your water so you can adjust with brewing salts. The salts can enhance flavor, help immensely with fermentation and finishing, but if used incorrectly can have negative effects on your beer.
- A carbon filter (found at a local hardware store) at your water source will remove chlorine and heavy metals, but won’t affect the pH or mineral content of your water. Assuming your city water is not too hard or too soft and you are using a carbon filter, below is a guide for a 4-gallon (15 L) batch.
- Use calcium sulfate for drier, bitter or more hop-focused beers.
- Use calcium chloride for maltier, softer and fuller beers.
- Use 2 grams in mash.
- Use 1.5 grams in kettle.
A measuring scale is helpful.
Mashing
Heat water (one liter per pound of grain) in mash vessel 15° F (8° C) above target temperature. If shooting for 150° F (66° C), raise water temperature to 165° F (74° C). Learn about different step mash procedures to influence your beer. A single infusion mash is fine with modern malts. If you want a maltier beer, encourage alpha amylase activity by make sure you create more alpha amylase by keeping your mash temperature between 153-156° F (67-69° C). Use a chef’s digital thermometer (found in a restaurant supply store) for accurate temperatures.
Mash for 60 minutes.
A mash paddle will help with good mixing and to make sure you do not scorch your mash.
At 60 minutes, add 1 gallon of 190° F (88° C) water and add heat to bottom of mash vessel (assuming you are using a direct-fired tun), bringing the mash temperature up to 160° F (71° C).
Lautering

Move all grain to lautering vessel. Make sure this vessel has a false bottom and sparge capability. Let grain settle for 10 minutes, then vorlauf for five. When vorlaufing, pull wort off slowly with a pouring vessel, then gently pour over the top of the grain bed.
After vorlauf is complete, turn sparge water on (178° F, 81° C) over the top of grain bed. While running wort to kettle, make sure the grain bed is always covered with water. Slowly run wort to kettle. It should take 45 minutes. Do not collect wort that is less than 1.010 or 2.5 P at 60° F (16° C). Collect 7 gallons (26 L) of wort (or 12 gallons or 45 L if collecting for two fermentation vessels.)
After vorlauf is complete, turn sparge water on (178° F, 81° C) over the top of grain bed. While running wort to kettle, make sure the grain bed is always covered with water. Slowly run wort to kettle. It should take 45 minutes. Do not collect wort that is less than 1.010 or 2.5 P at 60° F (16° C). Collect 7 gallons (26 L) of wort (or 12 gallons or 45 L if collecting for two fermentation vessels.)
Kettle Boil
Once kettle is at desired level, it should be at a boil within 5 minutes. Boil wort for 90 minutes, starting hop additions at the beginning of the boil. Try to keep a strong rolling boil for the entire duration. You should have 5 gallons (19 L) of wort at the end of the boil.
A stick with measured lines for liquid levels is helpful for your kettle level.
With 10 minutes left toward the end of the boil, add Whirlfloc or Irish moss (1 gram) and yeast nutrient (1.5 grams).
Whirlpool
At flame out or knock out, use a mash paddle to whirlpool wort for 30 seconds. Let wort rest and settle for 30 minutes.
At flame out or knock out, use a mash paddle to whirlpool wort for 30 seconds. Let wort rest and settle for 30 minutes.
Strike Out and Aeration
A plate chiller is a crucial piece of equipment for lager brewing. Run the wort through the plate chiller, bringing the temperature down to 50° F (10° C) for lagers.
An inline temperature gauge is ideal for temperature control, combined with an inline aeration stone hooked up to a small aeration pump (use a fish tank pump).
Run wort to the fermentation vessel, leaving 20 percent head space for fermentation. Leave the last gallon or so of wort in the kettle, noticing the hop/trub cone that you have left behind. Take a gravity sample halfway through transfer.
Yeast Pitching
Once your strikeout is complete, shake the yeast starter well and pour it into the fermentation vessel.
Fermentation
Yeast health, viability, and numbers are incredibly important. Ferment your lager beer in the lower 50s (10-12° C).
You will need a dedicated refrigerator or freezer with a temperature control unit set at 50° F (10° C) in order to lager your beer properly. When fermentation is nearly complete, raise refrigerator temperature to 57° F (14° C) for diacetyl rest. Fermentation should take between 8-12 days and longer the higher the gravity. Once fermentation is complete, take a gravity sample to ensure how much attenuation you have achieved and find out your alcohol percentage. Lower your refrigerator down to 30° F (-1° C). Age your beer for a minimum of 35 days total, longer for higher gravity beers. Transfer and remove your beer every week to avoid autolysis.
Filtration
In order to remove all the yeast from your beer, you will need to filter it.
A plate filter and 2 micron filter sheets will suffice to filter your beer at home.You will only have a good filtration if you do everything above correctly. Follow the directions that come with your plate filter.
Filtration is a very important part of technical brewing and the benefits are huge. Here is an analogy I created to help people understand its importance.
The Organic Vegetable Garden: Come spring, you decide to make the best organic vegetable garden possible. You gather the finest soil, best manure, the choicest seeds and plants. You pay detailed attention to the proper amount of sunlight-to-water ratio for your entire growing season. When harvest comes, you proudly pluck your vegetable out of the ground. At that moment when the vegetable is covered in dirt and manure, it has the most flavor and purest form. But if you take the vegetable to the sink and rinse it well, you can now hold it up to the light and admire the brilliance of your hard work as you bite into and taste all the subtle perfections because they are no longer hidden behind dirt and manure.
Most brewers yeast, even when in its finest form, is harsh and bitter tasting. There are little to no positive attributes by leaving yeast in beer. The exception to this is beer such as German hefeweizen or Belgian wit where the yeast is desirable to drink.
Filtration is one of the most technical processes used in a brewery. Brewers who understand the great benefit of filtration pride themselves in that they have the technical ability, understanding, education and knowledge to create “brilliant beer.” Other brewers sometimes pass off unfiltered beer as a positive thing because filtration strips flavor from beer. As we see from our vegetable analogy they are correct, but what type of flavors do you like in your beer?
Fermentation Vessels
Cornelius kegs can be used instead of standard carboys.
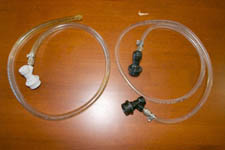
You can ferment 4 gallons (15 L) of beer in a Corny keg. During fermentation hook up the “in” ball lock valve with tubing going into a jar of water creating a vent line. Once fermentation is complete, pull off the “in” valve, leaving a closed system. Place pressure with CO2 on top of keg; hook up cobra head to remove yeast from around dip tub. Then take an “out” ball lock valve connected to an “out” ball lock valve with tubing in-between to create a transfer line. Hook up clean, sanitized, and purged Corny keg to the one with beer in it. Use CO2 pressure to transfer beer into the new Corny keg. Pull and turn pressure relief valve, and leave it open on the Corny keg you are transferring beer to. When transfer is complete, close the pressure relief valve and place pressure on keg.
Filtration is one of the most technical processes used in a brewery. Brewers who understand the great benefit of filtration pride themselves in that they have the technical ability, understanding, education and knowledge to create “brilliant beer.” Other brewers sometimes pass off unfiltered beer as a positive thing because filtration strips flavor from beer. As we see from our vegetable analogy they are correct, but what type of flavors do you like in your beer?
Fermentation Vessels
Cornelius kegs can be used instead of standard carboys.
You can ferment 4 gallons (15 L) of beer in a Corny keg. During fermentation hook up the “in” ball lock valve with tubing going into a jar of water creating a vent line. Once fermentation is complete, pull off the “in” valve, leaving a closed system. Place pressure with CO2 on top of keg; hook up cobra head to remove yeast from around dip tub. Then take an “out” ball lock valve connected to an “out” ball lock valve with tubing in-between to create a transfer line. Hook up clean, sanitized, and purged Corny keg to the one with beer in it. Use CO2 pressure to transfer beer into the new Corny keg. Pull and turn pressure relief valve, and leave it open on the Corny keg you are transferring beer to. When transfer is complete, close the pressure relief valve and place pressure on keg.
Carbonation
Once your beer is filtered into a clean vessel, hook up to CO2 at 10 PSI, leave it hooked up and rock the keg for four minutes (assuming that the beer is at 30° F or -1° C.). Leave beer hooked up to CO2 and let it settle for 24 hours. Look up Zahm and Nagel chart to find exact CO2 volumes. Use your PSI setting combined with temperature of beer for results. 2.6 to 2.9 volumes of CO2 are the range you will be looking for.
Sanitation and Purging
Every part of your equipment that will come in contact with your beer on the cold side will need to be cleaned, rinsed and sanitized.
To clean, use PBW cleaning agent (one tablespoon for each gallon of water) with 120° F (49° C) water with contact for at least 10 minutes. Triple rinse, then use Star San solution to sanitize (1 ounce for a 5 gallon bucket, 28g per 19 L). Do not rinse, but drain thoroughly. After fermentation, purge vessels with CO2 before putting beer in them.
Spray bottles with a strong Star San/water solution are very helpful.
Tasting and Evaluating Beer
You cannot be a technical brewer without having a technical palate. Drink your beer (and professional beer) with a technical palate.
Look for flavor and technical flaws so you can make your beer better next time. Study beers from the style that you are about to brew.
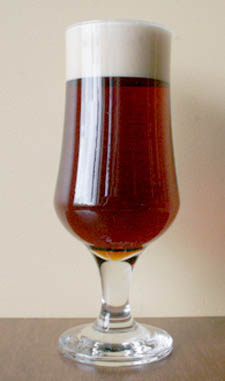
Discovering the beautiful world of classical German lager beers is wonderful and exciting. Fall in love with the rich maltiness of a Munich dunkel, the subtle breadiness of a helles, the full malt flavor of a Dortmunder, and the crisp hoppiness and flowery aroma of a German Pilsner. Dive into style guidelines and try to perfect your beers. Have fun with lager brewing!
Dunkel
Ingredients for 4 U.S. gallons (15.1 liters)
4.5 lb (2.04 kg) Weyermann Pilsner
5.5 lb (2.49 kg) Weyermann Munich II
0.2 lb (90 g) Weyermann Carafa® III
0.3 lb (136 g) Weyermann Caraaroma®
0.25 oz (7 g) Hallertauer Tradition pellets 5% AA (90 min)
0.75 oz (21 g) Hallertauer Tradition pellets 5% AA (60 min)
Wyeast Bavarian Lager 2206
Original Gravity: 1.055
Final Gravity: 1.016
SRM: 19
IBU: 20
Directions
Use all information from above article.
No comments:
Post a Comment