IOne of the challenges that homebrewers often face is portability; bottles are tedious and kegerators are even less mobile. The solution has always been to retrofit coolers with draft hardware, but why not think outside the box? After all, so much effort goes into perfecting the brewing process, so why not take the same approach to presenting our work?
Before the development of modern kegging and draft systems, draught beer was served from wooden barrels until being replaced by metal casks and kegs. As a believer in brewing being not only craft but also art, I wanted to allude to what serving beer used to be; to get back to basics.
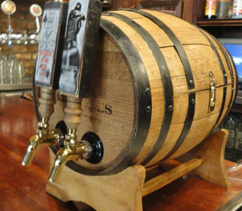
Building a Draft Barrel
 The process of building a draft barrel was a bit more difficult than converting a cooler, however the hardware and tools required were essentially the same.
Supplies
Wood stain (optional) paint for the barrel rings (optional) 1/2” stainless wood screws spray on sealer wood saw and some type of wood-to-metal adhesive
I had originally intended to use stainless steel bulkheads for the beer lines coming in, however the overnight shipping I purchased resulted in the hardware arriving many days later than the first event I chose to use my draft barrel.
Given the design of an ice immersion-type heat exchanger, a door was required to add ice along with a drain for excess water. The drain was easy to install, however cutting out the door has instilled in me a deep respect for Coopers and their craft.
The design of a barrel is a simple yet effective design, but its effectiveness is dependent upon all staves being intact. Luckily I had already numbered the staves before cutting so when the barrel collapsed like a Jenga game I knew where each piece went. It was clear that the barrel rings would not hold in place with the modifications, a problem easily alleviated with 1/2” stainless steel wood screws. Spray on sealer was used on the interior to ensure the device is waterproof.
 The next step was to decide if it would use a plate chiller or stainless tubing for heat exchange. Given the shape of the barrel and the availability of plate chillers, I chose to use tubing. Using some rough math, the thermal conductivity of 304SS and the space limitations of the barrel, I concluded that 35 ft. per coil would be sufficient to produce a serving temperature of 45 degrees or less depending on keg temperatures.
In retrospect a larger barrel would’ve been more appropriate if only a little more cumbersome. In coiling the tubing I had to make effective use of every inch inside of the barrel while avoiding the faucet tailpieces and drain. One was made to an 8.5 inch diameter and the other to 10 inches. This allowed for some gaps between coils and also a gap for adding ice.
 To complete the look I borrowed a DIY tap design using magnets and removable metal fascias for ease of keg swapping. I also chose to include hinges and a latch for the door if only to allow one to not have to set down ones beverage whilst loading ice.
I have used this draft barrel several times and none of the anticipated issues with serving temperature or durability have arisen. I simply adjust the ice on the kegs to get the serving temperature I am looking for. Being smaller than your average ice cooler, it is incredibly portable yet brings a little extra charm to further the experience given to others.
https://www.homebrewersassociation.org/pimp-my-system/whiskey-barrel-jockey-box/
Thank you so much Love your blog..
ReplyDeleteRobinets de Lavabo