Showing posts with label #homebrewingequipment. Show all posts

Tuesday, January 7, 2020

Remove Steam While Brewing - Condenser-Boss Steam Condenser


https://www.brew-boss.com/Condenser-Boss-Boil-Kettle-Condenser-p/cb-bb-apmount.htm

CONDENSER-BOSS - STEAM CONDENSER

Do you brew indoors and struggle with how to get rid of all the steam created during the brewing process, especially during the boil part of the brew process? Historically, home brewers installed electric fan exhaust hoods above their brew kettles and evacuated the steam to the outdoors. In fact, you've probably seen that method used in some of our demonstration videos. The problem with exhaust hoods is that all your conditioned air (heated or air conditioned) inside your home or brewery, is evacuated the outside while you are brewing. This means that your furnace/air conditioner has to work overtime to heat/cool the indoor air you air to keep up with what you are exhausting the outside! Over a 2 hour brew session, that represents a real cost as well as unnecessary wear and tear on your heating/cooling system.

Commercial breweries don't use exhaust hoods, instead they have elaborate and expensive steam condensing systems attached to their boil kettles to condense steam back down to water. We've been working over a year testing various designs for a smaller simpler condenser that we could offer for our homebrew and small brewery customers that would attach directly to our Brew-Boss and Brew-Boss Pro kettles without modification.

Introducing the Condenser-Boss. This really cool device mounts directly to the Deluxe Accessory port on your Brew-Boss kettle (or most other boil kettles). We've tried/tested/researched several designs, using our concepts, as well as information found on public homebrewing forums, to finally settle on this design.


https://www.brew-boss.com/Condenser-Boss-Boil-Kettle-Condenser-p/cb-bb-apmount.htm

The image above shows how simple this device is. It is constructed from off the shelf parts! Basically, cold water is mixed directly with steam to condense the steam inside a Triclamp "T". The device is clamped onto the accessory port on the kettle. A cold water supply is connected to the device. This cold water supply can be tap water or could be water that you recirculate through a chiller or large tank using a pump that delivers at least 20psi. The device uses about 9-15 gallons of water per hour, depending on the temperature of the water and the power input to the kettle. A flow control valve is included that allows you to regulate the flow to the lowest flow you can that eliminates any steam from exiting the device. Note the image shows a camlock fitting for cold water supply connection. The device you will receive will have a female garden hose connenction.

When the steam condenses inside the device, the steam contracts and actually creates a vacuum inside the kettle, sucking the steam into the device. This assures that all the steam is evacuated and DMS is expelled. The result is a steady stream of warm water discharging at the bottom of the device. You can dicharge this via a hose (not included) to a drain, let it drain into a bucket as we show in the video, or create a closed loop where you cool the water and pump it back into the cold water inlet.

We also provide a gasket that you press onto the rim of the kettle that provides a steam-proof seal between the cover and the kettle, so that no steam can exit the kettle through the lid gaps. We found placing some weights on the cover help prevent leakage around the lid. Other providers do not supply this gasket!

After using this device for several brews, we've found that there was one huge, unexpected advantage, beyond eliminating the exhaust of our conditioned indoor air to the outside that we did not consider! We greatly reduced our electrical power used for the brew session!. Because the boil occurs with the cover on the kettle, the power requirement to maintain the boil was reduced to less than half! On our 20 gallon Brew-Boss system we use regularly, we typically had to boil at 63% power to maintain the proper boil. We-ve found that we can reduce that to 28% and maintain the same rolling boil! We feel sending 15 gallons of water down the drain, although not ecologically desirable, is way more than compensated by the power savings it provides during a 60-90 minute boil.

This item includes a female garden hose fitting that allows you to connect directly to the discharge end of a garden hose. It also includes the mini flow control valve that allows you to turn the device off right at the device and to regulate water flow to minimize flow.

The cost of this item may seem high, but is much less than the alternative of installing an exhaust hood, and that doesn't even consider the ongoing cost of heating/cooling your indoor air every time you brew!

NOTE
: Unfortunately, this can't be used if you are using our Hops-Boss automated hops feeder.


APPLICATION NOTES: If you don't own a Brew-Boss kettle, and want to use this device, you have a few options to mount this device to your kettle.

Option 1: Purchase our Deluxe Accessory Port option for your kettle. Installation of the accessory port requires drilling a 7/8" diameter hole near the top of your kettle. This is the easiest way to add to third party kettles.

Option 2: If you would prefer to use a 1.5" Tri-Clamp flange on your kettle, select this option and we will not send the CamLock type connectors with the unit. It will simply ship with a 1.5" Tri-Clamp flange. With this option, we will also send you our Weldless 1.5 inch bulkhead triclamp flange adapter that you install on your kettle. This requires drilling a 41mm hole in your kettle. You will also need a Tri-Clamp gasket and clamp (not included).

Option 3: If you already have a 1.5" Tri-Clamp flange on your kettle, select this option and we will not send the CamLock type connectors with the unit or a Tri-Clamp bulkhead flange. It will simply ship with a 1.5" Tri-Clamp flange that you connect to your Tri-Clamp flange with a gasket and clamp (not included).

https://www.brew-boss.com/Condenser-Boss-Boil-Kettle-Condenser-p/cb-bb-apmount.htm


www.brew-boss.com


Monday, December 9, 2019

Low Price SS Heatling Elements - 5500 Watt, 2250 Watt, 1650 Watt

Low Price SS Heatling Elements - 5500 Watt, 2250 Watt, 1650 Watt

5500 Watt - W
as $75, NOW $50
https://www.brew-boss.com/ULWD-L6-30P-Stainless-Steel-Ripple-Heater-Element-p/htr-5500-ripple-l6-30p.htm


Beware of cheap copies with rubber band covers over the high voltage terminals and corrosive parts. They are not safe and are poorly constructed. The Brew-Boss heater is 100% potted with epoxy and is waterproof. No worries when cleaning about getting water inside the element.

It features an integrated 1.5" Tri-Clamp ferrule as well as an integrated L6-30P twist lock plug! Never has it been so easy to convert to electric brewing. No longer do you have to figure out how to enclose your heater element to make it safe. Any L6-30R twist lock receptacle will connect to this element or use the Brew-Boss Heater Cable for a perfect fit.

This heater requires a 1.5" Tri-Clamp flange on your kettle (all Brew-Boss kettles have this flange welded on). If you are converting to electric or have another brand of kettle, you can add a Tri-Clamp flange by having one welded on locally or by using our Weldless 1.5 Inch Tri-Clamp Bulkhead Adapter.

The element is constructed of shiny 304 stainless steel and will look like new for years. it is an ULWD (Ultra Low Watt Density) element, so no worries about scorching your wort.

The element itself is 14 inches long and the ferrule is a 1.5" Tri-Clamp. Please order the clamp and gasket separately as they are not included with this item.

This listing is for the heater element only. Pictures of the element with the mating Brew-Boss Heater cable are shown only to show how the components fit together.

  • 304 Stainless Steel
  • 14" Long Ripple Style
  • 240 Volts AC
  • 5500 Watts
  • Ultra Low Watt Density
  • Integrated L6-30P Twist Lock Plug
  • Integrated 1.5" Tri-Clamp Flange
  • Epoxy filled making it waterproof


It features an integrated 1.5" Tri-Clamp ferrule as well as an integrated L6-30P twist lock plug! Never has it been so easy to convert to electric brewing. No longer do you have to figure out how to enclose your heater element to make it safe. Any L6-30R twist lock receptacle will connect to this element or use the Brew-Boss Heater Cable for a perfect fit. This element requires a 20 amp 120 volt AC circuit to operate. Most residential outlets are 15 amp circuits. Make certain that you have a 20 amp circuit if you plan to use this heater.

This heater requires a 1.5" Tri-Clamp flange on your kettle (all Brew-Boss kettles have this flange welded on). If you are converting to electric or have another brand of kettle, you can add a Tri-Clamp flange by having one welded on locally or by using our Weldless 1.5 Inch Tri-Clamp Bulkhead Adapter.

The element is constructed of shiny 304 stainless steel and will look like new for years. it is an ULWD (Ultra Low Watt Density) element, so no worries about scorching your wort.

The element itself is 9 inches long and the ferrule is a 1.5" Tri-Clamp. Please order the clamp and gasket separately as they are not included with this item.

This listing is for the heater element only.
  • 304 Stainless Steel
  • 9" Long Foldback Style
  • 120 Volts AC
  • 2250 Watts
  • Ultra Low Watt Density
  • Integrated L6-30P Twist Lock Plug
  • Integrated 1.5" Tri-Clamp Flange


1650 Watt -  Was $65, NOW $40

https://www.brew-boss.com/120-Volt-1650-Watt-Foldback-Heating-Element-p/htr-1650-foldback-l6-30p.htm


It features an integrated 1.5" Tri-Clamp ferrule as well as an integrated L6-30P twist lock plug! Never has it been so easy to convert to electric brewing. No longer do you have to figure out how to enclose your heater element to make it safe. Any L6-30R twist lock receptacle will connect to this element or use the Brew-Boss Heater Cable for a perfect fit.

This heater requires a 1.5" Tri-Clamp flange on your kettle (all Brew-Boss kettles have this flange welded on). If you are converting to electric or have another brand of kettle, you can add a Tri-Clamp flange by having one welded on locally or by using our Weldless 1.5 Inch Tri-Clamp Bulkhead Adapter.

The element is constructed of shiny 304 stainless steel and will look like new for years. it is an ULWD (Ultra Low Watt Density) element, so no worries about scorching your wort.

The element itself is 9 inches long and the ferrule is a 1.5" Tri-Clamp. Please order the clamp and gasket separately as they are not included with this item.

This listing is for the heater element only.
  • 304 Stainless Steel
  • 9" Long Foldback Style
  • 120 Volts AC
  • 1650 Watts
  • Ultra Low Watt Density
  • Integrated L6-30P Twist Lock Plug
  • Integrated 1.5" Tri-Clamp Flange


#heatingelements, #brewboss, #homebrew

Thursday, August 29, 2019

HOPS FILTER BASKET/SPIDER

HOPS-BOSS HOPS FILTER BASKET/SPIDER 6X16"


https://www.brew-boss.com/product-p/hb-filter0616.htm
Hops filter basket. Keeps hops sediment out of your wort. Filter is constructed of 100% 304 Stainless Steel and is 6" dia x 16" tall with brackets that hang on the side of most brew kettles. It works as a stand-alone unit or with the Hops-Boss unit as well (see picture). This filter fits 15 and 20 gallon kettles only when used with the Hops-Boss as it is too tall for the 10 gallon kettle, although it can be set on the bottom of the 10 gallon kettle and used as a stand-alone filter.


The basket is wrapped with 300 micron stainless steel wire mesh. 
  • 6" Diameter x16" Tall
  • 300 Micron
  • 100% 304 Stainless Steel
  • Easily cleaned


Your Beer, Your Way!  Brew like a Boss!


#hopsfilterspider, #hops, #brewboss, #homebrewingequipment, #biab


Friday, April 19, 2019

Hoppy Easter SALE - Brew Boss Electric Homebrew Systems


Fill your basket -
JUST A FEW SYSTEMS LEFT AT THIS PRICE!


*** Brew Boss Lowest Price SALE ***


Up to 25% off the best homebrewing system out there!


These are complete electric brewing systems using the newest V3 controller.

Brew Boss -15 gallon system https://www.brew-boss.com/Brew-Boss-Homebrew-System-p/bb-15basic-v3.htm

Brew Boss 20 gallon system https://www.brew-boss.com/Brew-Boss-Homebrew-System-p/bb-20basic-v3.htm

*Get yours before they are gone!


Your Beer, Your Way!  Brew like a Boss!

Wednesday, November 29, 2017

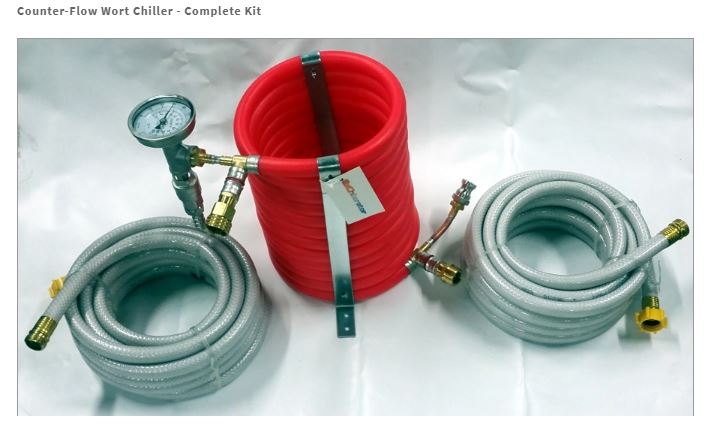
Brew Boss: Counter-Flow Wort Chiller - Complete Kit

Counter-Flow Wort Chiller - Complete Kit


http://www.brew-boss.com/Counterflow-Chiller-p/chiller-cf.htm


EXCHILERATOR MAX COUNTER FLOW WORT CHILLER KIT

We've tested many chillers and by far this one outperforms all others. We don't believe there is a more efficient chiller made. Simply pump your wort directly from the brew kettle (after whirlpooling with Swirl-Boss of course) through this chiller, and adjust the output valve to attain the proper pitching temperature. Literally chills an entire batch in the time it takes to pump it out! We include everything you need to use this chiller, including water supply hose, water discharge hose, pump connection, and brewery grade tubing for discharge of wort to fermenter.
  • Easy to use - fast clean up.
  • Inner tubing uses Co-Helical Design for Maximum chilling power
  • Uses PEX Material to provide low energy loss to atmosphere
  • Includes - Stainless Steel Nipple for 1/2" Silicone Hose on discharge and CamLock Nipple on Input Side of Chiller
  • Includes - Female and Male Garden Hose Fittings for Cold Water Supply and Drain Hoses Respectively
  • Includes - Two (2) 25 foot long food grade garden hoses for cold water supply and hot water drain
  • Includes - 6 Feet of 1/2" ID Silicone Brewery Hose For Chiller Discharge to Fermentation Vessel
  • Includes Dial Temperature Gauge and "T" Fitting
  • Includes 1/2" Ball Type Flow Control Valve for easy flow regulation to obtain proper output temperature.
  • No other wort chiller like "The ExChilerator". You receive it with everything you need for your brewery.
  • Brew-Boss also includes all the fittings and hoses to connect this to your pump and water supply, so this unit is complete, nothing else needed.


Your Beer, Your Way!
Brew Like a Boss!


#counterflowwortchiller,#brewboss,#homebrewequipment,#beer


Saturday, November 25, 2017

Brew Boss - Clean In Place (CIP) Assessory

http://www.brew-boss.com/Brew-Boss-Accessory-Port-Mounted-CIP-Ball-p/bb-cipmini.htm

BREW-BOSS ACCESSORY PORT MOUNTED CIP BALL
CIP stands for "Clean in Place". Professional breweries use this technology to clean their brew tanks as obviously you cant carry a 15 barrel brew kettle to a sink to clean it!

This CIP ball assembly is flow matched to the Chugger and TopsFlo pumps we supply with our homebrew systems. It attaches directly to the accessory port on the Brew-Boss 10, 15, and 20 gallon kettles. It allows you to clean your kettle after a brew session very easily. No more lifting the kettle and carrying to sink!

Cleaning Process for the Brew-Boss System:
1. Pump all wort into your fermenter until the pickup tube in the kettle can no longer suck liquid as you normally would after a brew session.
2. Use a wet/dry shop vacuum or wet rags to clean the trub (debris) at the bottom of the kettle.
3. Spray the inside of the kettle with a hose fitted with a strong stream spray nozzle to remove as much debris as possible from the heating elements first then from the sides of the kettle.
4. Once you accumulate 2-3 gallons of water, pump the dirty water out of the kettle into a drain or gravity drain the kettle.
5. Using the hose with spray nozzle again, spray the inside of the kettle, heating elements first, until the water level is about 1 inch above the heating element.
6. Turn on the heater to 75% power using the power slide bar in the Brew-Boss app.
7. Install the Brew-Boss Accessory Mounted CIP Ball to the accessory port.
8. Wait for the water to get quite hot (130-150F), and turn off the heater.
9. Add appropriate amount of PBW (powdered Brewery Wash) or other cleaner to the hot water.
10. Place the cover on the kettle and make certain the valves are wide open.
11. Turn on the pump. The CIP ball should begin spinning inside the kettle and spraying water all over the inside.
12. Let the pump run for 5-10 minutes or until no debris is visible inside the kettle.
13. Pump the dirty water out of the kettle into a drain or gravity drain the kettle.
14. Using the hose with spray nozzle again, spray the inside of the kettle to rinse the cleaner out of the kettle.
15. Pump the rinse water out of the kettle into a drain or gravity drain the kettle.

The above process seems complex only in the number of steps, but it is basically doing the same few steps over and over. The benefit of this method is the kettle never needs to be lifted or tipped over and no manual scrubbing is rarely necessary.


Your Beer, Your Way!
Brew like a Boss!!


#homebrewingequipment, #cleaninplace, #brewboss, #beer