Showing posts with label Bottling. Show all posts

Sunday, January 17, 2016

Mastering the Art of Bottle Conditioning


Bottling catches a lot of flack, especially from the die-hard keggers out there. Sure, preparing and filling a few cases of bottles is more labor-intensive than racking to a single keg, but packaging homebrew in bottles also has its benefits.

For one thing, grabbing a 6-pack of bottles to share or give to friends is quite a bit more convenient than shlepping a keg, CO2 tank and tap gear. Bottles are also perfect for long-term aging without taking up too much space in the cellar. And sometimes, there’s just nothing like popping a bottle of your own homebrew and hearing that “pffft” sound before pouring a beer into a glass.

To successfully bottle condition beer, it is important to take into account four key components: yeast, sugar, temperature and time.

Yeast

First and foremost, is yeast. Without enough viable yeast, there is nothing to convert sugar into CO2, which is what creates carbonation. If a beer undergoes a standard, healthy fermentation then there should be no issue with having enough yeast ready to do just a little bit more work to bottle condition beer.

Issues can arise, however. Extended fermentation periods, as well as highly flocculent yeast strains paired with lengthy secondary aging can cause yeast to go dormant. Filtering beer can also prevent enough viable yeast from making it into the bottling bucket. In these instances, more yeast can be pitched, which is actually sometimes standard procedure in many commercial breweries that bottle condition filtered beer.

The moral of the story—make sure the yeast is happy, healthy and up to the task of bottle conditioning your homebrew.

Sugar

The next vital key to the bottle conditioning puzzle is sugar. Without enough fermentable sugar, yeast will have nothing to transform into CO2 and carbonate beer. There are a few options for ensuring sugar levels are where they need to be to achieve the desired level of carbonation without fear of creating the dreaded “bottle bombs” (bottles that explode to due being over pressurized).

The daring homebrewer may determine when there’s just enough fermentable sugar left during fermentation and bottle at this point, but this is quite risky and without some experience with the particular recipe you’re brewing. The more common route is to wait for primary fermentation to complete fully, pick an easily fermentable sugar and add it to the bottling bucket. Rack the beer atop the sugar, mix it in thoroughly (without splashing!) and fill the bottles.

Corn sugar is the go-to priming sugar for many homebrewers because it is a simple sugar that is easily converted by yeast in a short time span. But brewers use everything from malt extract to honey to bottle condition beer. It is important to point out that different sugars have varying degrees of fermentability and will take different amount of times to achieve conditioning.

But wait! One of the most important parts of priming sugar is determining how much you need to achieve a specific level of carbonation, measured in volumes of CO2. The general rule of thumb used by beginners is 3/4 cup (177g) of corn sugar per 5 gallon batch to reach 2.25-2.5 vol. CO2. But, if you are after something with a higher or lower level of fizz, then you need to make some measurements.

Use the nomograph below to determine the amount of sugar you need to reach a specific level of carbonation. This is intended for a 5 gallon batch, but the amount of sugar determined for 5 gallons can be scaled to any volume. To use the nomograph, mark the temperature at which the beer will be bottled, the volumes of CO2 you’re after and then connect the lines with a straight-edge. Where the lines intersect the meter all the way to the right will determine how much corn or cane sugar is needed to reach that level of carbonation. Simple! Brewing software and online calculators can also be used to determine priming sugar amounts.
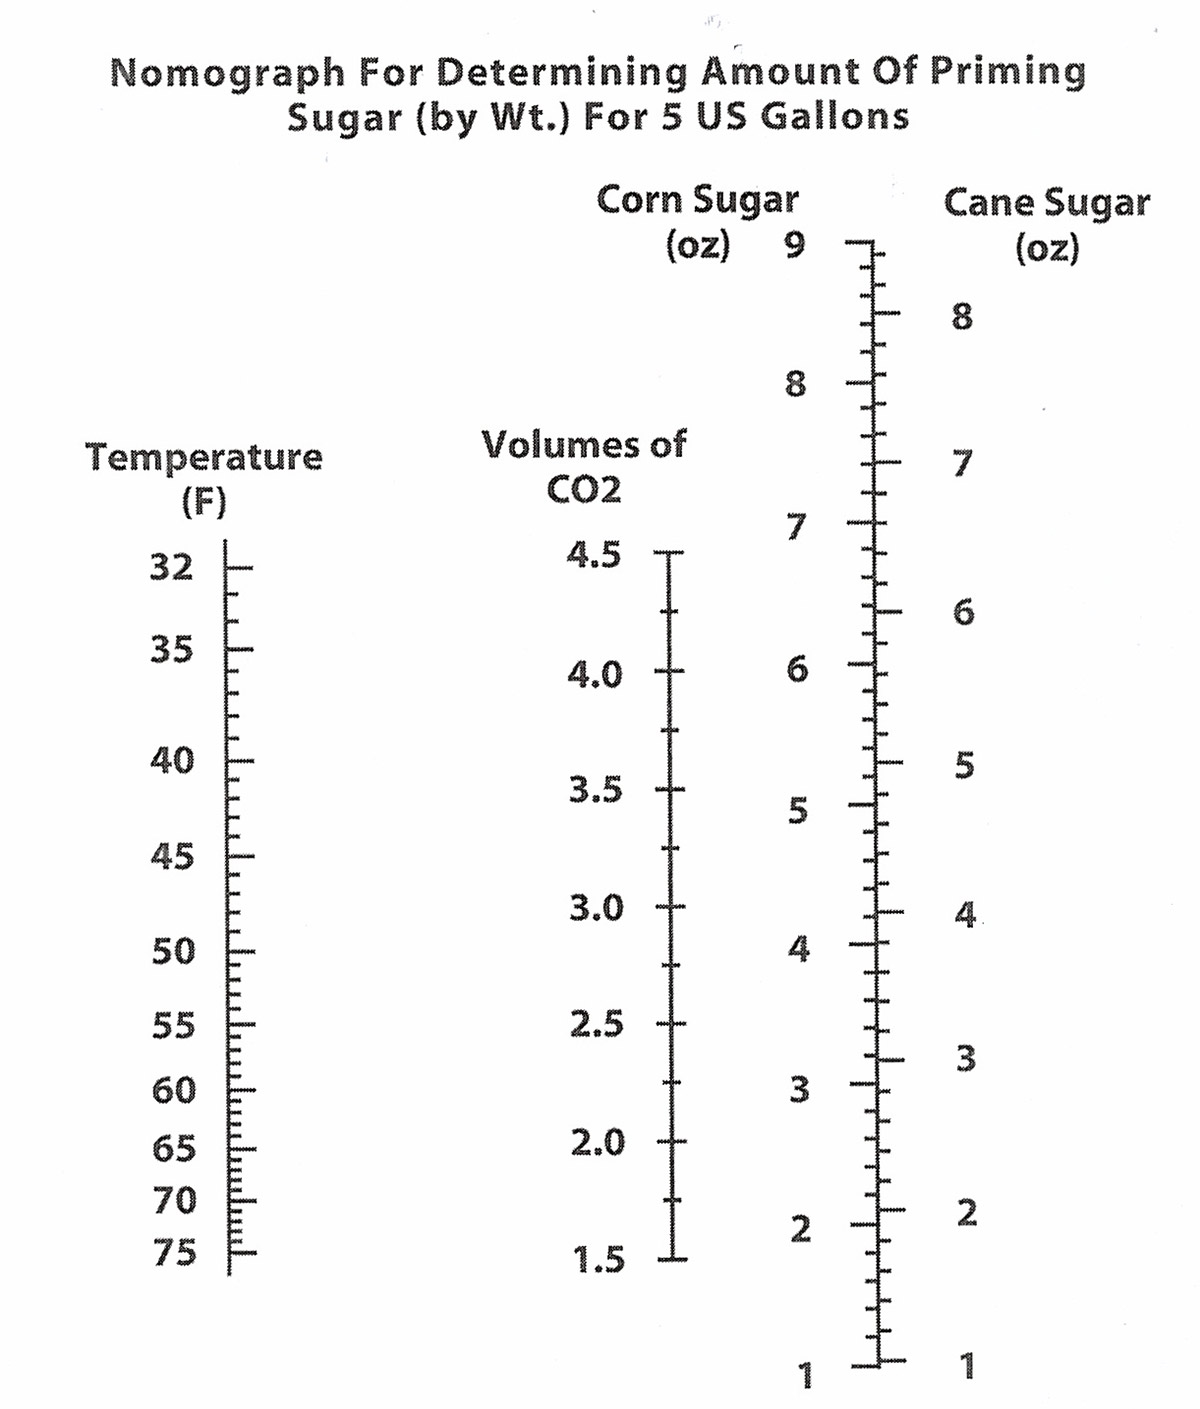
Carbonation Chart
Click image to enlarge. Graph From How To Brew by John Palmer.

Temperature

As with primary fermentation, temperature plays a big role in how efficiently yeast will do its job converting sugars into alcohol and CO2. At the very least, filled and capped bottles should be stored at the temperature it was held during primary fermentation. A little warmer can be even better. 68-80°F is the general range for bottle conditioning.

If you notice your bottles are having a hard time fermenting, but you’re confident with the yeast and priming sugar levels, it could very well be the temperature. Try sticking the bottles in a slightly warmer place and keep them off cold cellar floors that may be deceptively colder than the ambient temperature.

Time

Last but not least is time. Bottle conditioning typically takes 2-4 weeks to complete when using corn sugar. If you pop a bottle at two weeks, you’ll likely still hear the “pffft” of carbonation, assuming everything went to plan, but aging time up to a month is beneficial to ensure all the priming sugar has been consumed and the carbonation level has reached its fullest potential.

It’s important to remember that different priming sugars will take various lengths. Honey, for example, typically takes a bit longer than corn sugar. After two weeks, open a bottle every week or so and track the carbonation. Once you enjoy what you taste, it’s time to enjoy the fruits of your labor!
Sources: “Putting the Bubble in Your Beer” by Ray Daniels (September/October 2001Zymurgy); “For Easier Bottling” by Chuck Skypeck (September/October 2001 Zymurgy);How to Brew by John J. Palmer

Tuesday, November 17, 2015

Bottling Beer: 10 Tips for Home Brewers

EBIAB www.brew-boss.com / Brew Boss Electric Homebrewing Equipment


Bottling beer can be tedious, which is why many of us eventually make the switch to kegging. Home brewers say that bottling is their least favorite part of the brewing process. To help ease the pain, this week we present 10 tips on bottling your home brewed beer.

1. Inspect your Bottles Before Use – Inspect each bottle by holding it up in front of a window or light source and looking straight down the bottle. Bottles tend to chip and crack either around the mouth or bottom of the bottle, and they also tend to collect mold and other debris at the very bottom. Discard bad bottles to avoid a potential bottle bomb. Choose well made heavier bottles if possible and never use twist off bottles!

2. Remove Labels with Ammonia – Soak recycled bottles overnight in a solution of water and ammonia. After soaking, you will be able to gently rub off most bottle labels with your hands. Be sure to wear rubber gloves and work in a well ventilated area as the ammonia gas can be dangerous.

3. Use a “Jet Bottle Washer” and Bottle Brush – Used bottles frequently have clumps of mold in the bottom that can be difficult to remove. A “Jet Bottle Washer” washer is a device that screws onto the end of your faucet and has a valve on it that activates when you push the bottle over it. A bottle jet will make short work of cleaning most bottles. For stubborn sediment, a small bottle brush will remove the rest. Sanitize your bottles in a high quality sanitizing solution before bottling.

4. Don’t Bottle Directly from the Fermenter – Siphon your beer off the fermenter and into a temporary priming bucket or carboy when bottling. Minimize splashing, as air can easily oxidize your finished beer. Mix your priming sugar in while the beer is still in your priming bucket. This will help reduce the amount of sediment in your finished bottles, and also assure that the priming sugar is evenly mixed into your beer.

5. Use Fining Agents Well Before Bottling – Fining agents help to clarify your beer and reduce sediment in the finished bottles, but they need to be added well before bottling. Additions such as gelatin and polyclar should be added after active fermentation, but 5-7 days before bottling to give them time to settle as much of the excess yeast and proteins from the finished beer as possible.

6. Weigh your Priming Sugar ­- Avoid the habit of just adding 3/4 cup of corn sugar to your beer. Sugars vary widely in density, so one cup of a corn sugar may not be the same as another. Calculate the weight of the priming sugar needed for your target carbonation level using a tool such asBeerSmith or an online calculator and then weigh the sugar or DME before adding it.

7. Purchase a Good Bottle Capper – If you have ever used a cheap bottle capper, then you understand how important this piece of advice is. There are many different styles of bottle cappers, and all can work well, but spend a few extra dollars on a well made capper. Ask your local homebrew store owner which one he recommends. The extra dollars will save you a lot of pain and suffering on bottling day.

8. Oxygen Absorbing Bottle Caps or Not? – Oxygen absorbing bottle caps are a popular item, but are they really needed? Unless you are planning to store your beer for an extended period (a year or more), the answer is most likely no. The oxygen in the headspace of the bottle during bottling is consumed in part by fermentation of the priming sugar. In addition, CO2 is produced during fermentation of the priming sugar that helps protect the beer. As long as the caps are tight and properly sealed, there should be little risk of oxidization.

9. Fill bottles to the Brim – Bottles need the correct amount of headspace (air) at the top of the bottle for carbonation and proper pressure. If you are using a wand type of bottle filler, you can generally fill your bottles very close to the top before removing the wand. This should leave about 1″ to 1-1/2″ of headspace in the neck of the bottle, which will work well for carbonating your beer.

10. Store your Bottles Properly – After capping the bottles, store them at fermentation temperature for at least two weeks to allow proper fermentation of the priming sugar for carbonation. After that, store your beer in a cool place away from light. If you want to clear the beer more quickly, consider laagering (cold storing) your beer in the refrigerator. After use, rinse your bottles clean and store them upside down to make it easy to clean them next time.


Saturday, July 25, 2015

What's Happening in Your Beer Now? Bottle Conditioning

One more week to go until your beer is ready to drink! Are you feeling tempted to sample a bottle a little early? Totally understandable. Today, let's talk about what's really happening inside that bottle right now, and why it's best to resist the temptation to open it early.


What Happens After Bottling


The most important thing that's happening in that bottle right now is that you're beer is carbonating. The yeast is eating the last bit of sugar you added during bottling and releasing carbon dioxide. The carbon dioxide will first float to the top of the bottle, and then, as that space gets crowded, it will be gradually forced back into the beer itself. This is how carbonation works (science!) and why you see streaming bubbles all the way through the liquid once you pull off the cap.

This carbonation process takes between seven and 14 days, depending on factors like room temperature, active yeast left in your beer, the kind of sugar you used to prime the beer, and a few other things. It's not an exact science, which is why I generally recommend waiting a full two weeks before sampling your beer.

In addition to carbonating, your beer is continuing to clear and condition. As they finish consuming the priming sugar, the last yeast will fall out of suspension and collect on the bottom of your bottle, along with any other leftover solid bits that haven't cleared yet. This little bit of trub is unavoidable in homebrews — it won't generally affect the flavor of the beer unless there's more than a quarter-inch of it (usually it's just a very thin layer).

Beers also sometimes go through a bit of bottle shock when they're first bottled. If you taste the beer early, you might pick up some harsh notes or sulphuric flavors; these dissipate after about two weeks in the bottle.

The flavor of the beer also keeps changing — and will actually continue to change (usually for the better!) over the months to come. You might notice that your beer tastes different two months from now than it did when you first tried it. With most beer styles, I actually find that the flavor continues to improve over the months, and then starts to deteriorate after a year.

http://www.thekitchn.com/whats-happening-in-your-beer-now-conditioning-the-kitchns-beer-school-2015-217271?crlt.pid=camp.yoWh8DwDclRA