
To the new #homebrewer, understanding the differences between batch sparging and fly #sparging can be confusing. For the seasoned masher, deciding which is a better process for your homebrewing set-up can be an even greater challenge.
What is Sparging?
Sparging is part of the mashing process in homebrewing. After the initial mash step, sparging is used to rinse the grain bed of as much sugar as possible for the most efficient mash. The tricky part is sparging in such a way that the maximum amount of sugars are extracted and lautered into the boil kettle without bringing along tannins from grain husks which show up in beer as unpleasant astringency.
For both batch and fly sparging, it is important to keep sparge water temperatures between 165-170°F (74-77°C) to reduce tannin extraction while still effectively rinsing the grains. Now let’s look at the two most common sparging methods.
Fly Sparging
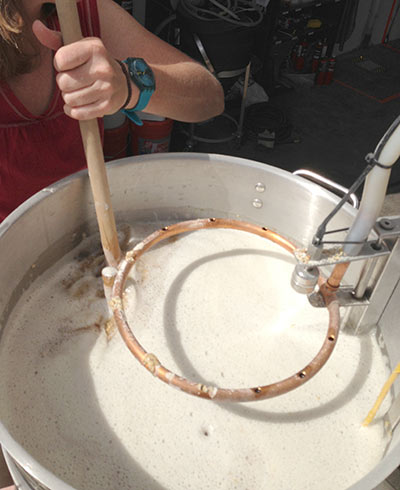
Also known as continuous sparging, fly sparging is a method used by most commercial breweries and all-grain homebrewers. Commercial brewers fly sparge largely due to the claim that the method has higher efficiency than other sparge methods. While a few points difference in efficiency may not mean much to a homebrewer, commercial brewers are trying to make high quality beer at an affordable price, so higher efficiency means less malt is needed, and ultimately less money spent.
However, fly sparging takes considerable time and requires some special equipment. The process is conducted by slowly sprinkling sparge water evenly over the top of the grains while the mash is slowly lautered into the boil kettle. This process of continually adding the sparge water while also lautering is where the name “continuous sparging” derives.
The entire process can take anywhere from a half hour to two hours and requires the ability to pump sparge water into a device known as a “sparge arm,” which is rigged to evenly distribute sparge water over the top of the mash kind of like a shower head.
The depth of the grain bed is crucial in successful fly sparging, along with the rate of flow and even distribution of sparge water. Too shallow of a grain bed will cause wort to come out murky as there is not enough grain to settle and act as a filter. Too deep of a grain bed can cause the dreaded stuck sparge. Generally, 4-8 inches is ideal. Flow rate is also important. If the flow is too fast it can create a vacuum around the false bottom that will also cause a stuck sparge. The flow should be about a trickle and ideally the sparge water is being added at about the same rate as the wort being lautered out of the mash and into the boil kettle.
Batch Sparging
However, fly sparging takes considerable time and requires some special equipment. The process is conducted by slowly sprinkling sparge water evenly over the top of the grains while the mash is slowly lautered into the boil kettle. This process of continually adding the sparge water while also lautering is where the name “continuous sparging” derives.
The entire process can take anywhere from a half hour to two hours and requires the ability to pump sparge water into a device known as a “sparge arm,” which is rigged to evenly distribute sparge water over the top of the mash kind of like a shower head.
The depth of the grain bed is crucial in successful fly sparging, along with the rate of flow and even distribution of sparge water. Too shallow of a grain bed will cause wort to come out murky as there is not enough grain to settle and act as a filter. Too deep of a grain bed can cause the dreaded stuck sparge. Generally, 4-8 inches is ideal. Flow rate is also important. If the flow is too fast it can create a vacuum around the false bottom that will also cause a stuck sparge. The flow should be about a trickle and ideally the sparge water is being added at about the same rate as the wort being lautered out of the mash and into the boil kettle.
Batch Sparging
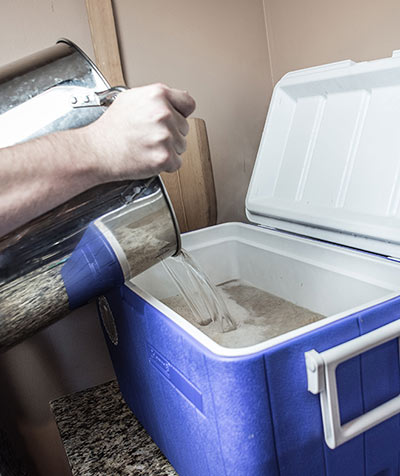
Batch sparging is, for the most part, strictly a homebrewing method. However, batch sparging is likely a descendant of “parti-gyle” mashing, which was a technique popular in England during the 19th century. Parti-gyle brewing is the process of completely draining the mash and using those runnings for one beer, while using the sparge runnings for other beers. Batch sparge uses the same general method of completely draining the mash before sparging, but all the runnings are combined in the boil kettle to be transformed into one beer.
Homebrewers have taken a liking to batch sparging because it requires minimal equipment to conduct and takes considerably less time, compared to fly sparging. All you need in addition to your extract equipment is a cooler converted into a mashtun and an extra pot to heat up the sparge water.
After the mash is complete, collect a few pitchers of wort and slowly add it back to the mash tun to promote a settled grain bed that will act as a wort filter. Once the bed is settled, lauter the wort entirely into the boil kettle, shut the valve of the mash tun, add in the sparge water and stir. After 10 minutes or so, collect all the sparge into the same boil kettle as the mash wort. Some people do one sparge step, others do multiple.
As mentioned in the fly sparging section, batch sparging is said to have lower efficiency than continuous sparging, but for homebrewers making 5-15 gallon batches, it really isn’t much of a difference to grab some extra grain. Some homebrewers would also dispute that the difference even exists. Batch sparging can also fall victim to stuck sparge, especially when gummy malts like wheat are involved. Using these techniques toavoid or fix a stuck sparge can remedy the headache.
Homebrewers have taken a liking to batch sparging because it requires minimal equipment to conduct and takes considerably less time, compared to fly sparging. All you need in addition to your extract equipment is a cooler converted into a mashtun and an extra pot to heat up the sparge water.
After the mash is complete, collect a few pitchers of wort and slowly add it back to the mash tun to promote a settled grain bed that will act as a wort filter. Once the bed is settled, lauter the wort entirely into the boil kettle, shut the valve of the mash tun, add in the sparge water and stir. After 10 minutes or so, collect all the sparge into the same boil kettle as the mash wort. Some people do one sparge step, others do multiple.
As mentioned in the fly sparging section, batch sparging is said to have lower efficiency than continuous sparging, but for homebrewers making 5-15 gallon batches, it really isn’t much of a difference to grab some extra grain. Some homebrewers would also dispute that the difference even exists. Batch sparging can also fall victim to stuck sparge, especially when gummy malts like wheat are involved. Using these techniques toavoid or fix a stuck sparge can remedy the headache.
So Which Should You Choose?
Both sparge methods have their ups and downs, and either can lend themselves perfectly to a homebrewing setup.
Fly sparging might be best for those homebrewers making larger batches in order to save a little cash on ingredients. Prospective pro-brewers who are honing skills as homebrewers may also benefit from continuous sparging since this is typically the method used by commercial breweries.
Batch sparging, on the other hand, is great for the all-grain newbie and homebrewer on a budget. The batch sparge process requires minimal equipment, only adds 10-20 more minutes of time to the mash process and leaves little room for major snafus.
In the end, it’s up to you which to pursue, but either way we’re glad you’re making your own beer at home! Tell us in the comments which sparge method you use and why!
Source: How to Brew by John Palmer





