Saturday, September 5, 2015

Stuck Ferment: Techniques


What is a stuck fermentation?

Brewers generally use the term "stuck fermentation" to mean a fermentation that started normally, but then stopped at a gravity significantly higher than the targeted gravity. But I think I should include in this discussion fermentations that either have not started, or have started very slowly, since these are fermentations that have "stuck" right from the beginning.
Some of the causes of these problems may be similar or at least closely related, but the means of getting fermentation satisfactorily under way may be different, so I shall deal with them separately.

Non-starting fermentations

These are generally the result of one or more of the following causes:
1. Yeast quality:
The sample used was too old or had been mishandled, and just contained few or even no viable cells. If a starter had been made, this lack of viability would have been obvious prior to pitching, and a fresh sample could then have been used for pitching. The answer is to re-pitch with a fresh starter (more on
this later).
2. Lack of nutrients to promote growth:
This is generally not a problem with all-malt worts, but can be so if high proportions of sugars (those not derived from malt) or non-malt adjuncts (such as rice or corn) are used. In that case, adding ammonium phosphate-based nutrients or proprietary nutrients such as Servomyces from White Labs will help, although these should probably be added along with a fresh yeast starter.
3. Insufficient oxygen dissolved in the wort:
Yeasts need oxygen in order to permit sufficient growth of new cells, which are what are going to do the work of fermentation. If fermentation hasn't started at all, then try aerating or oxygenating it again, and preferably re-pitch with a fresh batch of yeast. Whatever your technique may be (splashing, using an aeration device, or direct oxygen with a carbonation stone), make sure you have sufficient oxygen in the wort when you pitch your next brew.
4. Wrong temperatures:
If you pitched into wort above 90 °F (32 °C) then you may have drastically reduced yeast viability, or perhaps even killed the yeast off completely. If the wort was too cold, then that too can cause problems with initial growth. If you pitch an ale yeast strain into wort below 50 °F (10 °C) its growth will be at best sluggish, and it may even give up the ghost entirely. In that case you need to bring the wort temperature up to 65–70 °F (18–21 °C) and then re-pitch with a fresh, active yeast sample. Do pay close attention to the supplier's recommendations for pitching and fermentation temperatures for the yeast strain you are using. Good brewers are those who can brew a particular beer to a consistent quality, and control of fermentation temperature is important in achieving consistency. Temperature-controlled conical fermenters are available to the homebrewer, although at some cost; simpler solutions, such as a heating band or an insulated box heated by a bulb can be quite effective in this regard.
5. Not enough yeast pitched:
This will generally result in a very long lag time before fermentation is visible (that is CO2 bubbles can be seen on the surface. And by long lag time I mean more than 12 hours). It is true that in such cases, assuming none of the earlier problems are the cause, that fermentation will probably get under way eventually, and many homebrewers are content to leave it at that. In most instances the resulting beer will be disappointing for a number of reasons. The first is that wort sitting around at ambient temperatures is an inviting target to beer spoilage organisms; remember that if you encourage them once they may spoil not only the present brew but also later ones! The second is that if the yeast has to struggle in the early stages it may not perform properly as the fermentation gets under way. It may, for example, produce too many esters for the style, and it likely will not handle reduction of diacetyl so that the finished beer has too high a concentration of that chemical and an overly buttery taste. Also the yeast may be too tired to give the desired level of attenuation, so that the beer is overly sweet. This is not an easy problem to solve, for you are unlikely to have a fresh starter on hand to re-pitch the wort, and it will take a day or two to prepare one. Nevertheless, pitching a fresh starter is the best way to go. While you are preparing the starter, make sure the wort is kept tightly covered (with an airlock in case fermentation does start); if you are using an open fermentor all you can do is pray!
6. Very flocculent yeast:
Some yeasts, even when healthy and pitched in sufficient amounts — will flocculate so readily that fermentation will be slow to start and will be sluggish. Some brewers approach this by frequent rousing of the sediment in the fermenter, and that can sometimes work. This is essentially what happens with the traditional Yorkshire Stone Square fermentation system, where the yeast is continually pumped from the bottom of the vessel back to the top of the beer. At least one English beer that I am familiar with is fermented in this manner, and the result is that it has a significant concentration of diacetyl, a flavor that is by no means to everybody's taste.
Just to pull this together, if you have a fermentation that doesn't start or is very slow to do so, you have a serious problem and in most cases the only way out is to add a fresh, active yeast starter. Even that may not work if your wort has picked up unwanted organisms while sitting there virtually unprotected while you prepare the new starter. The latter may finally get a good fermentation going, but those devilish bacteria or wild yeasts will be waiting in the wings to spoil the beer. Every brewer should hold it to be an act of faith to pitch a sufficient quantity of active yeast into properly aerated or oxygenated wort. To me that means preparing a starter, for that will not only give sufficient yeast it will also prove that your sample is viable. How big a starter? Well that is a separate topic and one that I dealt with in the "Techniques" column from March-April 2012. Or you can check at www.mrmalty.com, which will easily allow you to calculate how much pitching yeast you need.

Stuck fermentations

The yeast was pitched and it took off satisfactorily, and then a day or so later everything seems to have stopped, with no more CO2 being evolved. You immediately think you have a stuck fermentation and wonder what to do about it. The very first thing to do is to ask yourself whether it really is a stuck fermentation. Just because the airlock isn't bubbling doesn't mean nothing is happening.
It might just be that you have a sluggish fermentation, which is often the case with high gravity worts, for example. Or, conversely it may have been a very rapid fermentation that reached completion more quickly than you bargained for. Or perhaps there has been a sharp temperature drop, and all you need to do is bring the fermenter into a warmer place. One thing is certain, however, and that is that you must check beer gravity before bottling or even kegging to avoid development of excessive pressure in that final container. If the gravity is the same on three consecutive days, and is in the target zone for finishing, then you are safe to bottle.
But suppose you have taken a gravity reading (take care to remove all gas from the sample) and you get a result greater than a third of the original gravity? Remember, that in most beers you would be looking at a finishing gravity about 15-30% of the original gravity. If this was an all-grain brew it's possible that you mashed at too high a temperature and have too high a level of non-fermentables. If that is the case there is not much you can do about it, you just have to accept it and resolve to take more care when you do the next mash. The only real way to determine if you have a true stuck fermentation is to do a forced fermentation by taking a sample, pitching with an excess of yeast and fermenting warm, then measuring the final gravity and checking it against the gravity of the wort in the fermenter. That's not too practical for the homebrewer, so you have to assume that you do have a stuck fermentation and need to take some action.
If the yeast has given up the ghost it could be that there was insufficient yeast nutrient present in the original wort, or that the yeast has flocculated very rapidly. It would therefore seem that a good solution would be to add some more nutrient and to rouse the yeast thoroughly, a remedy that many brewers espouse. In fact, rousing at this point may cause all sorts of oxidation problems, as well as increasing the concentration of diacetyl in the beer, without actually doing anything to improve attenuation.
What we need to add is some fresh yeast that can pick up the baton from the tired cells and complete the race. But just tossing in more yeast is unlikely to work, because there is no oxygen present to help yeast growth, but there is sufficient alcohol present to "poison" the yeast and reduce its vitality. Instead, the yeast must be in active, vigorous growth phase when it is added to the beer. And that means (yes, you've guessed it) adding a fresh starter. This technique is called kräusening.

Starter directions

If you have space, I suggest you make a 2-quart (2-L) starter for a 5-gallon (19-L) batch (10-15% kräusen is normal for the traditional method). If you do not have the space in your fermenter, a 1-quart (1-L) starter will usually work too, but a larger number of active yeast cells is better. Normally for a starter you would decant the liquor before pitching the sediment to the wort. You can do that here but since you want to add the yeast at full kräusen I think it is preferable to add all the liquid in the new starter.
Take 4 oz. (113 g) of dried malt extract (DME), and add water to a total of 1 quart (1 L), and stir until the DME is dissolved. Add a pinch of yeast nutrient and boil the solution for 20 minutes, then top up with boiled water as necessary and cool to about 70 °F (21 °C). Aerate thoroughly (oxygenation is better) and pitch with a fresh yeast sample; if you have a stir plate keep the pitched wort continuously agitated. Maintain at room temperature until it is fermenting vigorously (the so-called high kräusen stage), then add this starter to the beer. For best results the beer should have been left in the fermenter during this time so that much of the dissolved CO2 will have escaped.
Note that if your new yeast comes in a "smack pack" it can be added directly from the pack without smacking if you wish. However, it is preferable to smack it to break the inner pack and allow the yeast to become active in the pack, and then add its contents to the starter solution so that you get as much growth and as many active cells as possible in the starter.
Note also that some brewers prefer to use very lightly hopped wort to make a starter, usually at 10-15 IBU, which in this case would amount to a maximum of 1 gram of hops at 5% alpha acid.

Thursday, September 3, 2015

Why Cook Sous Vide?

www.brew-boss.com

Cooking sous vide is easier than its fancy name might suggest. You simply seal the ingredients in a plastic bag (you can also use a canning jar) and place them in a water bath, a combi oven, Brew Boss or any other cooker that can set and hold a target temperature to within a degree or two. When the food reaches your target temperature or time, you take it out, give it a quick sear or other finish, and serve it. That’s it.


The sous vide method yields results that are nearly impossible to achieve by traditional means. In the photo above, both of the tenderloins started at the same weight. The steak on the left was cooked in a pan to a core temperature of 52 °C / 126 °F, but more than 40% of the meat was overcooked. The other steak was cooked sous vide to the same temperature and then seared with a blowtorch to yield a juicier steak that is done to perfection from edge to edge.


Similarly, beef short ribs braised at 58 °C / 136 °F for 72 hours are melt-in-your-mouth tender, yet pink and juicy. And the delicate, custard-like texture of an egg poached at precisely 65 °C / 149 °F is amazing.


Sous vide is especially useful for cooking meats and seafood, for which the window of proper doneness is often vanishingly small when traditional methods are used. When you fry a piece of fish, the flesh is most succulent and tender within a very narrow temperature range. Because the cooking temperature of the pan is at least 200 °C / 392 °F hotter than the ideal core temperature of the fish, the edges will inevitably be far more cooked than the center when pan-fried.


Chicken breasts and other poultry cuts and poultry products are often held at a target temperature for a different reason: to kill potential pathogens and improve the safety of the food.


The idea of preserving and cooking food in sealed packages is ancient. Throughout culinary history, food has been wrapped in leaves, potted in fat, packed in salt, or sealed inside animal bladders before being cooked. People have long known that isolating food from air— accomplished more completely by vacuum sealing—, can arrest the decay of food. Packaging food also prevents it from drying out.


Although sous vide literally means “under vacuum” in French, the defining feature of the sous vide method is not packaging or vacuum sealing; it is accurate temperature control. A computer-controlled heater can warm a water bath to any low temperature you set, and it can keep it there for hours—or even days, if needed.


Such mastery over heat pays off in several important ways, most notably, freeing the cook from the tyranny of the clock. Traditional cooking with a range, oven, or grill uses high and fluctuating temperatures, so you must time the cooking exactly; there is little margin for error. With just a moment’s inattention, conventional cooking can quickly overshoot perfection.


When cooking sous vide, in contrast, most foods will taste just as good even if they spend a few extra minutes at a target temperature, so you can relax and devote your attention to the more interesting and creative aspects of cooking.


Precise temperature control and uniformity of temperature has two other big advantages. First, it allows you to cook food to an even doneness all the way through—no more dry edges and rare centers. Second, you get highly repeatable results. The steak emerges from the bag juicy and pink every time.


A final important benefit is that the closed bag creates a fully humid environment that effectively braises the food, so ingredients cooked this way are often noticeably juicier and more tender. Food cooked sous vide doesn’t brown, but a simple sear adds that traditional flavor where needed so that you can have the best of both worlds.


We’ have been asked many times about the safety of cooking plastic bags. The bottom line is that bags made expressly for cooking sous vide are perfectly safe —as are oven bags, popular brands of zip-top bags, and stretchy plastic wrap such as Saran Wrap.


The plastic that these products are made of is called polyethylene. It is widely used in containers for biology and chemistry labs, and it has been studied extensively. It is safe. But, do avoid very cheap plastic wraps when cooking. These are made of polyvinyl chloride (PVC), and heating them presents a risk of chemicals leaching into the food.

Tuesday, September 1, 2015

Homebrewing: 3 Ways to Chill Your Wort

On brewday, chilling your wort as quickly as possible has a lot of benefits. Since it's the last big thing on the brewing schedule, faster chilling means you can finish your brewday more quickly. From a chemistry perspective, faster chilling increases protein coagulation, known as "cold break", which can lead to clearer beer. From a sanitation perspective, the faster you chill your beer and pitch your yeast, the less likely you will get an infection. So it's no surprise that there are numerous methods devised to cool your wort as quickly and efficiently as possible. Here are three of the most common methods for chilling your beer on brewday, with pros, cons, and usage tips.

ICE BATH

The ice bath is the least complicated chilling system, and it's the one that most homebrewers start off with. To use an ice bath, fill a large bucket (larger than your brew kettle), sink, or tub with cold water and ice, and simply soak your kettle in it. The more water you use, and the colder water you have, the quicker your wort will chill to fermentation temperatures. I usually fill a few old milk jugs with water and freeze them a few days before brewing. They're faster to make than ice cubes, and they stay frozen longer, too.
The biggest downside of this method is the amount of time it takes to cool the wort. If you're doing small batches (3 gallons), it will take at least an hour to get your wort below 70°F, and that's with adding ice a few times through the process. If you're doing 5 gallon batches, expect it to take a couple hours and a lot of ice. It's helpful to add a very large amount of ice and let it chill overnight. While the process may be low maintenance, the extended chill time may impair beer clarity and increase the risk of infection in your beer.
Pros: Inexpensive (you need a sink, water and ice). No extra cleaning/sanitization required.
Cons: Increased cooling time, leading to risk of infection and chill haze.

IMMERSION CHILLER

An immersion chiller is a good step up from the ice bath for most homebrewers. An immersion chiller is a long coil of copper tube, from 20 to 50 feet, with hoses that can connect to a sink or a yard hose. To chill the beer, immerse the chiller into the wort, and run cold water through the copper until the beer is cooled. The beer begins to cool quickly, from the bottom of the kettle to the top.
When using an immersion chiller, make sure the outside of it is free of debris before you put it in the kettle. Additionally, you should put the chiller into the kettle 10 minutes before the end of the boil to sanitize the outside of the copper. Throughout the chilling, keep the lid on as tightly as possible to prevent air from contaminating the wort.
If your immersion wort chiller fits just inside your kettle without touching the sides and has enough coils, you should be able to chill your beer within a couple degrees of the water temperature within 30 minutes. If your wort chiller is too small for your kettle, it can take up to an hour for the beer to get to the same temperature. In either case, this is a step up in efficiency from the ice bath method.
Pros: Faster chill time. Easy to clean and sanitize. Inexpensive ($50 to $100, depending on size and quality)
Cons: Uses a lot of water. Doesn't scale up if you move to a larger kettle.

COUNTER FLOW CHILLER

counter flow style chiller cools the beer outside of the kettle, before it goes into the fermenter. A coiled copper tube is surrounded by a larger tube, which can be made out of copper or hose. As hot wort flows through the smaller internal tube, cold water flows the opposite direction through the external hose. These "counter flows" cool the wort very efficiently, since cold water is working on a smaller amount of wort at any given time. If the wort and water flows are balanced correctly you can chill the wort to within a couple degrees of the cool water temperature in a single pass through the chiller, which can be as quick as 15 minutes.
The best way to use a counterflow chiller is to pump your wort with a food grade liquid pump that can handle boiling temperatures. Often times the pump is more expensive than the chiller, so this really only works well if you use a pump in your brewing process already. If you're upgrading, expect to spend at least $150 on the chiller and around $200 for a pump and additional hardware.
Sanitation of a counterflow chiller is a bit difficult, since the cooled wort flows through an interior copper coil. The best way to sanitize is to pump boiling worth through the chiller and back into the kettle for the last 10 minutes of the boil. After each use, I like to pump a gallon of near-boiling clean water through the chiller to remove any hop debris or leftover wort from the inside. Even though the counterflow process is a little more complex, it is efficient and the same chiller can work for any size batch of homebrew.
Pros: Uses less water than immersion chiller. Fastest way to chill. Same chiller can be used for 5, 10 or 30 gallon batches.
Cons: Requires pump. Difficult to clean and sanitize. Expensive.

Sunday, August 30, 2015

How Malt Extract is Made


Malt extract is quite a powerful homebrewing ingredient, especially for beginners, as it takes out some of the variables like hitting mash temperatures and volumes. While more seasoned homebrewers can use it to supplement sugars in a “big” brew or help reach a target gravity if you fell short.
Malt extract most commonly comes in liquid or dry form. Liquid malt extract (LME) is a molasses-like consistency, while dry malt extract (DME) is more of a fine powder. Extracts come in different types depending on the grains used in production. Extra-pale, pale, amber, pilsner, wheat and Maris Otter are just a few of the options available to homebrewers. Liquid malt extract can also come as pre-hopped, though much less common in the homebrewing community.
Believe it or not, the malt extract making process is much like the beginning of an all-grain brew day.
Liquid Malt Extract Production


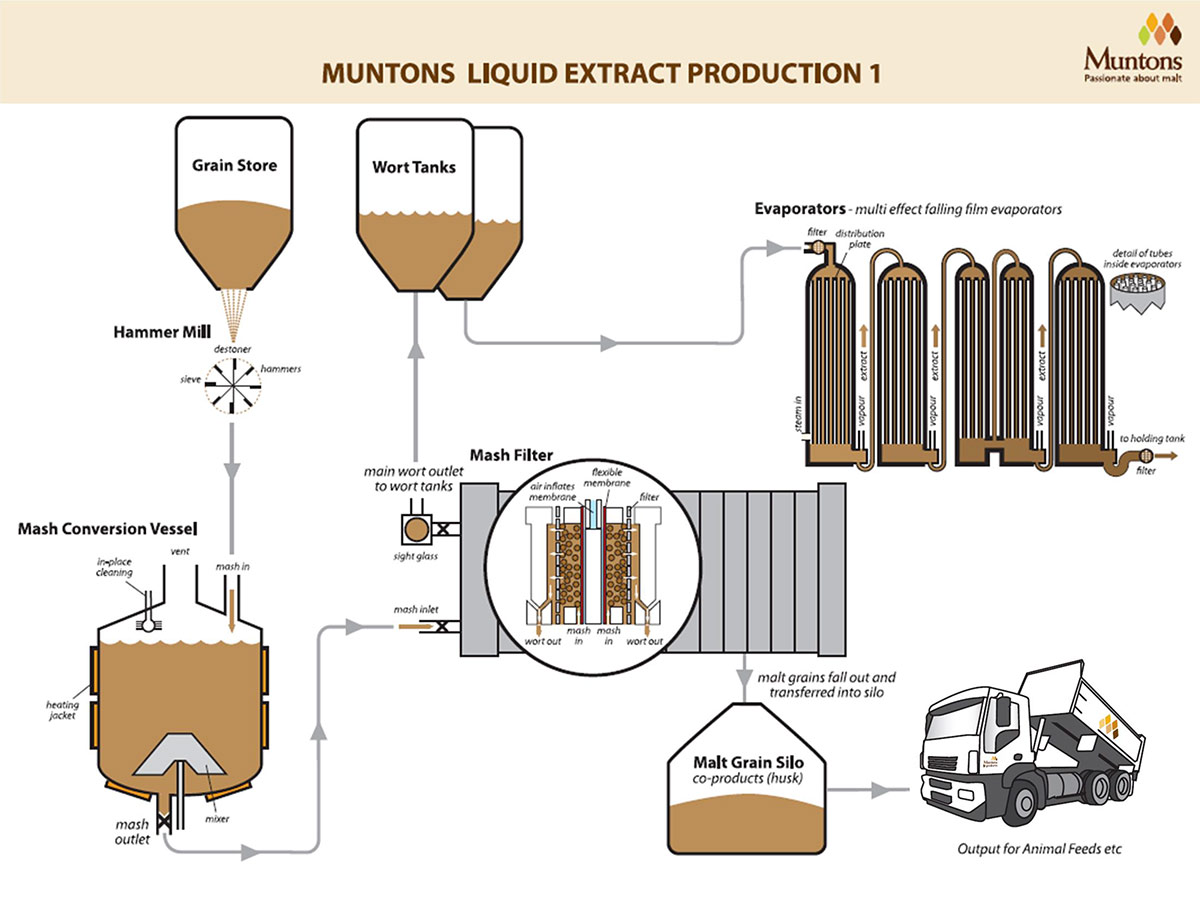
First, a large mash tun is filled with strike water and heated to the appropriate temperature. The amount of water needed is kept to a minimum, since extracts are low in water content. Once the liquor is heated, the grains are milled and sent to the tun for mash in. The grains undergo a standard mash, typically single step, where enzymatic activity breaks down components of the grain to create fermentable sugars, as any all-grain homebrewer or pro-brewer would do before moving to the boil. For extracts, the goals are usually a low water to grist ratio and quick yet efficient mash rest.
Liquid Malt ExtractOnce the mash is complete, the sugary-sweet wort is sent through a pipe to a filter. The filter helps separate out the spent grain sediment, while sending the sediment-free wort to holding tanks. If a malt extract is hopped, it will often times undergo a boil in one of these tanks to promote isomerization.
From the tanks, the wort is sent to evaporators. This is where the process starts to really differ from your typical homebrew day.
The evaporators rid of 80 percent of the wort’s water content, leaving a syrupy, 20 percent liquid malt extract. Dry malt extract requires one additional step where the evaporated malt extract is sent through a centrifuge to further separate water from the malt. What is left is a powder-like substance.
That’s it! Essentially malt extract is made by mashing and dehydration.

Friday, August 28, 2015

5 Sugar Adjuncts to Include in Your Brew


Homebrewers always start with malt when sourcing fermentables, but it doesn’t have to stop there. Specialty sugars and other sugar sources can create unique characteristics when included in a recipe. Here are a few things to keep in mind before dosing your wort with more sugar:
  1. Most sugars ferment out completely, increasing the alcohol content without adding any body.
  2. Keep specialty sugar additions below 20 percent of the total fermentables, with 5-15 percent being ideal.
  3. Flavorful and pungent sugars can lose a lot of their favor characteristics when added to the boil or before vigorous fermentation. If you want to preserve these qualities, secondary is a good option.
  4. As with any ingredient, taste everything in its raw form to see how it might work in a recipe before using.

1. Honey

Honey has long been on the fermentation scene as the main sugar source in mead and is even mentioned in the famous 18th century BC Hymn of Ninkasi. Varieties vary depending on the nectar source and processing, and honey is ultimately graded into four categories. Homebrewers should stick Grade A and B honeys that are locally produced and have been treated with little to no heat. Be wary of cheap, mass-produced and/or heat treated honeys, as they tend to have low levels of flavor and aroma.
While honey can be added at most points of the beer making process, the flavor and aroma compounds have a boiling point around 180°F, and anything above that results in these characteristics being blown off. Add honey towards the end of the boil or during/after fermentation. Honey will ferment out completely, so if you want that raw honey character to shine, consider backsweetening techniques used in mead and cider making.

2. Jaggery

Made from the sap of palm trees, jaggery is a popular sugar in Asia and Africa that can be found in ethnic and specialty markets. It typically is gold to brown in color because it has not undergone the process to remove the molasses and crystals, with the lighter color typically indicating a higher quality sugar with fewer impurities.
Jaggery was commonly used by English brewers starting in the early 18th century during periods when malt was expensive and/or hard to obtain. It can add subtle yet complex notes of fruit and nuts, along with a silky texture. Typically added during the boil, it can add crisp, smooth drinkability to homebrew. Try out this jaggery pale ale recipe!
Homebrewing Sugars

3. Fruits

While some fruits may shine in a beer, others may ferment out into something flavorless, or worse, offensive. Browse the recipe archive and Homebrewopedia to find successful recipes that include fruits.
Whether frozen or raw, select high-quality, ripe fruit to include in a recipe. It is also important to recognize that along with a fruit’s sugar comes quite a bit of water content. This means when added to beer, the alcohol content will likely go up very little if at all as the water increases the volume. Using fruit concentrates free of preservatives can help prevent the water dilution.
Fruit is often added to the boil or in the primary fermenter—both instances will likely result in much of the flavor and aroma being lost. Adding the fruit to secondary and racking the fermented wort on top is a good choice to retain fruit character, but watch out for revigorated fermentation.

4. Molasses

Molasses is a byproduct of the sugar refining process and has been the source of fermentables in beer for quite some time. Just take a look at George Washington’s infamous “small beer” recipe, which uses molasses in place of malt altogether.
It comes in colors ranging from light to dark, depending on when the molasses was collected during production. All molasses tends to have strong flavor and aroma, but generally the darker the molasses the bolder the characteristics. Avoid molasses that has been sulfured, and always do a taste test before using it in a beer. If there are prominent metallic notes, continue the search.
Molasses is usually added during boil, but be sure to not to let it scorch. Start with small quantities as not to overpower other flavor components of the beer. Generally, lighter molasses will add subtle complexity, while the darker types are much richer and full flavored. Avoid dark molasses in lighter beers as it can overpower the beer’s overall flavor profile and add a lot of dark color.

5. Maple Syrup

Holes are drilled in maple trees to allow sap to escape, which is boiled down to make maple syrup. It can take anywhere from 25-35 gallons of sap to make one gallon of syrup, earning it the name “Yankee Gold” because of its high price tag. Quality maple syrup comes in two grades, and brewers should be on the lookout for B grade syrup, which is typically darker and more flavorful. Avoid all cheap maple syrups.
Brewers typically add syrup after primary fermentation to avoid blowing off the delicate woody and nutty aromas. Adding to secondary is recommended. If you are after prominent maple character but don’t want to purchase a lot of Yankee Gold, fenugreek can be used to mimic maple syrup with great results.

Wednesday, August 26, 2015

Fruit Beer Tips from Dry Dock Brewing


Dry Dock Brewing Co. of Aurora, Colo. brews Apricot Blonde, which is one of the Centennial State’s favorite fruit beers. The golden-blonde ale is fermented with “shiploads” of apricot puree for a well balanced, crisp beer.
First brewed in 2006 on Dry Dock’s original 7 barrel brewhouse, Apricot Blonde has gone on to earn awards worldwide, including a recent bronze medal for fruit beer in the 2014 Great American Beer Festival.
We spoke with Dry Dock founder Kevin Delange to find out what advice he has for homebrewers pursuing fruit beers:
1. Don’t Fear the Can
While many brewers opt for fresh fruit, it’s easiest to use aseptic fruit from a can or package. This way you don’t have to worry about wild yeast that is present on fresh fruit. High quality beer with great fruit character is absolutely achievable with frozen or canned fruit options.
2. Mind the Krausen
Fruit is rich with sugars, and if added to the fermenter before primary fermentation you can have substantial krausen (the foam that appears on the surface of fermenting beer) formation and temperature swings. If you add the fruit a few days after fermentation has begun, it is easier to control the krausen and manage fermentation.
3. Pasteurize Fresh Fruit
If using fresh fruit, I found that it works well to add the fruit right after the boil so that the high temperature is able to pasteurize the fruit, but it’s not so hot that you set up the pectins. This reduces the risk of potential wild yeast contamination when brewing with fresh fruits.
4. Embrace the Haze
Don’t fear a foggy fruit beer. Instead, embrace the haze. Although crystal clear fruit beers (especially if the fruit color comes through), or any beer for that matter, it’s sometimes just easier to accept a hazier appearance in exchange for a great tasting brew.

Monday, August 24, 2015

How to Brew Russian Kvass

kvass-featured

The beauty of folk beer styles is the degree of variation they can take from one brewer to the next. Recipes are dictated by what grows locally and what is in season, making for a beer that reflects the true local flavor.

Kvass, an ancient Russian beer, is one of those styles that can take many forms depending on where and at what time of year it is brewed, but at its core it’s always a low alcohol (<2% ABV) bread-y beer with a slight sour tartness.

A Drink for the Masses

Kvass, like many of the oldest-known beer styles, was likely discovered by accident. Some lucky person drank the water-bread mixture that had been sitting out for a few days and decided what it had turned into was something worth making again.

In its earliest form, loaves of old bread and/or flour were simply soaked in hot water. Wild yeast was relied upon to spontaneously ferment the concoction, which gave it the signature reserved tartness. In some instances, some of the small batch breweries would add whatever ingredients were available locally, but it wasn’t uncommon to go without.

After a few days, the bread-y mixture ferments up to 2% ABV and the entire contents—solids and all—would be consumed. This made for a great source of nutrition, while also turning undrinkable water into something potable.

As the allure of kvass shifted from a thing of utility to a lively beverage to be imbibed, the process was refined. Wild fermentation was ditched for something cultured. The commercial kvass breweries would sometimes use brewer’s yeast, but the small batch and home breweries would typically use a baker’s yeast culture. Then, local ingredients were added to add interesting flavors.

Fruits like strawberries and dried grapes added more intriguing sweetness to the flavor, while also balancing some of the Lactobacillus sourness. Lemon is a more recent addition that has become popular to add a citrus compliment to the Lacto, and even herbs and spices like peppermint have been used.

Eventually, kvass reached a point of popularity in Russia and its neighboring countries that spanned from common peasant to royalty. Street vendors pushed carts equipped with a large cask-like tanks to peddle kvass to passerbys. Some even say kvass is one of Russia’s most treasured culinary tradition, second only to sauerkraut.

Today, commercial breweries continue to brew kvass in Russia and homebrewers carry on with the tradition of putting their own twist on an ancient style by using unusual ingredients and pushing the strength up towards 5% ABV. The popularity of kvass even led to a non-alcoholic version that essentially captures some of the flavor qualities in a soda-like beverage.

Making Kvass

One of the oldest known kvass recipe is quite simple, and is still easily made today with varying results. A loaf of rye bread, typically something about to go bad, is placed in a vat and boiling-hot water poured over it. The bread soaks in the water for 24 hours, after which sugar and a yeast starter of baker’s yeast and flour are added. As soon as fermentation begins, it is bottled to add a bit of carbonation and is consumed fresh 2-3 days after.

A lot of kvass brewers would forgo the bread and use flour as the base, but a rye loaf can add lots of interesting crusty bread and other sour qualities that flour might not achieve.

One of the other key components of kvass flavor is the Lactobacillus sourness. It is not lip puckering, but adds a refreshing hint of tartness that really compliments the flavors of a rye bread. While you can still rely on a 100% wild fermentation, some brewers will try to cultivate their own wild yeast or use a combination of ale yeast and a Lactobacillusculture. Others have simply forgone the bugs, sticking with ale yeast and relying on ingredients like lemon juice to achieve a sour component.

From there, you can add other ingredients you think might compliment the profile. In addition to what was mentioned above, grains, hops, different yeast styles, herbs, spices, fruits vegetables and just about everything else could make its way into the recipe. If you want to hold true to kvass traditions, utilize ingredients that are grown locally and are in season at the time of brewing.

Being a low gravity beer, kvass finishes fermentation fairly quickly and has always been intended to be enjoyed fresh. There’s no need to let this one sit. Carbonation levels vary and traditionally was achieved through bottle conditioning.

Check out this kvass recipe, which uses modern techniques to create a brew that honors the Russian drink. It even includes a recipe for making your own rye bread!